ULS-Heli Documentation
Precision landing for large VTOL drones and helicopters, up to 50 m range.
Application
ULS-Heli is designed for autonomous landing of large VTOL drones and
helicopters, assisted landing and parking of manually controlled aircraft,
and marine-based helicopters. Its dust- and waterproof design is built for
challenging environments.
ULS-Heli-G3 uses two identical, equal-priority receivers for redundancy and
yaw estimation in MRX mode, and shares its receiver platform with
ULS-XSpot-G3.
Documents
Each page is generated from the source of the controlled PDF; the numbered PDF can be downloaded from the document portal.
1 - ULS-Heli-G2 Datasheet
Specifications, performance, dimensions and pinouts of ULS-Heli-G2 — precision landing for large VTOL drones and helicopters, up to 50 m range.
ULSDC-PBDS210925 · version 0.2.0 · issued September 21, 2025
The numbered PDF is the controlled copy: download it from the portal.
Introduction
Purpose
The purpose of this datasheet is to provide comprehensive technical information about the ULS-Heli-G2 System family. This includes specifications, performance characteristics, and detailed descriptions of system components, such as transmitters and receivers. By outlining the interfaces between these components, the datasheet aims to facilitate seamless integration and operation for system engineers, integrators, and developers working system.
Scope
This document is intended for use by system engineers, integrators, and developers working with ULS-Heli-G2 systems. It provides detailed information on the system.
System Base Components
Transmitter (Ground Unit)
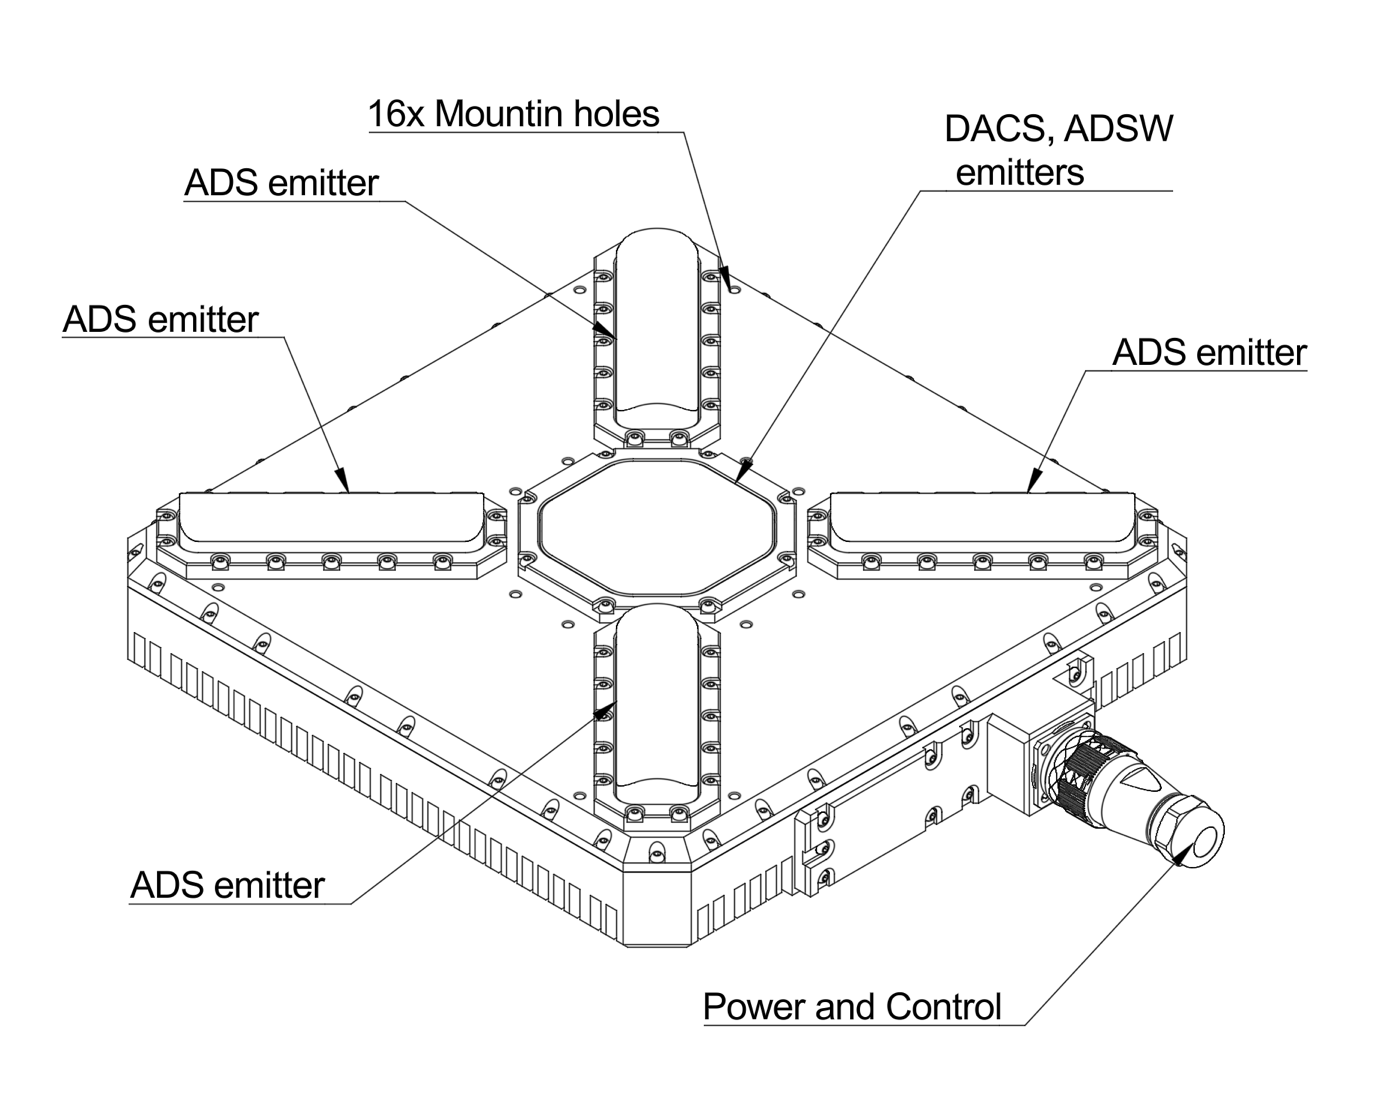
Figure: ULS-Heli-G2 Transmitter
A transmitter is a device placed on the ground (platform, moving object). It emits a signal in the Infrared range and serves as a kind of beacon. Transmitter marks position for drone landing.
The primary function of the transmitter is to continuously send out a coded signal that can be detected and interpreted by the receiver unit onboard the XCopter. This signal contains critical information needed for the operation of the system, such as positional data, commands, and status.
Receiver (Onboard Unit)
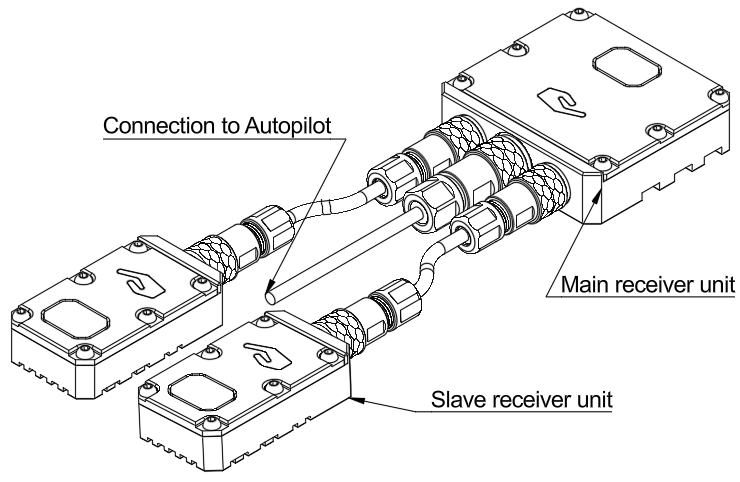
Figure: ULS-Heli-G2 Receiver
A receiver is a device that is placed on board an aircraft.
The receiver decodes this signal to derive flight information such as positional coordinates, real-time transmitter status updates, and landing guidance. It interprets the data to navigate accurately and ensure drone follows the intended flight path. It provides feedback to the autopilot systems, such as Ardupilot and PX4, to adjust the flight parameters as needed for optimal and safety landing or hovering above.
Part Numbering
| Part Number | Description |
|---|
| ULS-HELI-G2 | System set with 3 receivers. |
| ULSDV-HL-TX-G2 | Transmitter unit. |
| ULSDV-HL-RXM-G2 | Master receiver unit. |
| ULSDV-HL-RXS-G2 | Slave receiver unit. |
| SA610/P4IB | 4 Pin Connector for receiver. Manufacturer Weipu. |
| SA810/P8IIB | 8 Pin Connector for receiver. Manufacturer Weipu. |
| SA1610/P10IIB-1 | 10 Pin Connector for transmitter. Manufacturer Weipu. |
Table: Part Numbering
System specification.
| Parameter | Value |
|---|
| Distance range m.: | 50.0 |
| Working angle (deg): | 60 |
| Data update frequency (Hz): | 20 |
Table: Common Specification
| Parameter | Value |
|---|
| Field of view (deg): | 90 |
| Dimensions mm : | 46x26x12 |
| Weight g.: | 40 |
| Power Consumption (W): | 3 |
| Voltage supply (V): | 5 |
| Interfaces: | USB, CAN, UART |
Table: Receiver (Slave) Specifications
| Parameter | Value |
|---|
| Field of view (deg): | 90 |
| Dimensions mm : | 50x50x14 |
| Weight g. : | 60 |
| Power Consumption (W): | 3 |
| Voltage supply (V): | 5 |
| Interfaces: | USB, CAN, UART |
Table: Receiver (Master) Specifications
| Parameter | Value |
|---|
| Field of emitting (deg): | 60 |
| Dimensions mm. : | 290x215x48 |
| Weight g.: | 4100 |
| Power Consumption (W): | 10 |
| Voltage supply (V): | 22.0-26.0 |
| Interfaces : | USB, CAN, UART |
Table: Transmitter (Ground) Specifications
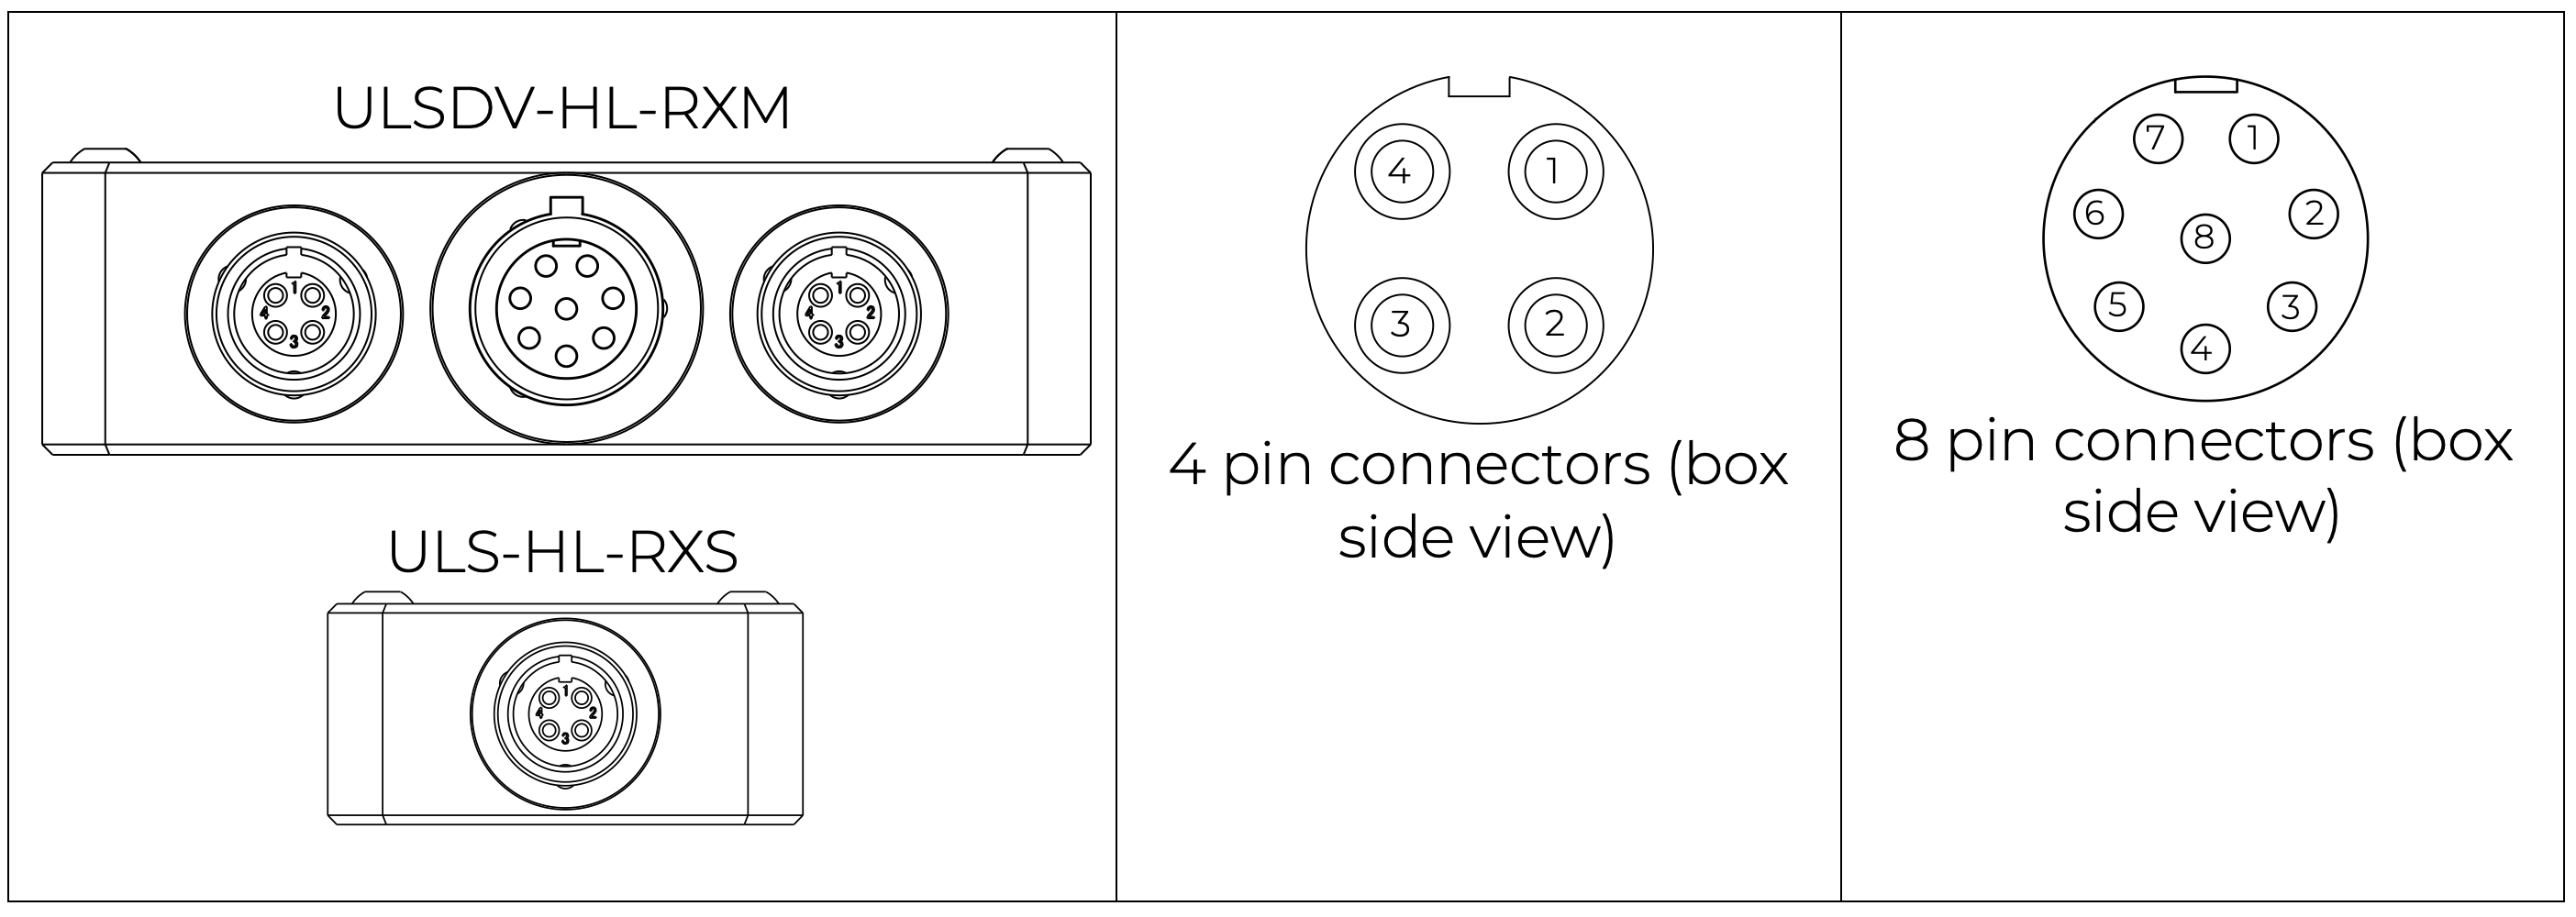
| Pin | Function |
|---|
| 1 | Vin (+5V) |
| 2 | CANH |
| 3 | CANL |
| 4 | GND |
Table: 4 Pin Connector Pinout
| Pin | Function |
|---|
| 1 | Vin (+5V) |
| 2 | CANH |
| 3 | CANL |
| 4 | UART_TX (OUT) |
| 5 | UART_RX(IN) |
| 6 | USB_D- |
| 7 | USB_D+ |
| 8 | GND |
Table: 8 Pin Connector Pinout
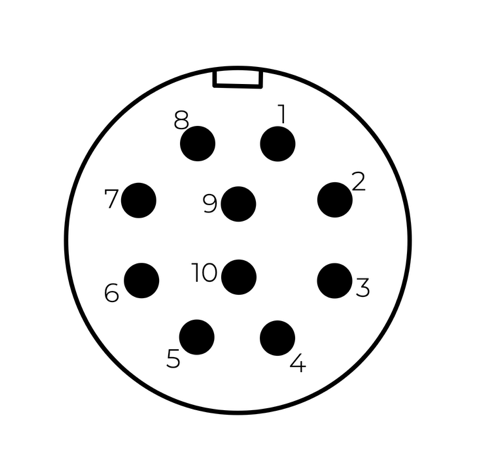
| Pin | Function |
|---|
| 1 | Vin +18V – +28V |
| 2 | RS422A |
| 3 | RS422B |
| 4 | RS422Y |
| 5 | RS422Z |
| 6 | CAN-L |
| 7 | CAN-H |
| 8 | USB-D- |
| 9 | USB-D+ |
| 10 | GND |
Table: Transmitter 10 Pin Connector Pinout
Please DO NOT "HOT-PLUG" Transmitter cable. Apply power on transmitter only when connector connected to transmitter.
Please check pin numbers on connector.
Incorrect wiring or connection under voltage can damage the device and USB interface of connected PC !
Mechanical dimensions
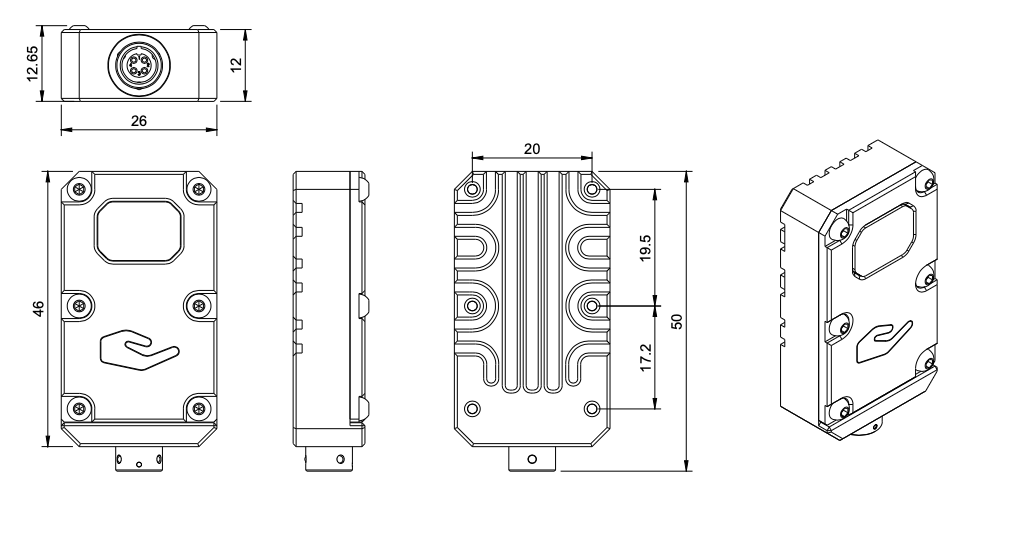
Figure: Slave receiver Mechanical Dimensions
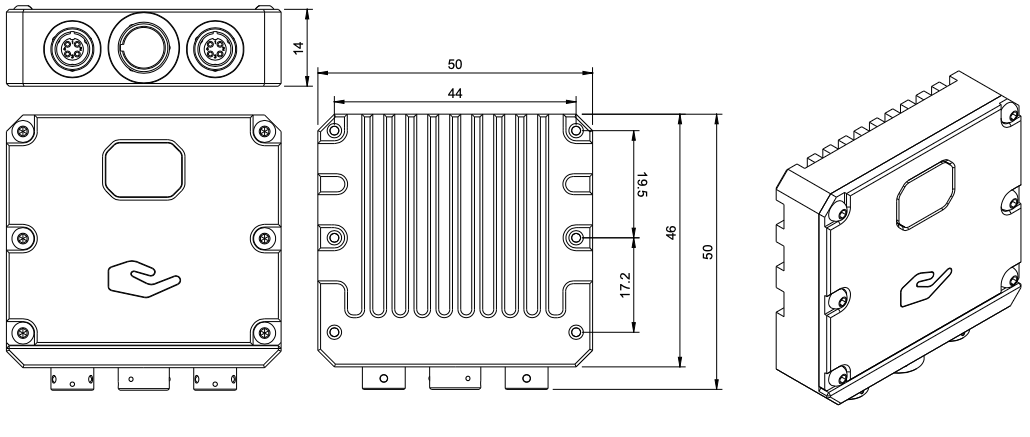
Figure: Master receiver Mechanical Dimensions
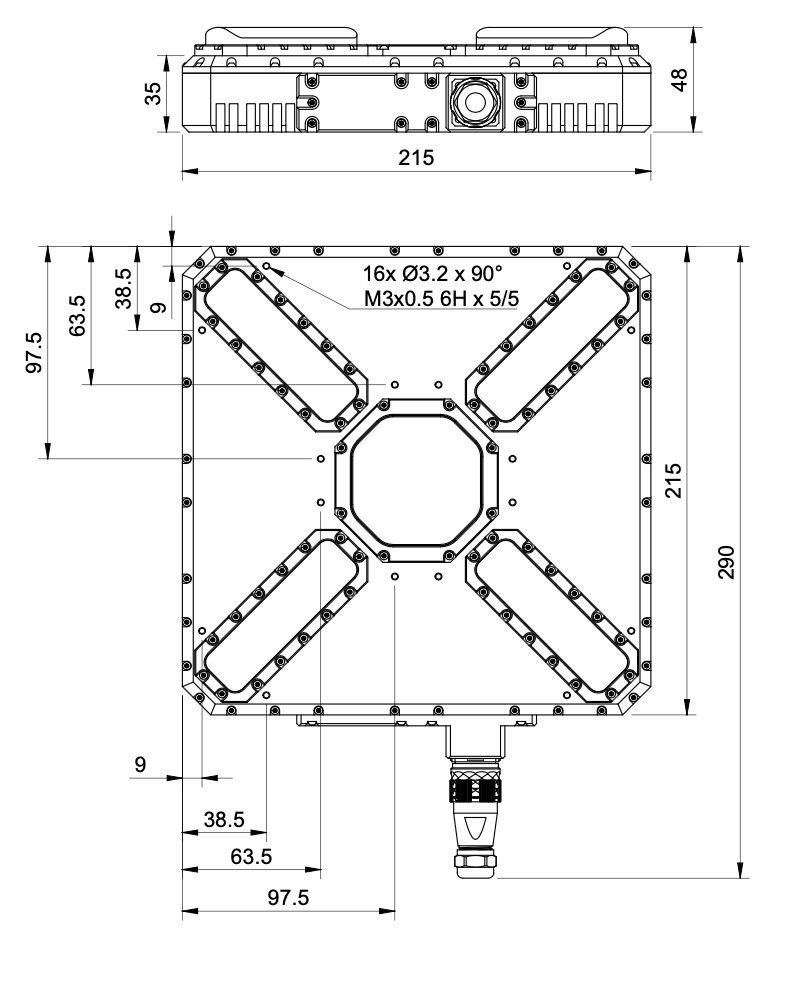
Figure: Transmitter Mechanical Dimensions
The device is shipped in a protective case.
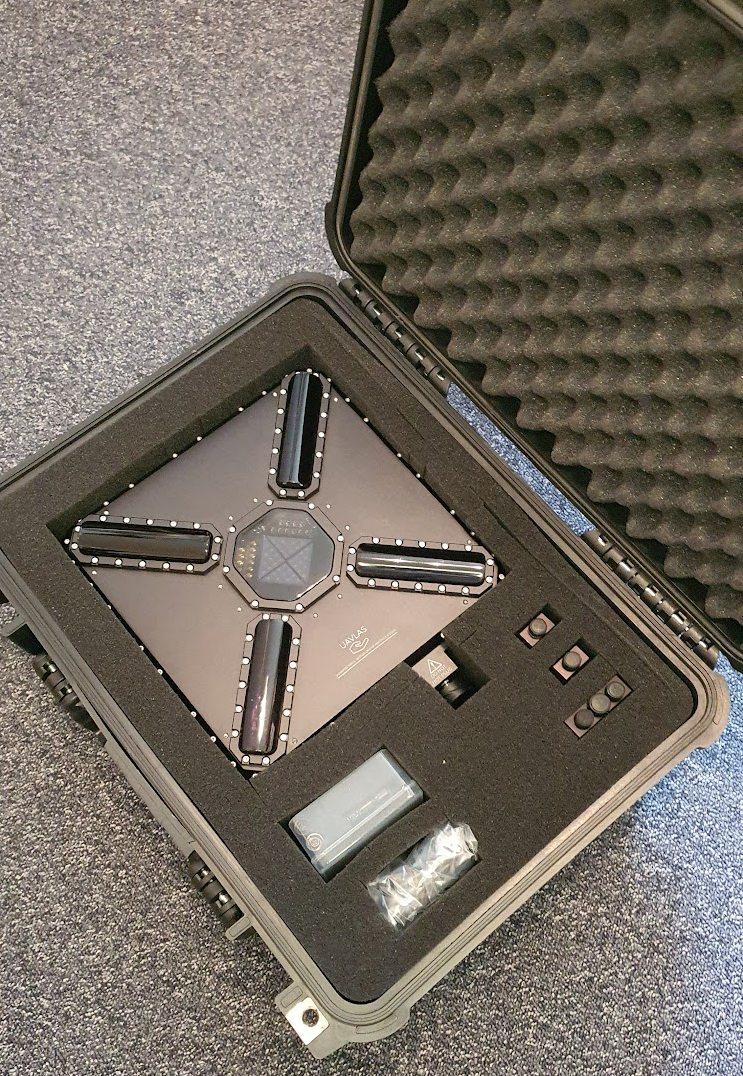
Figure: Protective Packaging Case
Environmental Conditions
Environmental Conditions - Industrial Grade
Equipment is designed to operate reliably in demanding environmental conditions typical of aerospace, industrial automation, and outdoor applications.
Operating Temperature Range
- Standard operating range: -20°C to +55°C
- Covers most industrial and outdoor applications
- Reliable performance across temperature extremes
- No performance degradation within specified range
Humidity Tolerance
- Relative humidity: Up to 70% (non-condensing)
- Protected against moisture in typical operating conditions
- Suitable for outdoor and semi-protected installations
- Condensation prevention through sealed design
Ingress Protection
- IP67 rated (Dust tight and water immersion resistant)
- 6 - Complete protection against dust ingress
- 7 - Protected against temporary immersion in water (up to 1 meter depth for 30 minutes)
- Suitable for harsh industrial environments
- Protected against rain, splashing, and temporary submersion
- Dust-tight sealing for contaminated environments
Storage Conditions
- Storage temperature: -40°C to +70°C
- Relative humidity: Up to 95% (non-condensing)
- Long-term storage in industrial facilities
Operational Environment Standards
- Designed to meet industrial equipment requirements
- Suitable for UAV/drone applications
- Outdoor installation capable
- Protected against:
- Dust and particulate matter
- Water spray and rain
- Temporary water immersion
- Temperature fluctuations
- High humidity
Change Control
All changes to this document must be reviewed and approved by the relevant technical leads and stakeholders
2 - ULS-Heli-G2 Interface Control Document
Electrical, mechanical and communication interfaces of ULS-Heli-G2 — precision landing for large VTOL drones and helicopters, up to 50 m range.
ULSDC-PBICD210925 · version 1.0.1 · issued September 22, 2025
The numbered PDF is the controlled copy: download it from the portal.
Introduction
Purpose
This document outlines the interfaces between the ULS-Heli-G2 system components, including the transmitter, receiver, and autopilot systems (Ardupilot and PX4 and similar).
Scope
This document is intended for use by system engineers, integrators, and developers working with ULS-Heli-G2 systems. It provides detailed information on the interfaces between the system components, ensuring seamless integration and operation.
System Components
Transmitter (Ground Unit)
Figure: ULS-Heli-G2 Transmitter
A transmitter is a device placed on the ground (platform, moving object). It emits a signal in the Infrared range and serves as a kind of beacon. Transmitter marks position for drone landing.
The primary function of the transmitter is to continuously send out a coded signal that can be detected and interpreted by the receiver unit onboard the XCopter. This signal contains critical information needed for the operation of the system, such as positional data, commands, and status.
Receiver (Onboard Unit)
Figure: ULS-Heli-G2 Receiver
A receiver is a device that is placed on board an aircraft.
The receiver decodes this signal to derive flight information such as positional coordinates, real-time transmitter status updates, and landing guidance. It interprets the data to navigate accurately and ensure drone follows the intended flight path. It provides feedback to the autopilot systems, such as Ardupilot and PX4, to adjust the flight parameters as needed for optimal and safety landing or hovering above.
Interface Overview
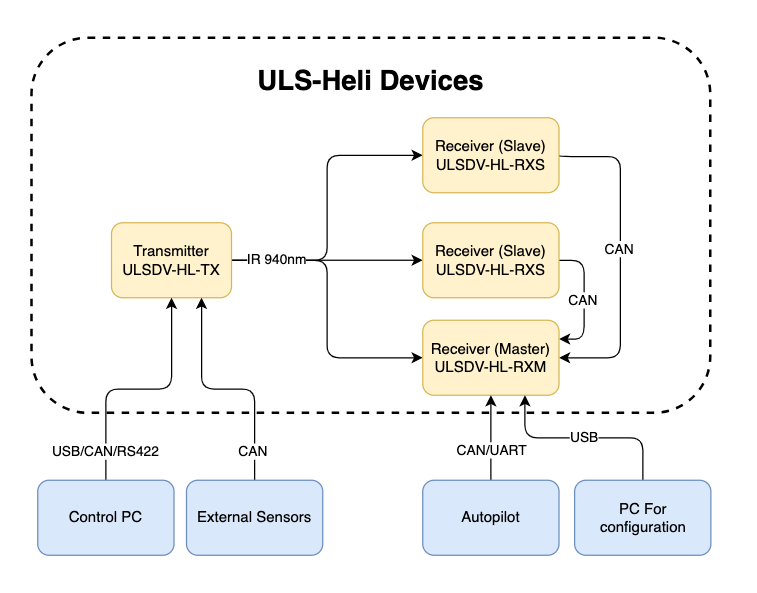
Figure: ULS-Heli-G2 System Interfaces Overview
Transmitter to Control PC Interface (External Sensors)
The transmitter can be connected to a control PC or external equipment for configuration, status monitoring, and data exchange.
Data Types
- Status information
- Control signals
- Transmitter configuration
- External IMU/COMPASS data
Connection Types
- CAN Bus - For network communication
- USB - For configuration and firmware updates
- RS422 - For serial communication with external sensors
Transmitter Pinout
| Pin | Function |
|---|
| 1 | Vin +18V – +28V |
| 2 | RS422A |
| 3 | RS422B |
| 4 | RS422Y |
| 5 | RS422Z |
| 6 | CAN-L |
| 7 | CAN-H |
| 8 | USB-D- |
| 9 | USB-D+ |
| 10 | GND |
Table: Transmitter 10 Pin Connector Pinout
Please DO NOT "HOT-PLUG" Transmitter cable. Apply power on transmitter only when connector connected to transmitter.
Please check pin numbers on connector.
Incorrect wiring or connection under voltage can damage the device and USB interface of connected PC !
Transmitter to Receiver Interface
The transmitter and receiver use an optical interface to exchange data. Transmission uses IR emission at 940 nanometers. Data transmission is only in the direction from the transmitter to the receiver.
Data Types
- Position encoded
- Status encoded data (Transmitter orientation and instructions)
Connection Type
- Optical IR 940nm - Infrared optical link
Receiver to Autopilot and Receiver to PC Interfaces
Data Types
- MAVLink messages
- ULS-Blitz frames
- ASCII protocol
Connection Types
- UART - Serial communication with autopilot
- CAN - Network communication
- USB - Direct PC connection
Receiver Pinout
| Pin | Function |
|---|
| 1 | Vin (+5V) |
| 2 | CANH |
| 3 | CANL |
| 4 | GND |
Table: 4 Pin Connector Pinout
| Pin | Function |
|---|
| 1 | Vin (+5V) |
| 2 | CANH |
| 3 | CANL |
| 4 | UART_TX (OUT) |
| 5 | UART_RX(IN) |
| 6 | USB_D- |
| 7 | USB_D+ |
| 8 | GND |
Table: 8 Pin Connector Pinout
Powering Interfaces
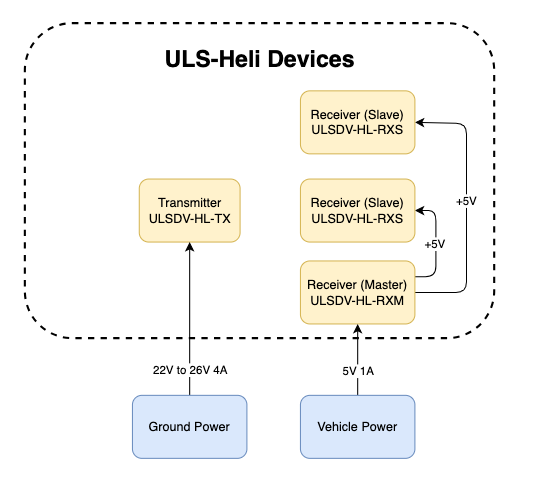
Figure: Power Distribution and Connections
Transmitter Electrical Characteristics
| Parameter | Value | Unit | Notes |
|---|
| Supply Voltage | 22.0 - 26.0 | V | Nominal 24V |
| Supply Current | 4 | A | Peak |
| Power Consumption | 18.1 | W | Typical |
Table: Transmitter Electrical Specifications
Receiver Electrical Characteristics
| Parameter | Value | Unit | Notes |
|---|
| Supply Voltage | 5.0 | V | From flight controller |
| Supply Current | 1 | A | Peak |
| Power Consumption | 3 | W | Typical |
Table: Receiver Electrical Specifications
Functional Interfaces
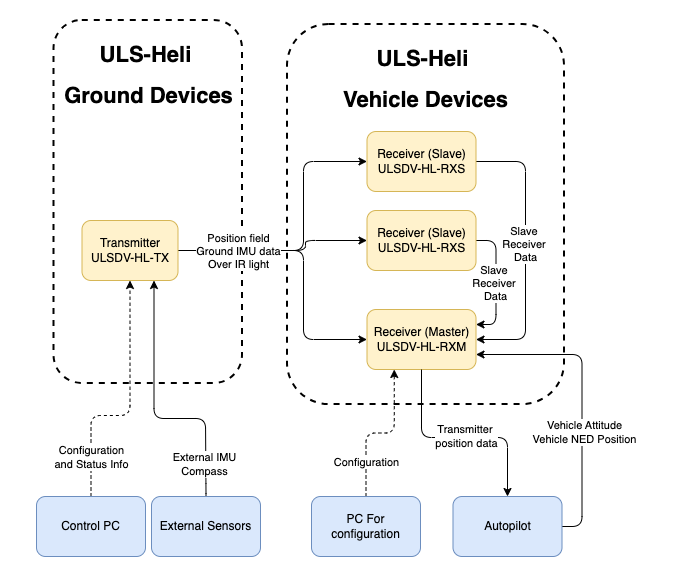
Figure: Data Flow and Functional Interfaces
Data Exchange
The ULS-Heli-G2 system implements several data exchange mechanisms:
Control PC Functions:
- Configure and view status of transmitter
- Set configuration of receivers
- Send control signals (On/off, compass override information)
External Equipment:
- External IMU/Compass equipment can be used to override internal IMU/compass information
Receiver Functions:
- Accept data from transmitter over IR signal (position field information and ground unit IMU data)
- Accept NED and Attitude information from autopilot to convert coordinate system
- Multiple receivers can communicate to calculate vehicle orientation (YAW)
- Send position offset data to autopilot
Mechanical Interfaces
Figure: Slave receiver Mechanical Dimensions
Figure: Master receiver Mechanical Dimensions
Figure: Transmitter Mechanical Dimensions
Transmitter Mounting
Use 16 mounting holes to mount transmitter to panel. 3D model of the transmitter can be provided upon request.
Receiver Mounting
Both master and slave receivers have mounting provisions for secure installation. 3D models of the receivers can be provided upon request.
Communication Protocols
Overview
The protocol used by devices for configuration is proprietary and is described in other documents. However, the protocol implements the possibility of transmitting messages (Blitz messages) that can be used by the user to control the device and obtain information. These messages are universal, and the format describes the data that is transmitted by various devices in our system connected to a single network.
Use CMD=6 to send Blitz messages.
In this document, the CAN protocol is specified. RS485 is used to implement custom protocols that can be defined in the future.
flowchart LR
  A[Sender Device] --> B[GLOBAL]
  B --> C[CMD = 6]
  C --> D[ID]
  D --> E[dsn_lid]
  E --> F[msg_id]
  F --> G[Blitz Payload data <= 8 bytes]
  G --> H[Receiver Device]
The CAN protocol uses the following frame structure:
| Field | Description |
|---|
| GLOBAL | Flag used to send packets over several local networks |
| CMD | Command field (Use CMD=6 to send Blitz messages) |
| ID | Packet sender ID (local id src_lid for local packets and device id for global packets src_did) |
| dsn_lid | Destination local ID address |
| msg_id | Message ID used to identify Blitz packet types |
Table: CAN Protocol Frame Fields
Status Bit Definitions
Most messages include a status byte with the following bit definitions:
| Bit | Flag | Description |
|---|
| 0 | ULS_STATUS_RX_CARRIER_OK | IR signal detected |
| 1 | ULS_STATUS_RX_SQ_OK | Signal quality OK |
| 2 | ULS_STATUS_RX_POS_OK | Position estimated |
| 3 | ULS_STATUS_RX_VEL_OK | Velocity estimated |
| 4 | ULS_STATUS_RX_GU_IMU_OK | Ground Unit IMU OK |
| 5 | ULS_STATUS_RX_MRX_OK | MRX message received (secondary receiver) |
| 6 | ULS_STATUS_RX_MRXDATA_OK | MRX Yaw and Distance calculated OK |
Table: Status Bit Definitions
Common Data Structure
Blitz Common Data Structure
Structure: __blitz_common_data_struct
| Field | Type | Description |
|---|
src_lid | uint8_t | Source logical ID |
msg_id | uint16_t | Message ID (see message types below) |
data | union | Message-specific data (8 bytes max) |
Table: Blitz Common Data Structure
The union contains all possible message structures:
xcg1_rx_raw_measurmetrx_raw_measurmetrx_pos_in_tx_framerx_mrxrx_dacs
Usage: Universal container for all ULS Blitz message types.
Implementation Notes
- Packed Structures: All structures use
__attribute__((packed)) to ensure no padding bytes are added by the compiler. - Endianness: The protocol assumes little-endian byte order for multi-byte fields.
- Angular Precision: Angular measurements use 16-bit signed integers with specific scaling factors for different ranges.
- Distance Units: Distance measurements may use different units (cm, 10cm increments) depending on the message type.
Message Types
XCG1 Raw Measurement (0x0010)
Message ID: ULS_BLITZ_MSG_ID_XCG1_RX_RAW_MEASURMENT (0x0010)
Structure: __uls_blitz_xcg1_rx_raw_measurmet
| Field | Type | Description |
|---|
status | uint8_t | Status bits (see Status Bit Definitions above) |
d | uint8_t | Distance in 10 cm increments |
aX | int16_t | Angular information X-axis, proportional [-30000 = -30°, +30000 = +30°] |
aY | int16_t | Angular information Y-axis, proportional [-30000 = -30°, +30000 = +30°] |
oF | int8_t | Sensor offset Forward in cm |
oR | int8_t | Sensor offset Right in cm |
Table: XCG1 Raw Measurement Message Format
Purpose: Legacy raw measurement data for XCG1 systems with limited angular range.
Raw Measurement (0x0011)
Message ID: ULS_BLITZ_MSG_ID_RX_RAW_MEASURMENT (0x0011)
Structure: __uls_blitz_msg_rx_raw_measurmet
| Field | Type | Description |
|---|
status | uint8_t | Status bits (see Status Bit Definitions above) |
counter | uint8_t | Message counter for tracking |
aX | int16_t | Angular information X-axis [-180° to +180°] |
aY | int16_t | Angular information Y-axis [-180° to +180°] |
distance | uint16_t | Distance measurement |
Table: Raw Measurement Message Format
Angular Conversion Formula:
degrees = (value_int16 * 180.0f) / 32767.0f
Purpose: Standard raw measurement data with full angular range.
Position in TX Frame (0x0012)
Message ID: ULS_BLITZ_MSG_ID_RX_POS_IN_TX_FRAME (0x0012)
Structure: __uls_blitz_msg_rx_pos_in_tx_frame
| Field | Type | Description |
|---|
status | uint8_t | Status bits (see Status Bit Definitions above) |
counter | uint8_t | Message counter for tracking |
posX | int16_t | Position X-coordinate in transmitter frame (cm) |
posY | int16_t | Position Y-coordinate in transmitter frame (cm) |
posZ | int16_t | Position Z-coordinate in transmitter frame (cm) |
Table: Position in TX Frame Message Format
Purpose: 3D position data relative to the transmitter coordinate system.
Message ID: ULS_BLITZ_MSG_ID_RX_MRX (0x0013)
Structure: __uls_blitz_msg_rx_mrx
| Field | Type | Description |
|---|
status | uint8_t | Status bits (see Status Bit Definitions above) |
counter | uint8_t | Message counter for tracking |
yaw | int16_t | Yaw angle [-180° to +180°] |
distance | uint16_t | Distance measurement in cm |
Table: MRX Information Message Format
Purpose: Multi-receiver (MRX) information for secondary receiver data.
Message ID: ULS_BLITZ_MSG_ID_RX_DACS (0x0014)
Structure: __uls_blitz_msg_rx_dacs
| Field | Type | Description |
|---|
status | uint8_t | Status bits (see Status Bit Definitions above) |
counter | uint8_t | Message counter for tracking |
yaw | int16_t | Yaw angle [-180° to +180°] |
distance | uint16_t | Distance measurement |
yawContinuous | int16_t | Continuous yaw angle ±32768° |
Table: DACS Information Message Format
Purpose: DACS (Distance and Azimuth Correction System) data with continuous yaw tracking. Available on VTOL systems only.
Ground IMU Measurement (0x0020)
Message ID: ULS_BLITZ_MSG_ID_GIMU_MEASUREMENT (0x0020)
Structure: __uls_blitz_msg_gimu_data
| Field | Type | Description |
|---|
status | uint8_t | Status bits (see Status Bit Definitions above) |
counter | uint8_t | Message counter for tracking |
roll | int16_t | Roll angle [-180° to +180°] |
pitch | int16_t | Pitch angle [-180° to +180°] |
yaw | int16_t | Yaw angle [-180° to +180°] |
Table: Ground IMU Measurement Message Format
Angular Conversion Formula:
degrees = (value_int16 * 180.0f) / 32767.0f
Purpose: Ground unit IMU (Inertial Measurement Unit) orientation data.
IMU Override (0x0030)
Message ID: ULS_BLITZ_MSG_ID_XX_TXC_IMU_OVERRIDE (0x0030)
Structure: __uls_blitz_msg_xx_txc_imu_override
| Field | Type | Description |
|---|
control | uint8_t | Control bits (see Control Bits below) |
counter | uint8_t | Message counter for tracking |
roll | int16_t | Override roll angle [-180° to +180°] |
pitch | int16_t | Override pitch angle [-180° to +180°] |
yaw | int16_t | Override yaw angle [-180° to +180°] |
Table: IMU Override Message Format
Control Bits:
| Bit | Description |
|---|
| 0 | SET Roll - Enable roll angle override |
| 1 | SET Pitch - Enable pitch angle override |
| 2 | SET Yaw - Enable yaw angle override |
| 3-7 | Reserved |
Table: IMU Override Control Bits
Angular Conversion Formula:
degrees = (value_int16 * 180.0f) / 32767.0f
Purpose: Override IMU data on ground unit for external orientation control.
Magnetometer Override (0x0031)
Message ID: ULS_BLITZ_MSG_ID_XX_TXC_MAG_OVERRIDE (0x0031)
Structure: __uls_blitz_msg_xx_txc_mag_override
| Field | Type | Description |
|---|
control | uint8_t | Control bits (see Control Bits below) |
counter | uint8_t | Message counter for tracking |
mx | int16_t | Magnetic field X-component |
my | int16_t | Magnetic field Y-component |
mz | int16_t | Magnetic field Z-component |
Table: Magnetometer Override Message Format
Control Bits:
| Bit | Description |
|---|
| 0 | SET override - Enable magnetometer override |
| 1-7 | Reserved |
Table: Magnetometer Override Control Bits
Magnetic Field Conversion Formula:
mag_value = (value_int16 * 1.0f) / 32767.0f
Purpose: Override magnetometer data on ground unit for external compass control.
Environmental Conditions
For the Receiver Unit
- Operating temperature range: -40°C to +85°C
- Humidity range: Less than 70%
- Dust and moisture protection: IP67
- 6 - Complete protection against dust ingress
- 7 - Protected against temporary immersion in water (up to 1 meter depth for 30 minutes)
For the Transmitter Unit
- Operating temperature range: -40°C to +85°C
- Humidity range: Less than 70%
- Dust and moisture protection: IP67
- 6 - Complete protection against dust ingress
- 7 - Protected against temporary immersion in water (up to 1 meter depth for 30 minutes)
Storage Conditions
- Storage temperature: -40°C to +85°C
- Relative humidity: Up to 70% (non-condensing)
- The receiver unit does not requires additional protective measures in dusty or moist environments
- The transmitter unit can operate in harsh outdoor conditions without additional protection
- Extended temperature range (-40°C to +85°C) enables operation in extreme climates
Part Numbering
| Part Number | Description |
|---|
| ULS-HELI-G2 | System set with 3 receivers. |
| ULSDV-HL-TX-G2 | Transmitter unit. |
| ULSDV-HL-RXM-G2 | Master receiver unit. |
| ULSDV-HL-RXS-G2 | Slave receiver unit. |
| SA610/P4IB | 4 Pin Connector for receiver. Manufacturer Weipu. |
| SA810/P8IIB | 8 Pin Connector for receiver. Manufacturer Weipu. |
| SA1610/P10IIB-1 | 10 Pin Connector for transmitter. Manufacturer Weipu. |
Table: Part Numbering
Specifications
| Parameter | Value |
|---|
| Distance range m.: | 50.0 |
| Working angle (deg): | 60 |
| Data update frequency (Hz): | 20 |
Table: Common Specification
| Parameter | Value |
|---|
| Field of view (deg): | 90 |
| Dimensions mm : | 46x26x12 |
| Weight g.: | 40 |
| Power Consumption (W): | 3 |
| Voltage supply (V): | 5 |
| Interfaces: | USB, CAN, UART |
Table: Receiver (Slave) Specifications
| Parameter | Value |
|---|
| Field of view (deg): | 90 |
| Dimensions mm : | 50x50x14 |
| Weight g. : | 60 |
| Power Consumption (W): | 3 |
| Voltage supply (V): | 5 |
| Interfaces: | USB, CAN, UART |
Table: Receiver (Master) Specifications
| Parameter | Value |
|---|
| Field of emitting (deg): | 60 |
| Dimensions mm. : | 290x215x48 |
| Weight g.: | 4100 |
| Power Consumption (W): | 10 |
| Voltage supply (V): | 22.0-26.0 |
| Interfaces : | USB, CAN, UART |
Table: Transmitter (Ground) Specifications
Change Control
All changes to this document must be reviewed and approved by the relevant technical leads and stakeholders
3 - ULS-Heli-G2 Operation Manual
Installation, setup, integration and troubleshooting of ULS-Heli-G2 — precision landing for large VTOL drones and helicopters, up to 50 m range.
ULSDC-PBOM210925 · version 1.0.0 · issued January 26, 2026
The numbered PDF is the controlled copy: download it from the portal.
ULS-Heli-G2 Operation Manual
Table of Contents
- Introduction
- Safety Information
- Getting Started
- Installation
- Basic Operation
- Advanced Features
- Troubleshooting
- Maintenance
- Specifications
- Support
Introduction
Purpose
The ULS-Heli-G2 is a professional-grade optical positioning system designed to enable precision approach and landing for helicopters and heavy-lift rotary-wing UAVs. It provides reliable short-range positioning in GPS-denied or degraded environments, including maritime and industrial operations.
Scope
This manual covers safe operation, installation, configuration, and routine maintenance of the ULS-Heli-G2 system, including aircraft receivers (Master/Slave) and the ground transmitter (Beacon).
Intended Audience
Pilots, flight technicians, and integration engineers responsible for installing and operating the system on helicopters or heavy-lift rotary UAV platforms.
Important Safety Guidelines
- WARNING: Rotary-wing aircraft operations are inherently hazardous. Only qualified personnel should install and operate this system.
- WARNING: Avoid direct eye exposure to high-intensity optical emitters. Do not stare into the Beacon emission aperture.
- CAUTION: Ensure secure mounting and vibration isolation compliant with airworthiness requirements for your platform.
- CAUTION: Verify electromagnetic compatibility and power budgets when integrating with aircraft systems.
- NOTE: Maintain clear line-of-sight between aircraft receivers and ground Beacon during approach and landing.
Regulatory Compliance
- System components should be installed per applicable aviation regulations and local maritime/industrial standards.
- Environmental considerations: the system is qualified for all-weather operation; verify local restrictions for optical emissions.
Getting Started
What’s in the Box
- 1× Ground Transmitter (Beacon) — heavy-duty IP-rated enclosure
- 1× Master Receiver — aircraft unit with enhanced features
- 2× Slave Receivers — compact aircraft units for redundancy
- Connection cables — USB, CAN, UART interface options
- Mounting hardware — aircraft and ground mounting kits
- Documentation — datasheet and operation manual
System Requirements
- Aircraft power for receivers: 5 V DC, ~3 W per receiver
- Ground power for Beacon: 22–26 V DC, ~10 W
- Supported autopilots: ArduPilot Helicopter (native), PX4 compatible; or custom AP via USB/UART/CAN
- Clear approach corridor ensuring line-of-sight to Beacon
Installation
1. Preparation
- Review aircraft electrical and mechanical integration constraints (space, power, EMI/EMC).
- Identify mounting locations for receivers with unobstructed forward field of view (~90°).
- Select Beacon site providing 60° emission coverage and safe standoff from rotor/obstacles.
2. Ground Transmitter (Beacon) Mounting
- Mount the Beacon on a stable platform (deck/helipad) within the planned landing area.
- Ensure emission aperture faces the approach path; verify no occlusion within 60° working angle.
- Connect 22–26 V DC supply; confirm IP-rated sealing and strain relief on cables.
3. Aircraft Receiver Installation
- Install Master and Slave receivers per platform layout, oriented to maximize forward line-of-sight.
- Provide vibration isolation per aircraft standards; route cables securely away from moving parts.
- Connect power (5 V DC) and chosen data interface (USB, UART, or CAN) to the flight computer/AP.
4. Initial Setup
- Power Beacon and receivers; confirm device enumerations and link status on AP.
- Configure AP integration (ArduPilot/PX4) to accept ULS-Heli-G2 positioning input.
- Perform alignment check: validate that receiver FOVs cover the approach corridor; adjust mounts if needed.
Basic Operation
Power-On Sequence
- Power Beacon and verify status indicator.
- Power aircraft receivers; confirm data link availability.
- Verify AP integration: positioning data visible and updating at 20 Hz.
Approach and Landing
- Establish approach with direct line-of-sight to Beacon within 50 m range.
- Maintain alignment within the 60° working angle.
- Monitor horizontal/vertical offsets on AP/HMI; use cues to correct approach.
- Execute landing per SOPs; system supports <5 cm horizontal and <10 cm vertical accuracy at 1 m (linearly scaling).
Operating Notes
- System operates day/night and in adverse weather (rain, fog, snow, dust) within qualified limits.
- If dual receivers are installed, Master manages fusion and automatic failover.
Advanced Features
Dual Receiver Configuration (Master/Slave)
- Redundancy with automatic failover for critical operations.
- Cross-checking and sensor fusion for enhanced accuracy.
- Independent power supplies recommended.
Interfaces
- USB, UART, CAN for integration to flight computers or custom APs.
- ArduPilot Helicopter: native support; PX4: full compatibility.
Update Rate and FOV
- 20 Hz update rate for smooth positioning.
- Receiver FOV ~90°; Beacon emission angle ~60°.
Troubleshooting
| Problem | Possible Cause | Solution |
|---|
| No positioning data | Interface misconfiguration | Verify AP settings; check USB/UART/CAN wiring |
| Intermittent updates | Obstructed line-of-sight or FOV misalignment | Re-orient receivers/Beacon; clear approach corridor |
| Reduced accuracy | Excessive vibration or misalignment | Improve mounting isolation; re-check alignment |
| Beacon not powering | Supply out of range | Verify 22–26 V DC and cable integrity |
| Receiver not powering | 5 V supply issue | Check aircraft power rail and connectors |
Maintenance
Regular Maintenance
- Clean receiver optics and Beacon aperture; remove salt spray/dust.
- Inspect mounts, fasteners, and cable strain relief.
- Verify firmware/software compatibility with AP after updates.
Preventive Maintenance
- Quarterly alignment verification and functional tests.
- Replace worn vibration isolators per aircraft maintenance schedule.
Specifications
- Horizontal Accuracy: <5 cm at 1 m (linear scaling)
- Vertical Accuracy: <10 cm
- Operating Range: up to 50 m
- Update Rate: 20 Hz
- Working Angle (Beacon): 60°
Receiver (Slave)
- Weight: 40 g
- Dimensions: 46 × 26 × 12 mm
- Field of View: 90°
- Power Consumption: 3 W
- Supply Voltage: 5 V DC
- Interfaces: USB, CAN, UART
Receiver (Master)
- Weight: 60 g
- Dimensions: 50 × 50 × 14 mm
- Field of View: 90°
- Power Consumption: 3 W
- Supply Voltage: 5 V DC
- Interfaces: USB, CAN, UART
Beacon (Ground)
- Weight: 4100 g
- Dimensions: 290 × 215 × 48 mm
- Emission Angle: 60°
- Power Consumption: 10 W
- Supply Voltage: 22–26 V DC
- Interfaces: USB, CAN, UART
Support
- Technical Support and Services available via the website contact page.
- For integration assistance (ArduPilot/PX4/custom AP), engage engineering support.
Contact for more information
Document Change History
| Version | Date | Author | Description of Changes |
|---|
| 1.0 | 2026-01-26 | UAVLAS Documentation Team | Initial release |
4 - ULS-Heli-G3 Datasheet
Specifications, performance, dimensions and pinouts of ULS-Heli-G3 — precision landing for large VTOL drones and helicopters, up to 50 m range.
ULSDC-PBDS110426 · version 0.1.19 · issued April 11, 2026
The numbered PDF is the controlled copy: download it from the portal.
Introduction
Purpose
The purpose of this datasheet is to provide a concise technical overview of the ULS-Heli-G3 system family, including the transmitter and 2 identical, equal-priority RXM receiver units. The document is intended to help customers, evaluators, and integrators understand the product role, key characteristics, and integration fit. Detailed interface definitions remain in the Interface Control Document.
Scope
This document is intended for system engineers, integrators, and developers preparing ULS-Heli-G3 integration.
Intended Audience
This datasheet is intended for customers, sales engineers, system integrators, and technical evaluators.
Product Overview
ULS-Heli-G3 is a generation 3 precision optical positioning system designed for integration with aircraft platforms that require accurate relative positioning and landing guidance. The system architecture consists of one ground transmitter and 2 equal-priority RXM onboard receivers. The dual-receiver architecture supports redundancy and yaw orientation estimation in MRX mode.
System Base Components
Transmitter (Ground Unit)
- Device code: ULSDV-HL-G3-TX
- Primary function: Optical IR field emission for precision positioning
- Optical emission parameters: 940nm, pulsed
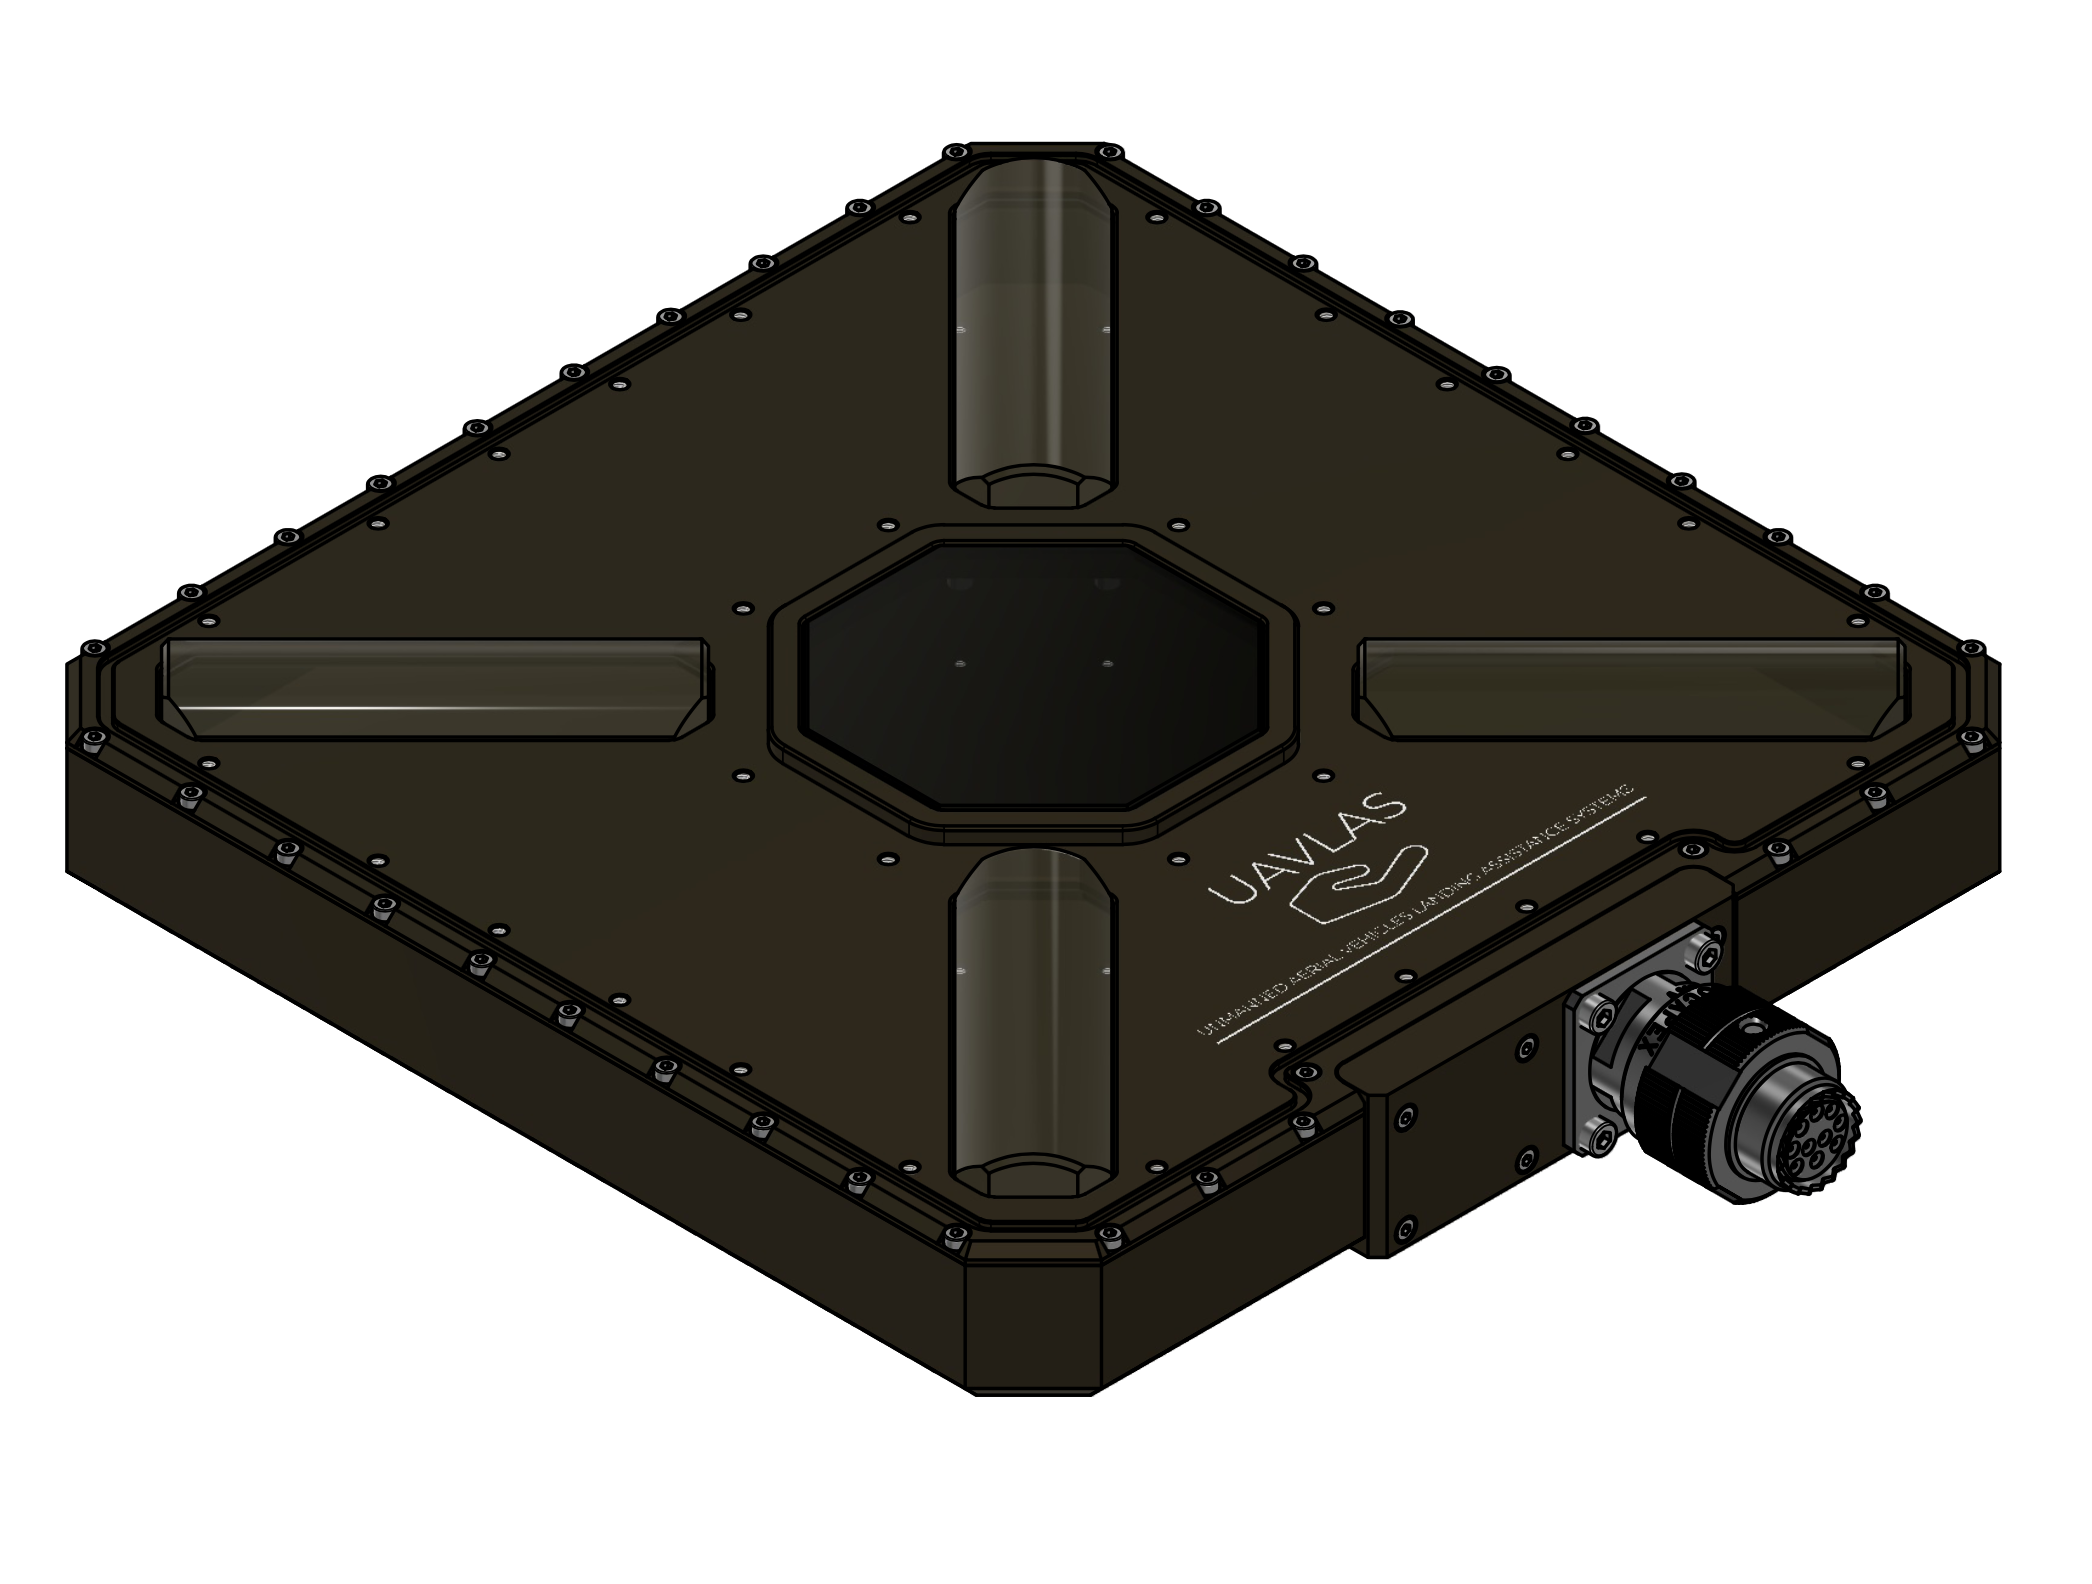
Figure: ULSDV-HL-G3-TX Transmitter
Receiver (Onboard Unit)
- Device code: ULSDV-HLXS-G3-RXM
- Primary function: Optical IR field sensor for precision positioning
- Optical central wavelength : 940nm
System architecture uses 2 identical RXM receiver units operating with the same priority.
Both RXM units are used for redundancy and for yaw orientation estimation using a triangular method in MRX mode.
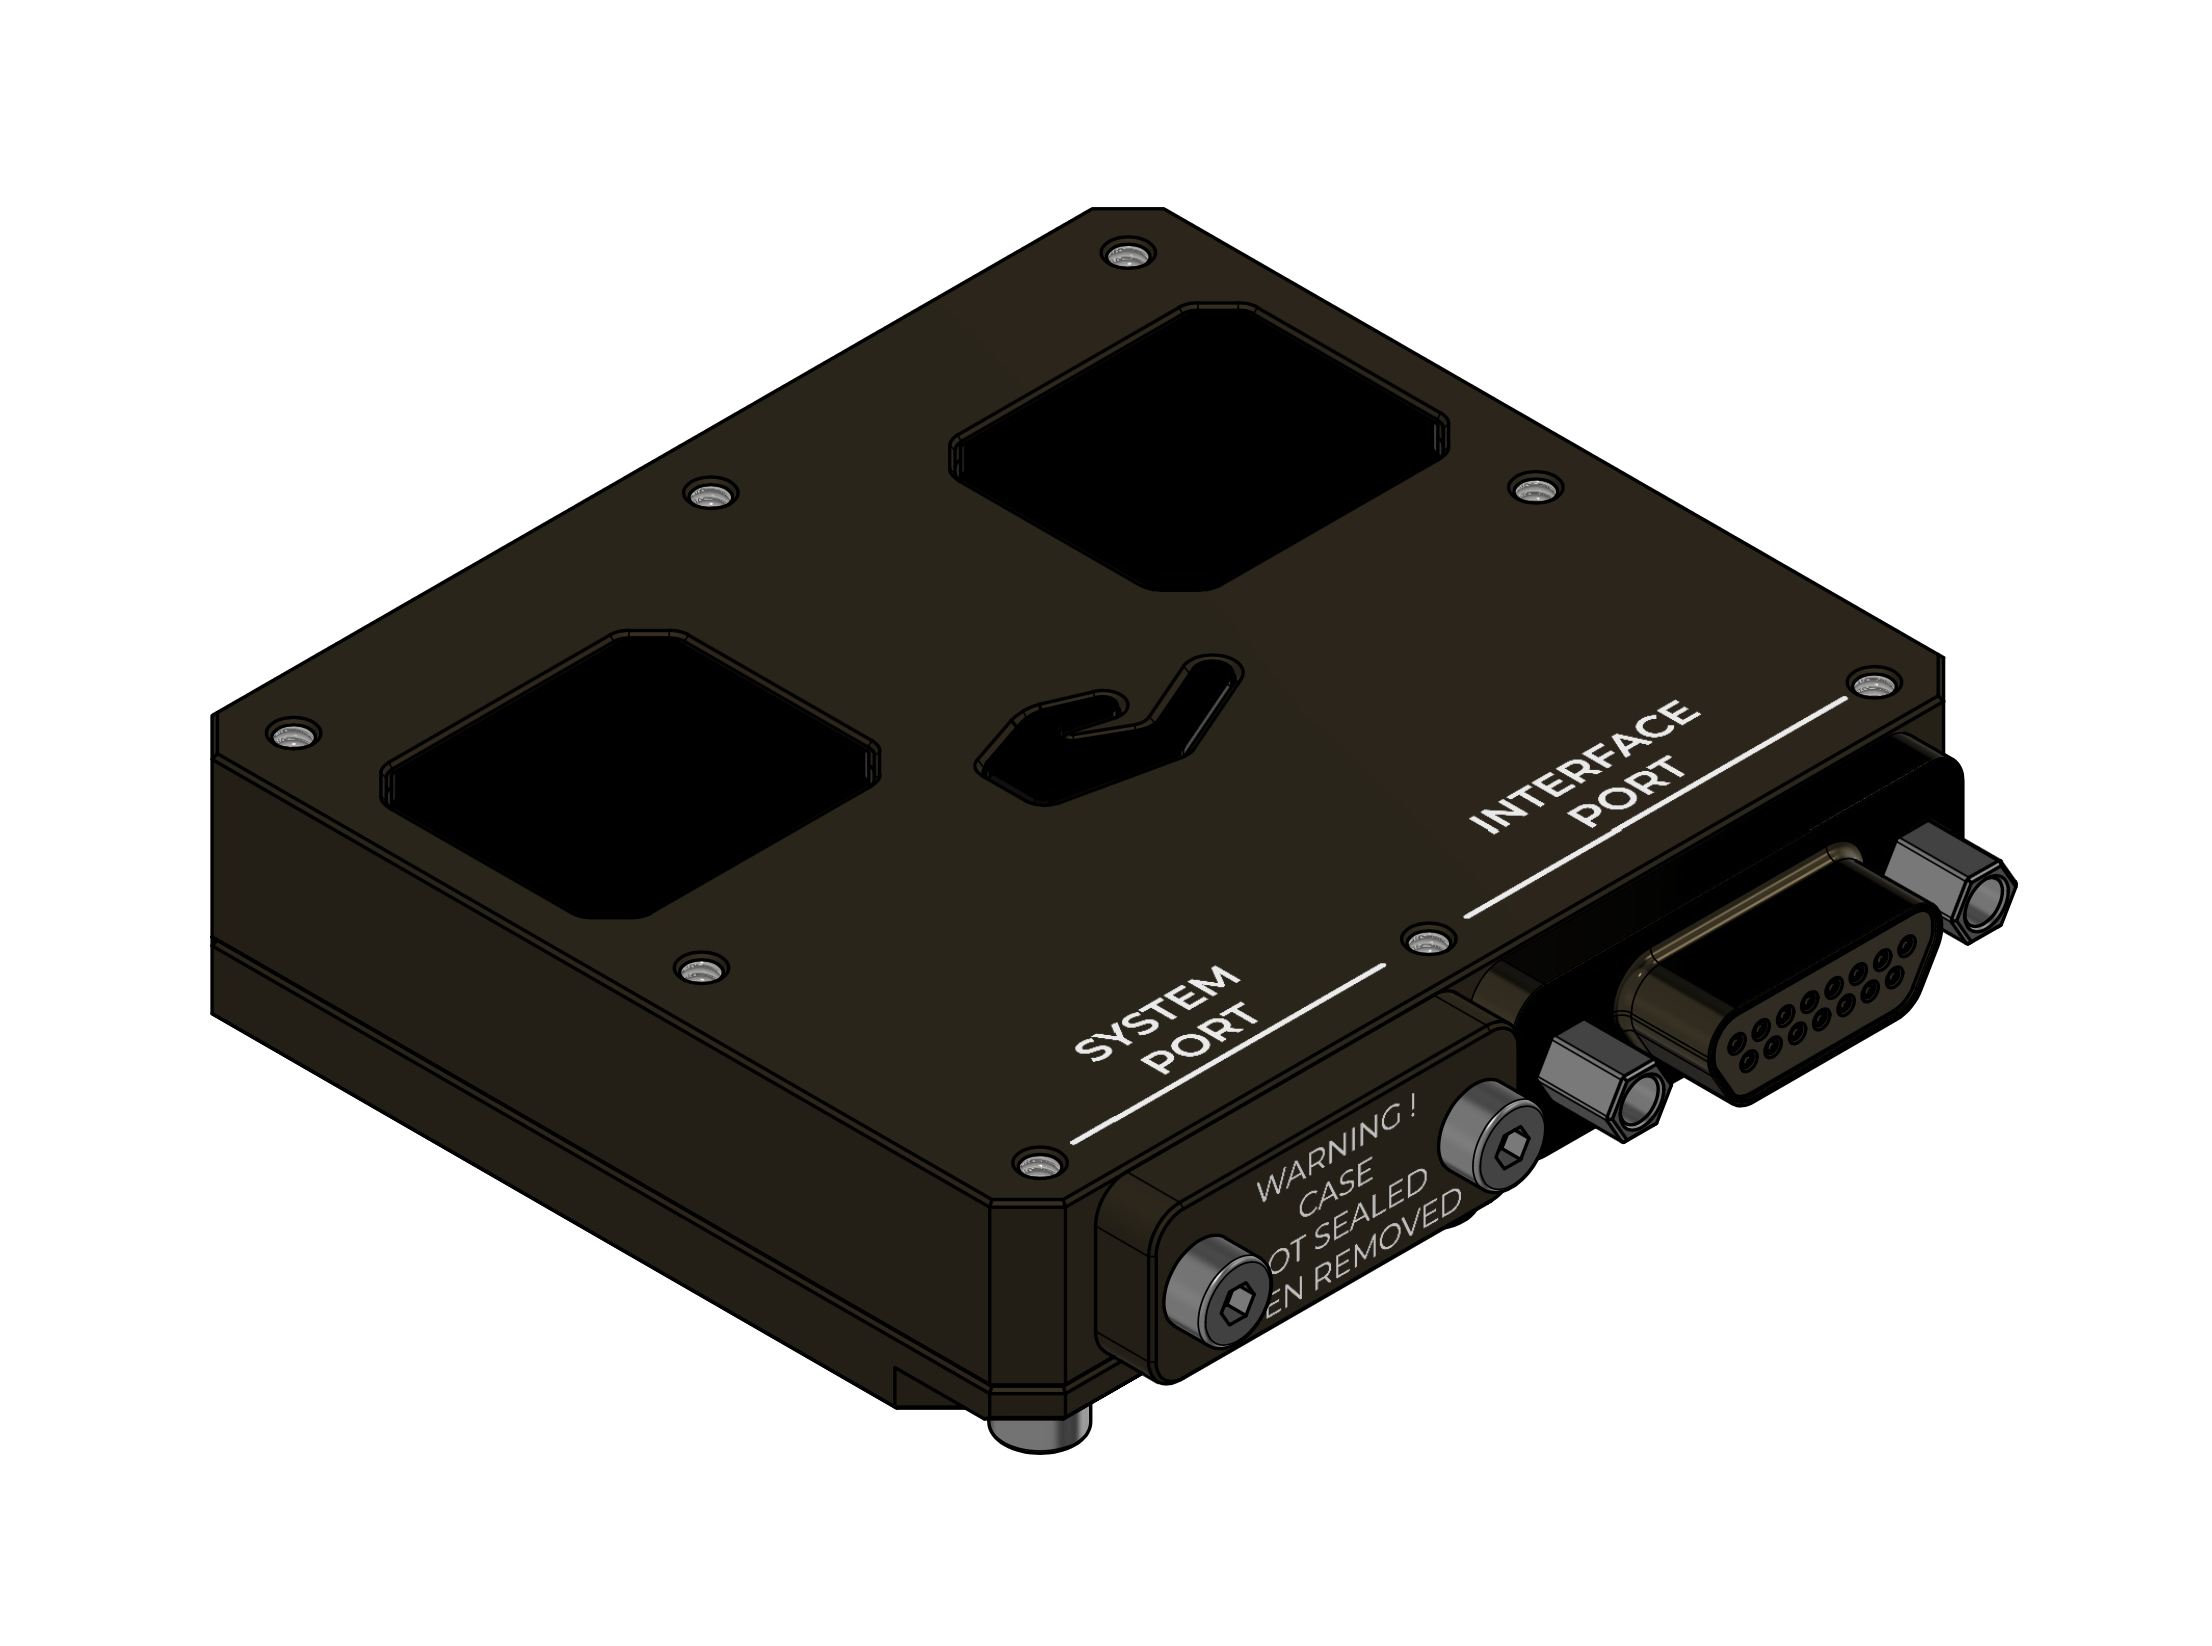
Figure: ULSDV-HLXS-G3-RXM Receiver
RS422–UART Onboard Adapter
When the autopilot has only a UART interface, the ULSDV-HLXS-G3 RS422-to-UART adapter (ULSDV-XX-UART-RS422) is used onboard to connect the ULSDV-HLXS-G3-RXM receiver to the autopilot.
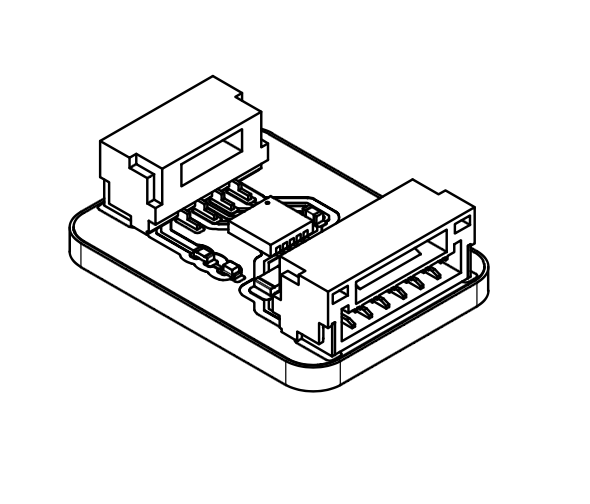
Figure: ULSDV-XX-UART-RS422 Onboard Adapter
USB–RS422 Ground Adapter
The ULSDV-XX-USB-RS422 adapter is used on the ground to connect the ULSDV-HL-G3-TX transmitter to a PC for configuration and control.
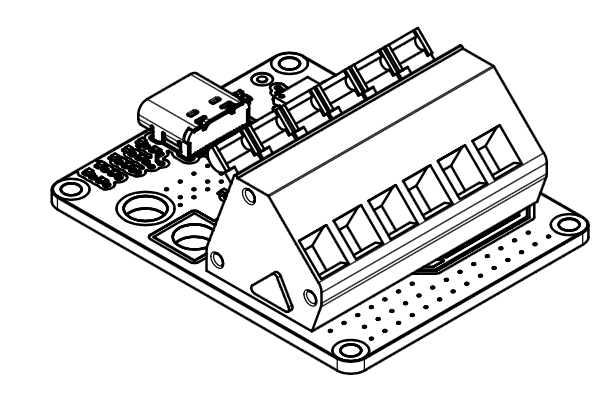
Figure: ULS-XX-USB-RS422 Ground Adapter
Key Features
- Dual RXM receiver architecture for redundancy and yaw estimation in MRX mode
- Shared generation 3 receiver platform for improved hardware commonality
- Optical transmitter-to-receiver link for precision positioning data transfer
- RS422-based native hardware interfaces with adapter support for UART-only autopilots
System Applications
- Precision landing and approach guidance
- Platform-relative positioning for autonomous aircraft operations
- Integration with supported autopilot and mission systems
System Wiring Schematics

Figure: HL/XS G3 Ground-Side Wiring Schematic

Figure: HL/XS G3 Onboard Wiring Schematic
Part Numbering
| Part Number | Description |
|---|
| ULS-HELI-G3 | System set with transmitter and 2 identical RXM receiver units. |
| ULSDV-HL-G3-TX | Transmitter unit. |
| ULSDV-HLXS-G3-RXM | RXM receiver unit (identical hardware for Set A and Set B), quantity 2 per system. |
| ULS-XX-UART-RS422 | RS422-to-UART onboard adapter for connecting RXM receiver to UART-only autopilots. |
| ULS-XX-USB-RS422 | USB-to-RS422 ground adapter for connecting transmitter to PC (configuration and control). |
| TVP00WCI-13-98P | Manufacturer Amphenol. Transmitter connector type. |
| TV06RW-13-98S | Manufacturer Amphenol. Transmitter cable connector type. |
| M83513/04-B06C | Receiver connector type. |
| M83513/03-B03C | Receiver cable connector type. |
Table: Part Numbering
System Specifications
| Parameter | Value |
|---|
| Distance range (m) | 30m…50m |
| Working angle (deg) | 60 |
| Data update frequency (Hz) | 20 |
| Receiver architecture | 2 identical RXM receivers with same priority |
| Redundancy mode | Dual-RXM redundancy |
| MRX yaw estimation method | Triangular method |
Table: Common Specification
| Parameter | Value |
|---|
| Field of view (deg) | 95 |
| Dimensions (mm) | 50x54 |
| Weight (g) | 50 |
| Power consumption (W) | 10 |
| Supply voltage (V) | +12V…+24V |
| Interfaces | CAN,USB,RS422 |
Table: ULSDV-HLXS-G3-RXM Receiver Specifications
| Parameter | Value |
|---|
| Field of emitting (deg) | 30 (60 in Wide Field) |
| Dimensions (mm) | 254 x 214 |
| Weight (g) | 1960 |
| Power consumption (W) | 20W |
| Supply voltage (V) | +18V..+24V |
| Interfaces | CAN, RS422 |
Table: ULSDV-HL-G3-TX Transmitter (Ground) Specifications
Interface Summary
The ULS-Heli-G3 system uses optical, RS422, CAN, USB, and adapter-assisted UART connectivity depending on subsystem role and host platform capability.
- Transmitter to receiver: optical IR link
- Transmitter to control PC: USB to RS422 adapter path
- Receiver to host system: native RS422, CAN, USB, or adapter-assisted UART
For connector, pinout, signal, and protocol definitions, refer to ULSDC-PBICD110426-ULS-Heli-G3-ICD.
Mechanical Dimensions
| Component | Dimensions (mm) | Notes |
|---|
| ULSDV-HLXS-G3-RXM (ULSDV-HLXS-G3-RXM) | ~ 50mm x 52mm | Without connector |
| ULSDV-HL-G3-TX | ~254mm x 214mm | Without connector |
Table: Mechanical Dimensions
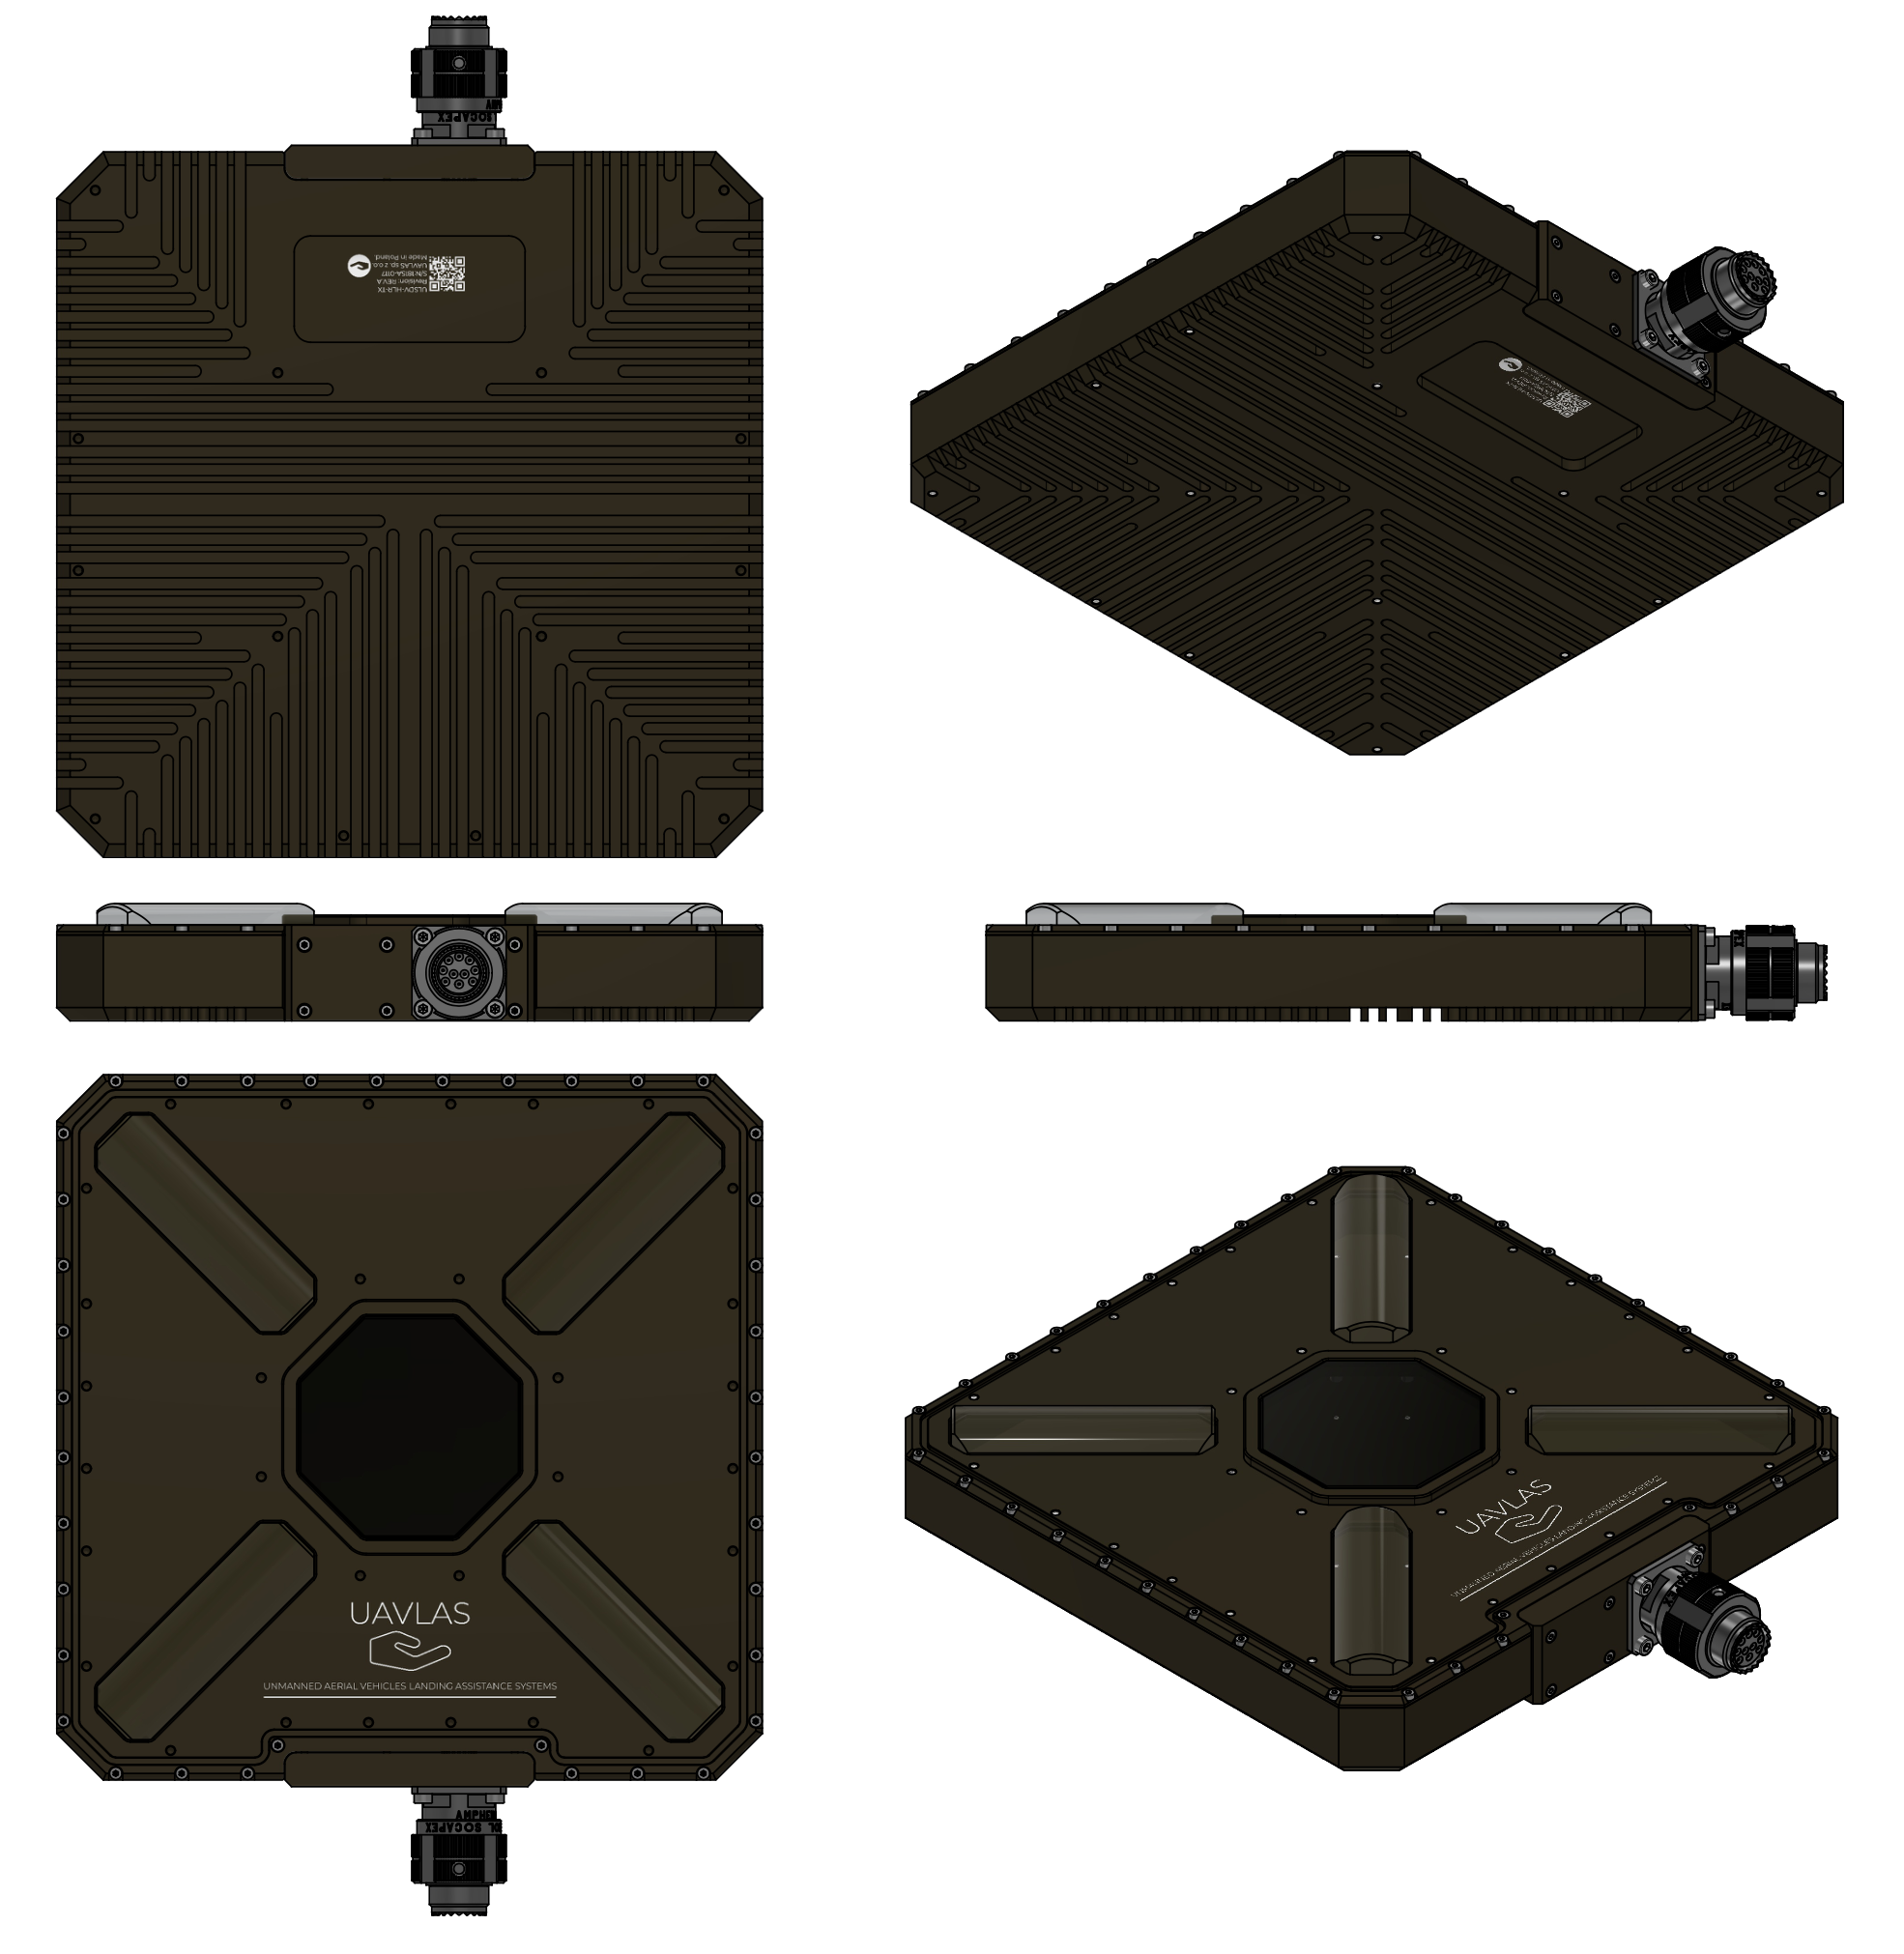
Figure: ULSDV-HL-G3-TX Projection Views (Color)
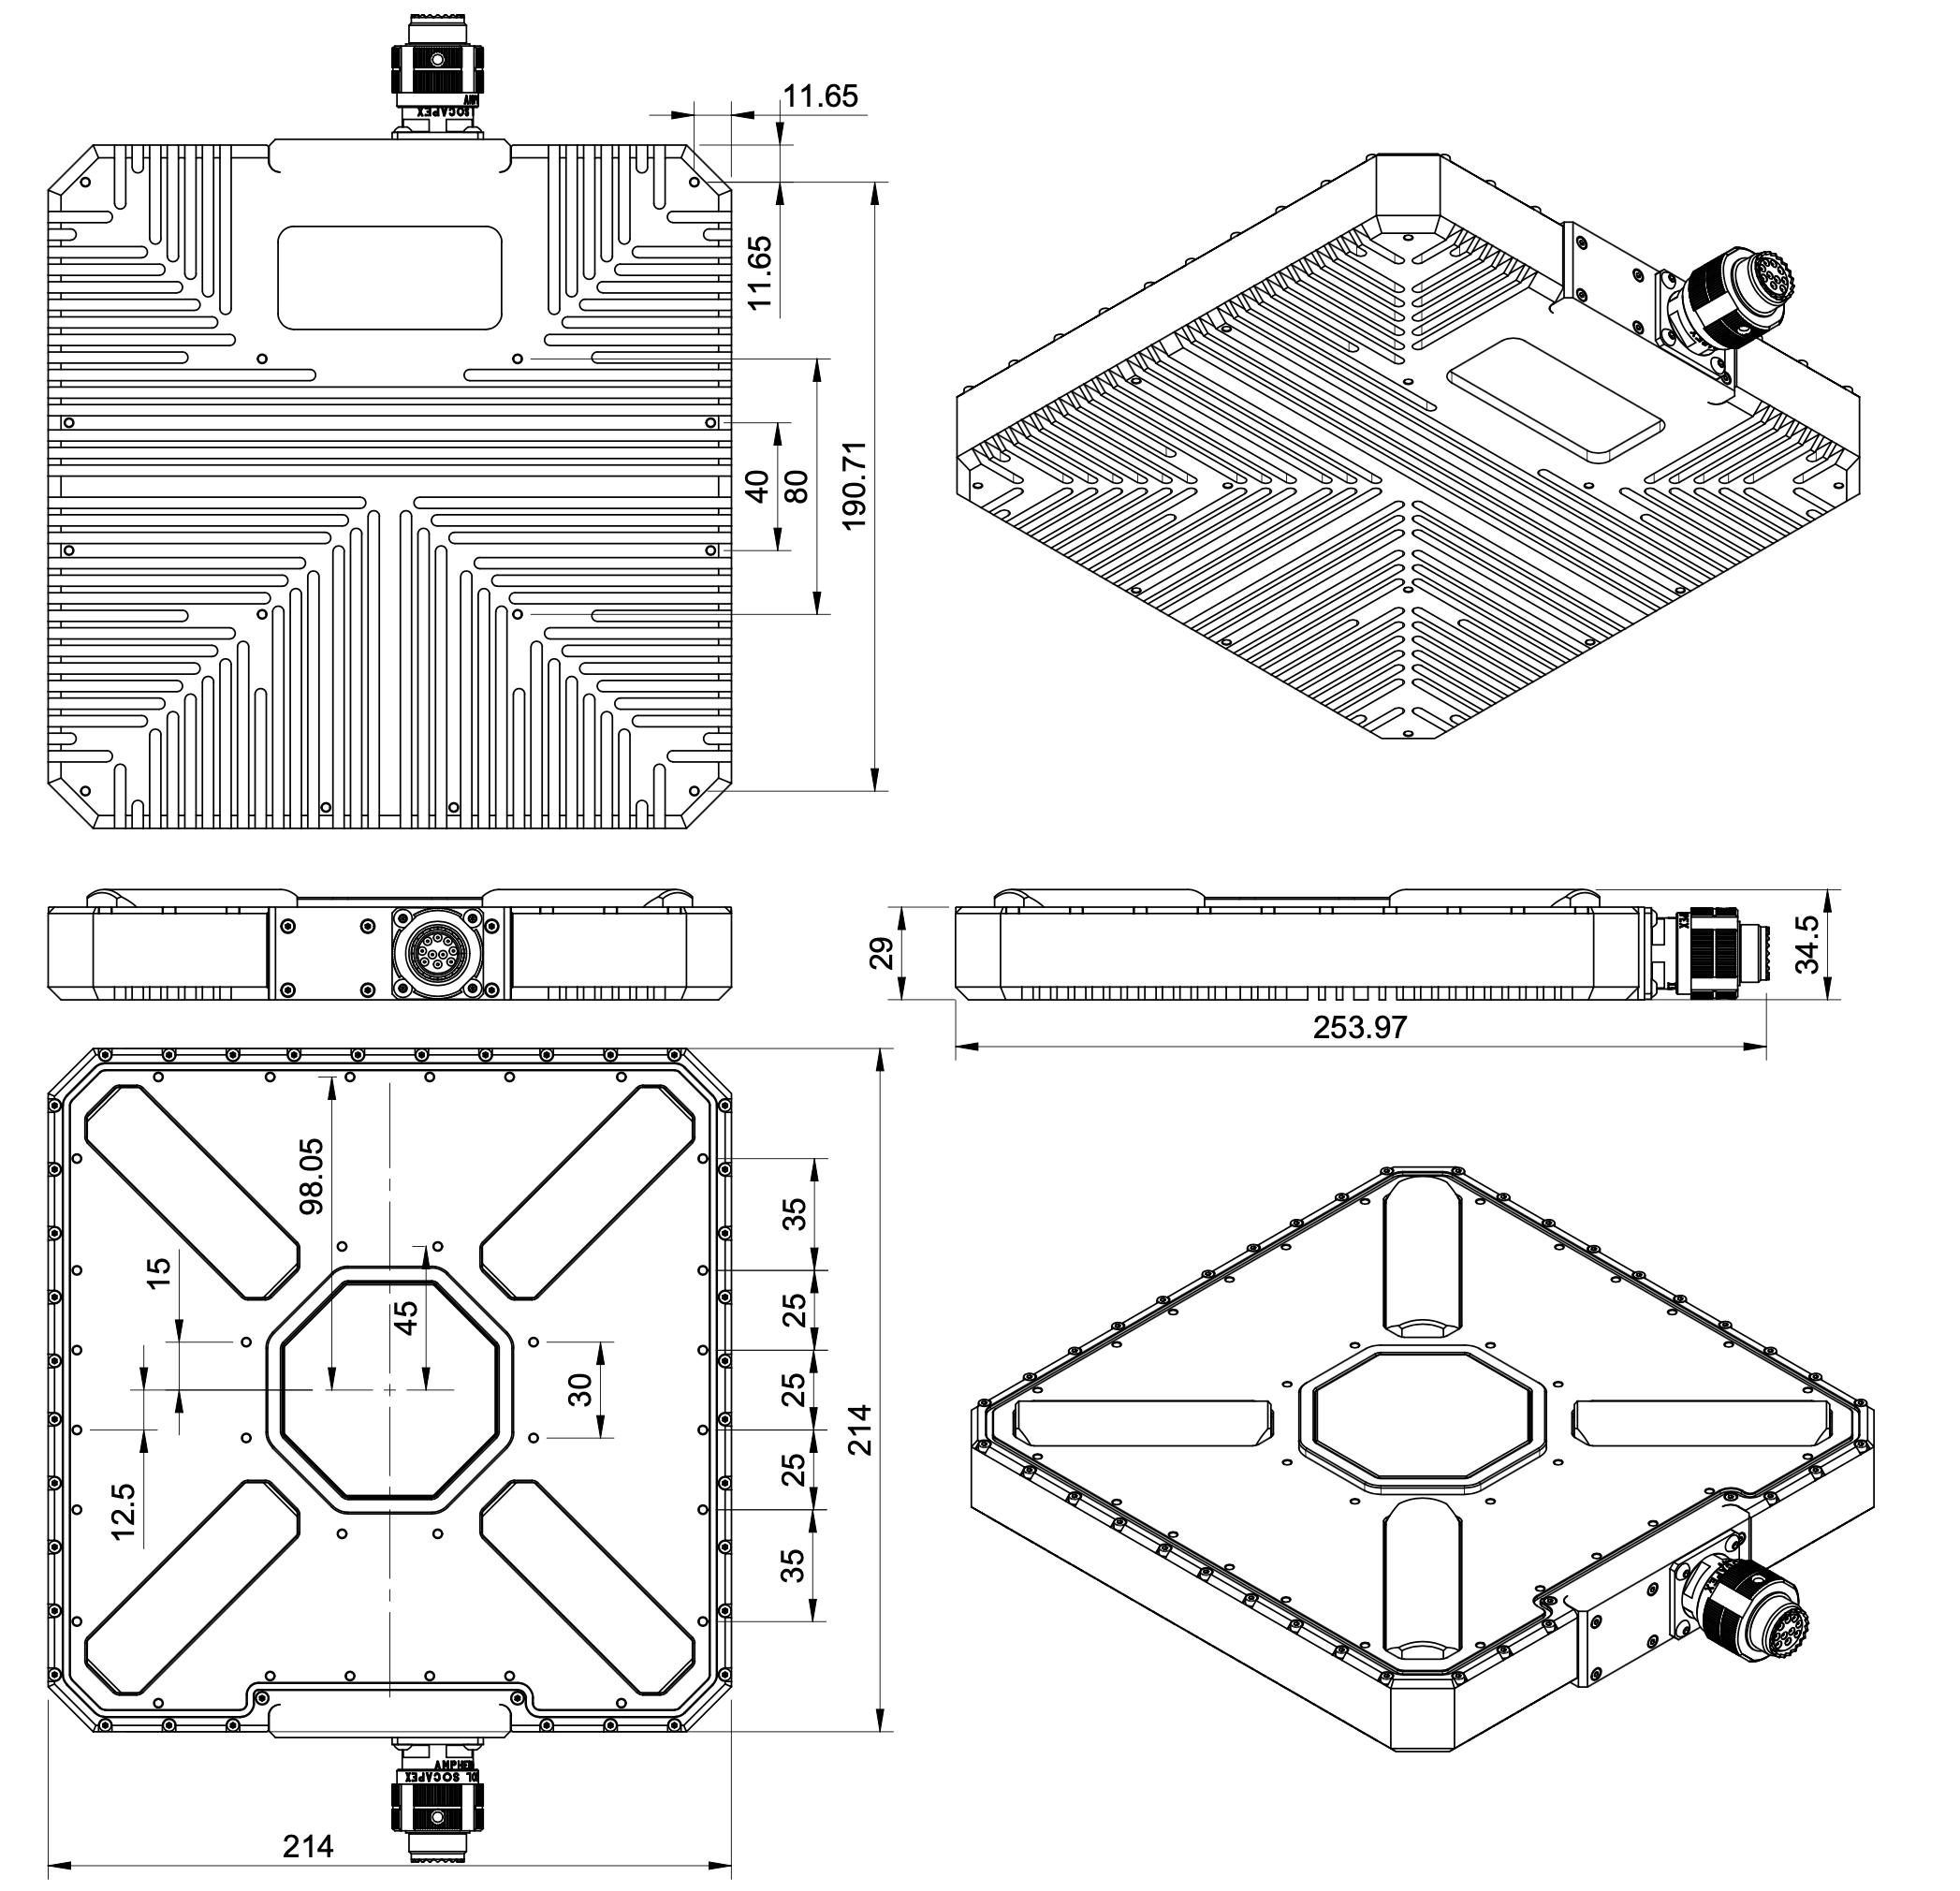
Figure: ULSDV-HL-G3-TX Transmitter Dimensions
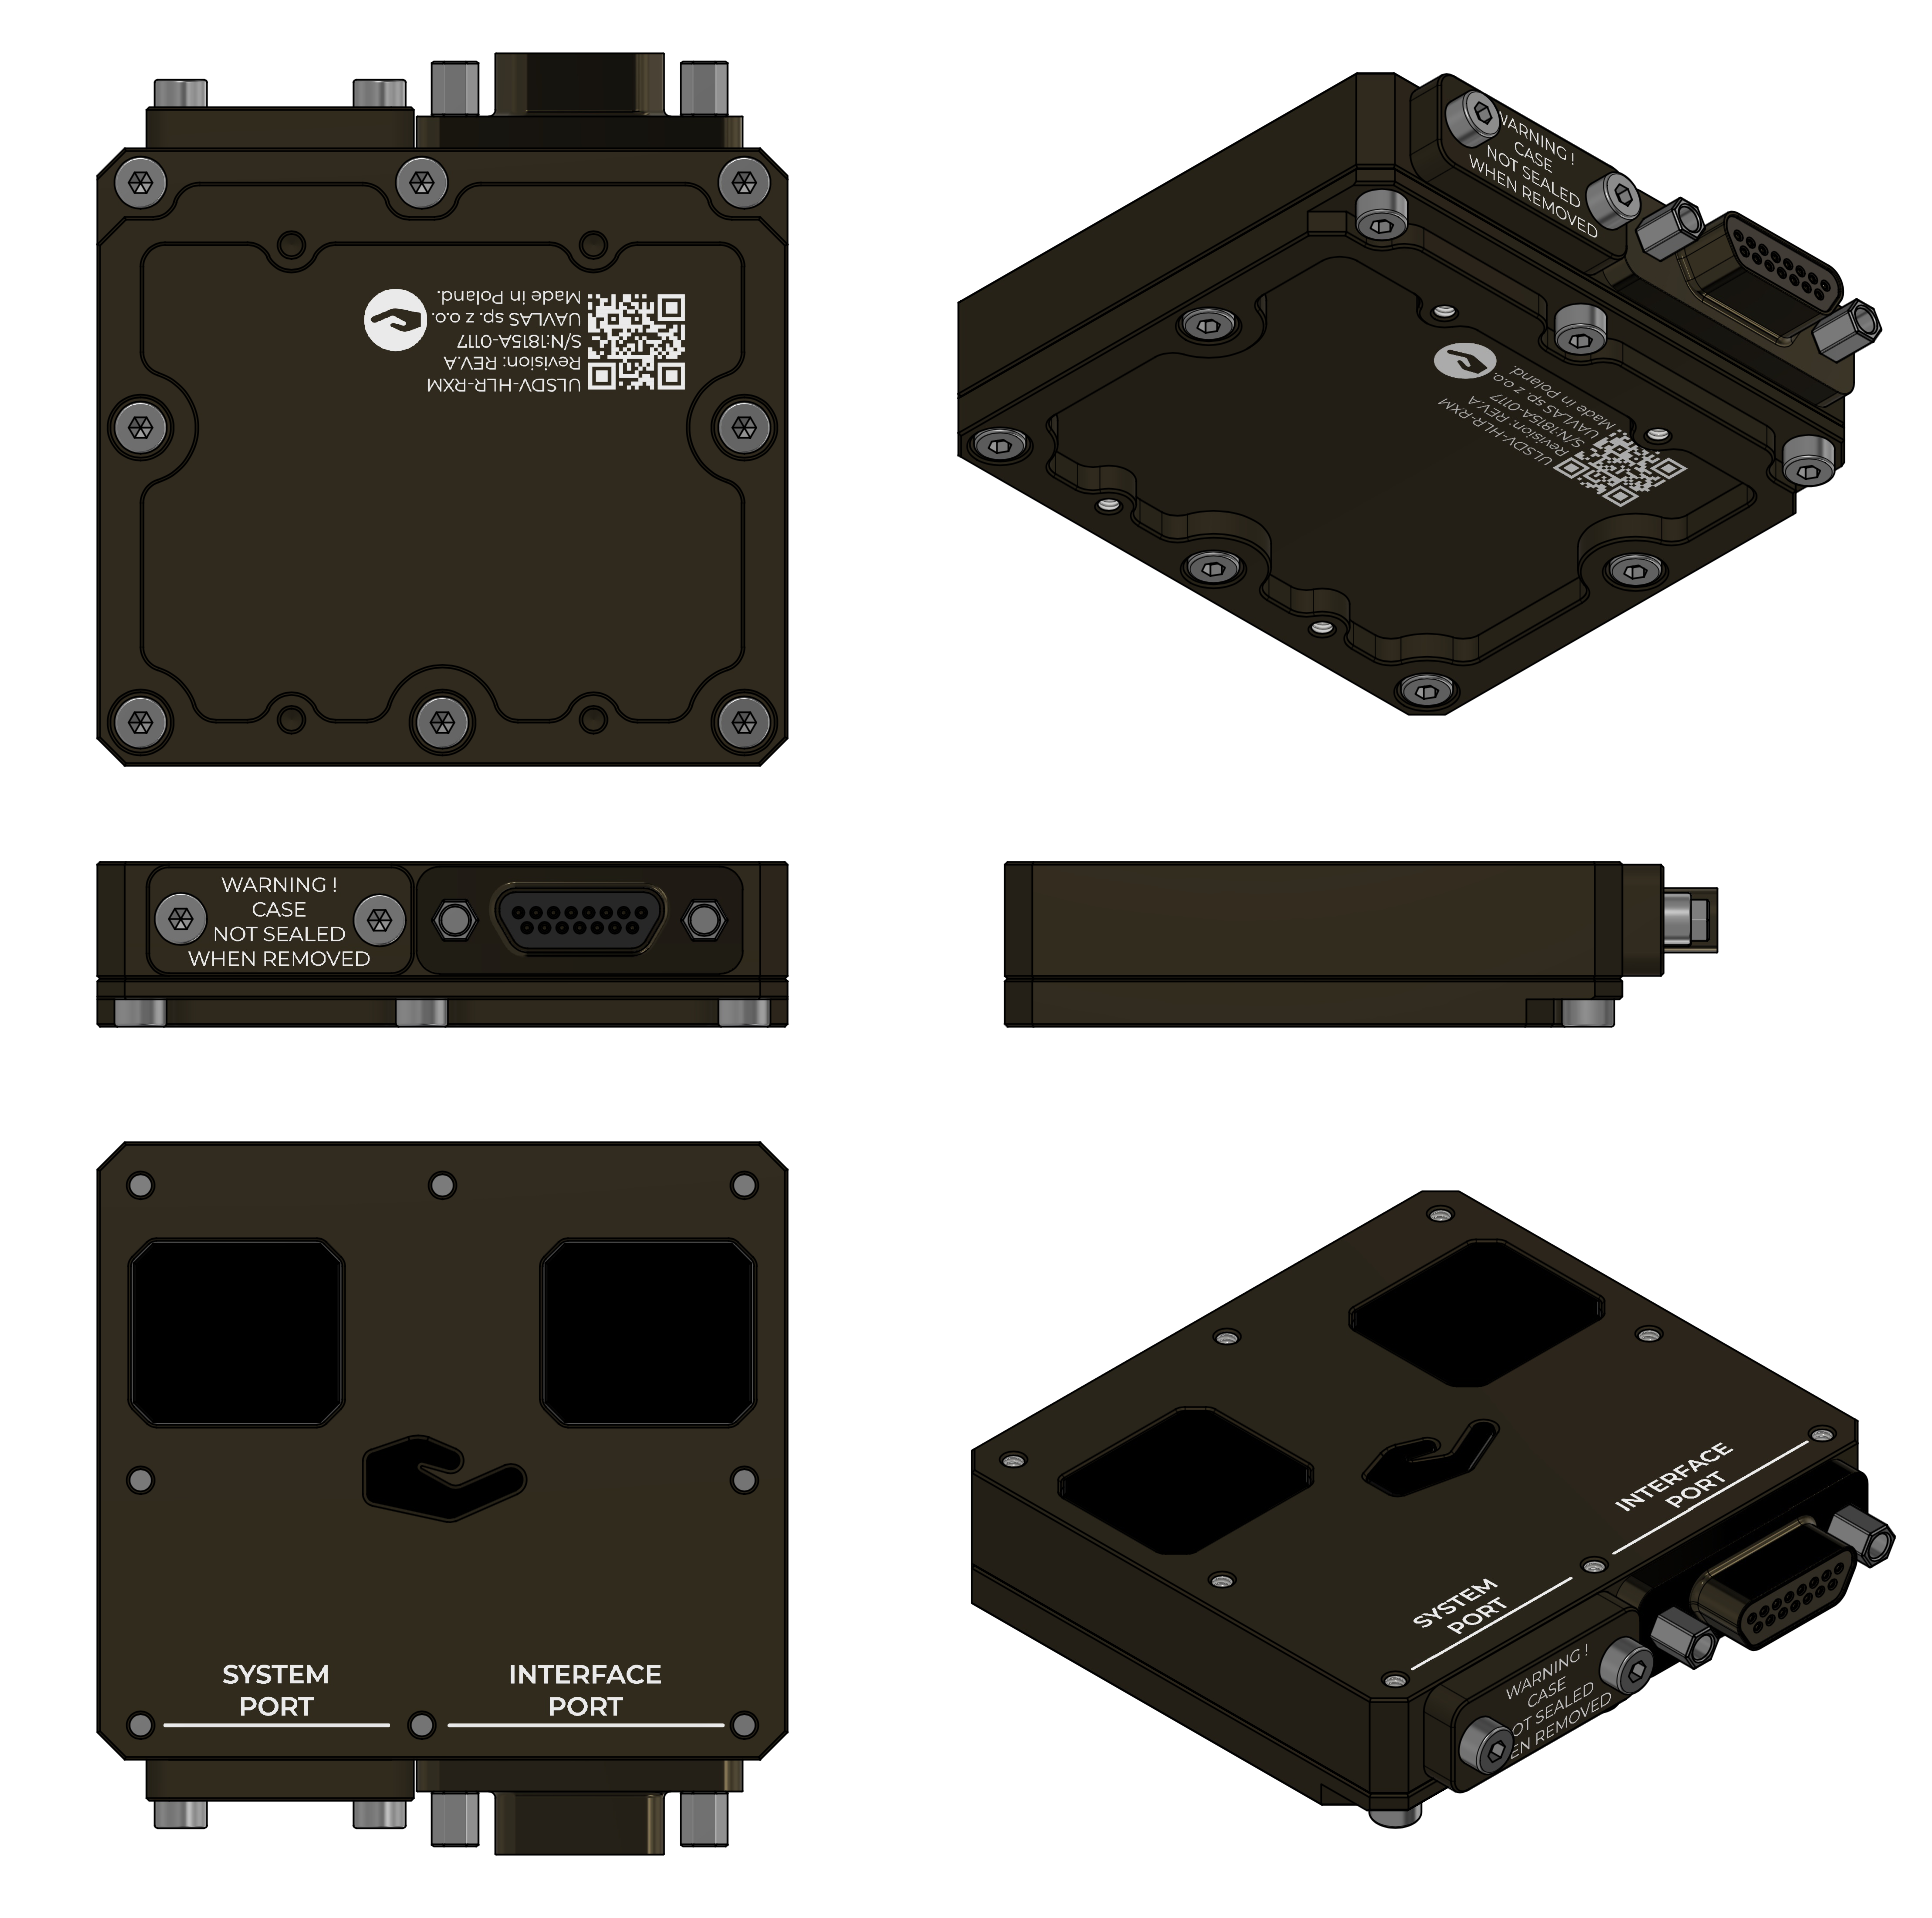
Figure: ULSDV-HLXS-G3-RXM Projection Views (Color)
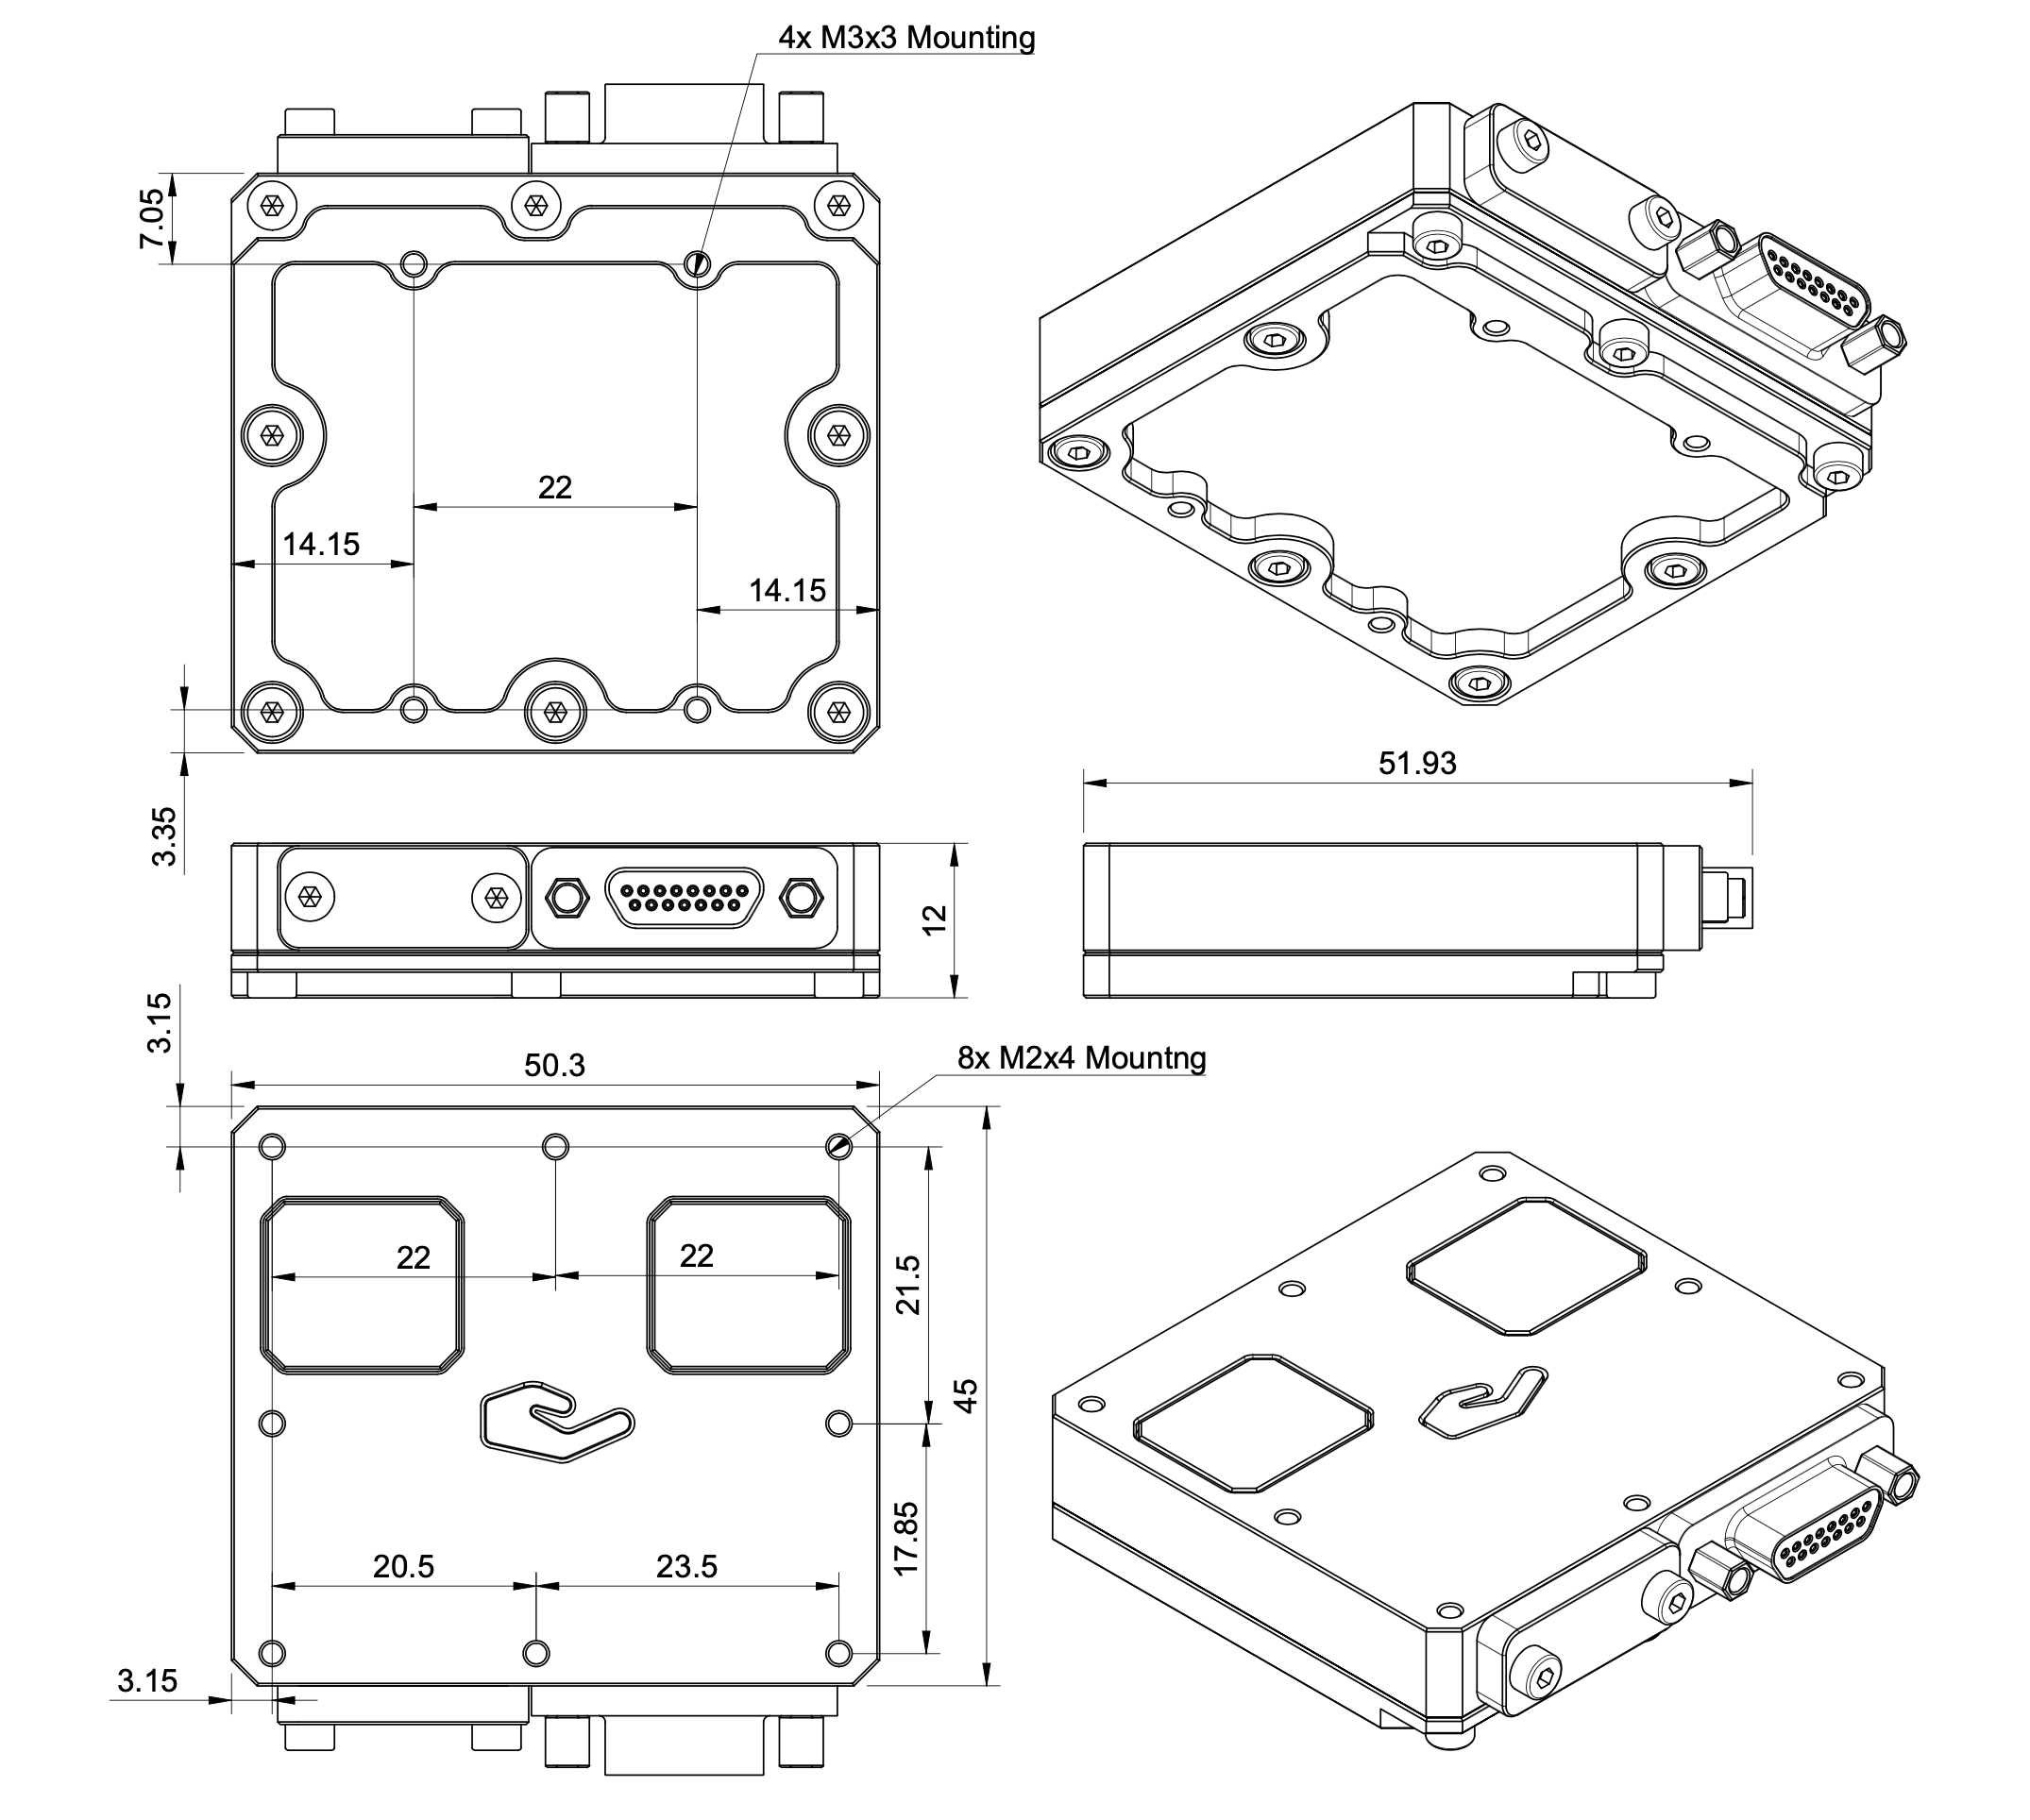
Figure: ULSDV-HLXS-G3-RXM Receiver Dimensions
| Item | Packaging Value |
|---|
| Packaging type | Rugged case |
| Unit net weight | 2500 |
| Unit gross weight | 4500 |
| Box dimensions | 180x380x400 |
Table: Packaging Information
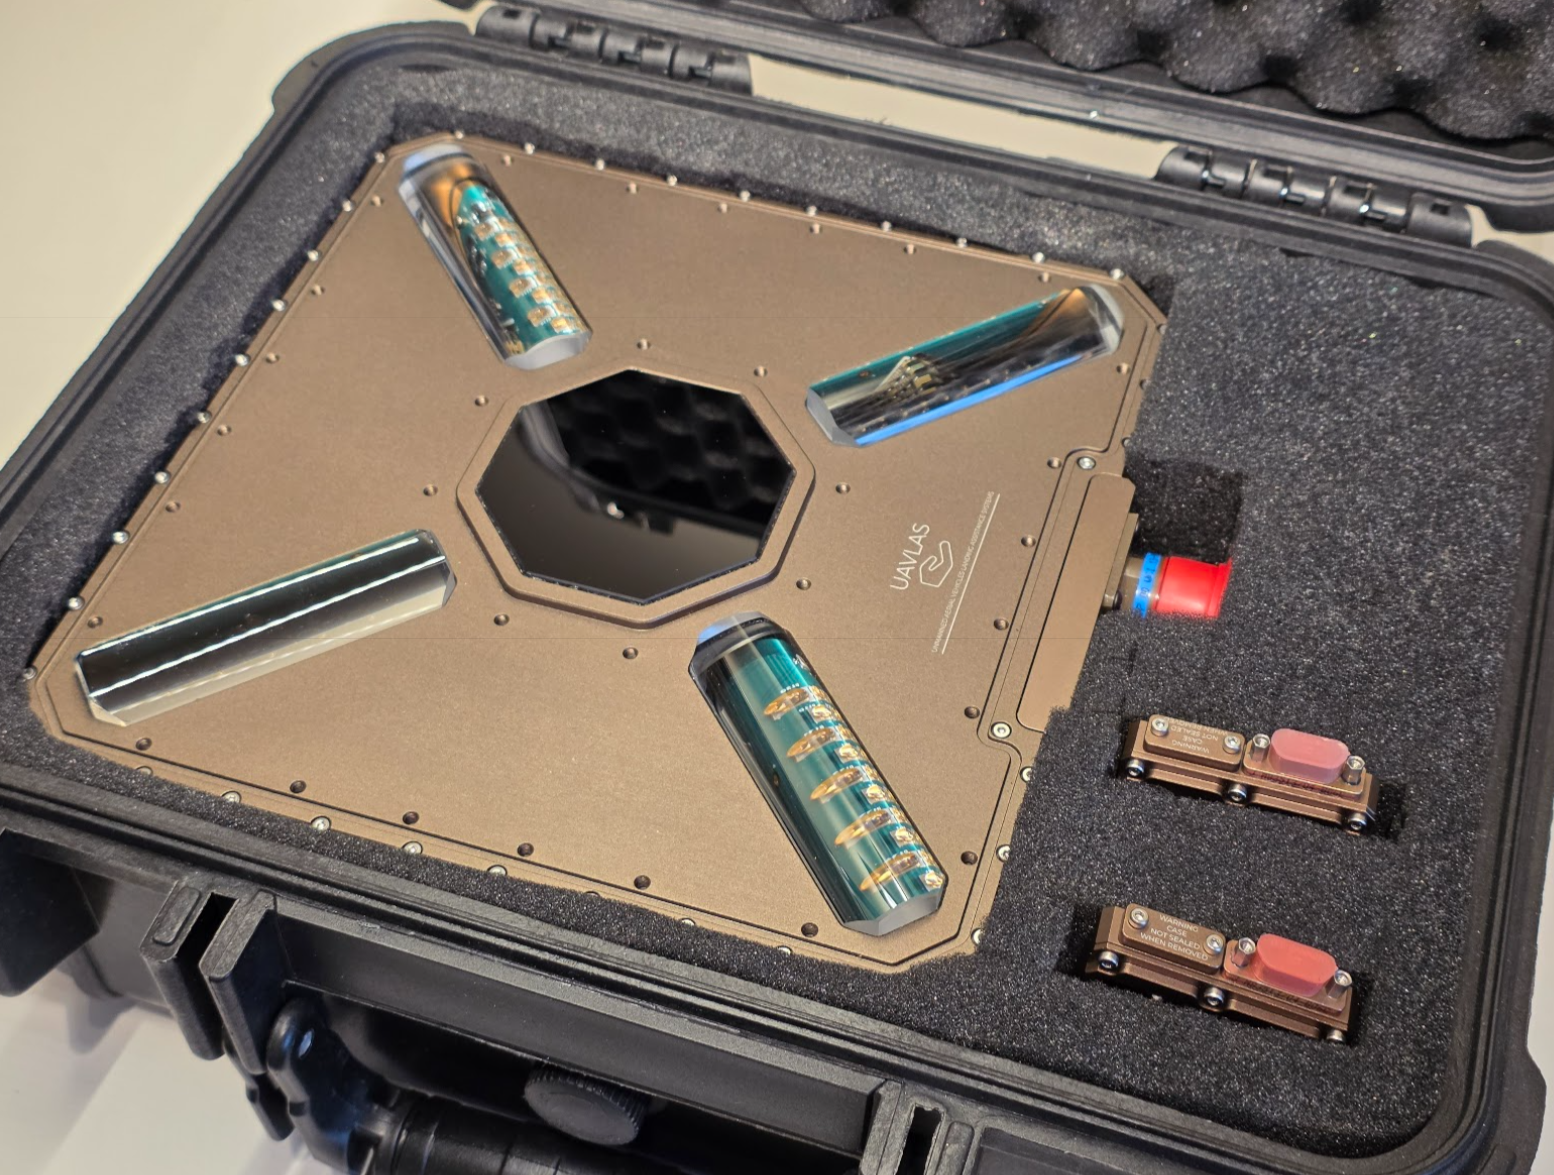
Figure: ULS-Heli-G3 packaging
Environmental Conditions
Equipment is designed to meet stringent military and maritime operational requirements, providing reliable performance in the most demanding environmental conditions including shipboard operations, offshore platforms, and tactical deployments.
Operating Temperature Range
- Extended operating range: -40°C to +85°C
- Meets MIL-STD-810 requirements for temperature extremes
- Arctic to desert operations capability
- No performance degradation across full temperature range
- Qualified for rapid temperature transitions and thermal shock
- Cold-soak start capability from -40°C
Humidity and Salt Fog Resistance
- Relative humidity: Up to 95% (condensing)
- Salt fog resistant per MIL-STD-810 Method 509
- Maritime environment qualified for shipboard operations
- Corrosion-resistant materials and protective coatings
- Protected against salt spray and marine atmosphere
- Suitable for offshore platform installations
Ingress Protection
- IP67 rated (Dust tight and water immersion resistant)
- 6 - Complete protection against dust, sand, and particulate ingress
- 7 - Protected against temporary immersion in water (up to 1 meter depth for 30 minutes)
- Exceeds requirements for shipboard and maritime operations
- Protected against:
- Heavy rain and sea spray
- Temporary submersion (deck washing, wave impact)
- Sand and dust storms
- Contaminated environments
Shock and Vibration
- Vibration: MIL-STD-810 Method 514
- Helicopter vibration profile qualified
- Shipboard vibration and shock resistant
- Continuous operation during vibration
- Mechanical Shock: MIL-STD-810 Method 516
- Drop and impact qualified
- Transportation and handling shock resistant
- Crash survival design considerations
Electromagnetic Compatibility
- EMI/EMC: MIL-STD-461 compliant
- Electromagnetic interference immunity
- Low electromagnetic emissions
- RF coexistence with military avionics
- Lightning protection per MIL-STD-464
- ESD Protection: IEC 61000-4-2
- Contact discharge: ±8kV
- Air discharge: ±15kV
Storage Conditions
- Storage temperature: -55°C to +85°C
- Relative humidity: Up to 95% (condensing)
- Long-term storage in uncontrolled environments
- Sealed for preservation and long-term depot storage
Altitude and Pressure
- Operating altitude: -500m to +4500m above sea level
- Storage altitude: -500m to +12000m
- Pressure differential resistant
- Suitable for high-altitude helicopter operations
Maintenance and Serviceability
- Designed for field maintenance and repair
- Minimal preventive maintenance required
- Accessible components for service and inspection
- Environmental seals serviceable in the field
- Long service intervals suitable for deployed operations
Note: All environmental specifications are subject to final qualification testing. Contact UAVLAS for the most current test data and certification documentation. Custom environmental testing and certification to specific standards available upon request.
Optical Radiation Safety (IR Emission)
The transmitter (ground unit) emits pulsed infrared optical radiation with a centre wavelength of 940nm. The receivers are optical sensors only and do not emit optical radiation.
INFRARED RADIATION IS EMITTED FROM THE TRANSMITTER OPTICAL APERTURES WHENEVER THE UNIT IS POWERED. Do not look into the transmitter emitter apertures at close range. IR emission at 940nm is invisible and does not trigger the blink or aversion reflex, so the eye receives no natural warning of exposure.
Why This Warning Is Given
Radiation at 940nm is outside the visible range. The protective mechanisms that limit exposure to bright visible sources — the blink reflex, pupil constriction, and the instinct to look away — are not triggered by an invisible source. Exposure time is therefore limited only by operator behaviour, which is why the precautions below are given as operating instructions and not left to the operator’s judgement.
The transmitter is a positioning beacon. It is not an illumination product and is not intended to be viewed at any time.
Operating Precautions
- Do not look directly into the transmitter emitter apertures from a distance of less than 1 metre while the unit is powered.
- Treat the transmitter as emitting whenever supply voltage is applied, including when no receiver is present and no positioning data is being transferred.
- Switch emission off before working directly in front of the transmitter. Use the Illumination parameter in ULS-Tools to disable emission, or disconnect supply power.
- Do not view the powered transmitter through binoculars, telescopes, camera lenses, magnifiers, or any other light-collecting instrument. Such optics concentrate the emission and can raise the exposure at the eye by orders of magnitude compared with unaided viewing.
- Do not add, remove, or modify optical elements of the transmitter. Added optics change the emission characteristics and invalidate any photobiological classification of the unit.
- Position the transmitter so that the emission field is directed away from work positions and walkways where personnel stay for extended periods.
- Servicing personnel working inside the emission field at close range should disable emission first rather than rely on viewing distance.
Classification and Applicable Standards
| Item | Value |
|---|
| Emitter type | Incoherent IR LED array (not a laser) |
| Centre wavelength | 940nm |
| Emission mode | Pulsed |
| Applicable standard | IEC 62471 / EN 62471, Photobiological safety of lamps and lamp systems |
| Classification distance | 200mm (non-GLS source, per IEC 62471) |
| Risk group | TBD — to be entered from the IEC 62471 assessment report |
| Hazard distance | TBD — to be entered from the IEC 62471 assessment report |
Table: Optical Radiation Safety Data
The transmitter uses light emitting diodes, not laser emitters. LED sources are assessed under IEC 62471; the laser product standard IEC 60825-1 does not apply to this product.
For a 940nm source the applicable exposure limits are the retinal thermal hazard (380nm to 1400nm), the retinal thermal hazard for a weak visual stimulus (780nm to 1400nm, which applies specifically to sources that give no visual cue), and the infrared hazard to the cornea and lens (780nm to 3000nm). The corneal and lens limits are intended for chronic exposures longer than 1000s at a daily averaged irradiance of 100 W/m² or more.
Organisations operating this equipment within the European Union are additionally subject to Directive 2006/25/EC on the exposure of workers to artificial optical radiation, which requires the employer to assess worker exposure against the exposure limit values given in Annex I of that directive. UAVLAS provides the emission data needed for that assessment on request.
Compliance and Standards
- Document classification and release control as defined in metadata
- Product-specific compliance statements to be finalized for release
Use the part numbering section to identify system variants, subassemblies, and related accessories.
Change Control
All changes to this document must be reviewed and approved by the relevant technical leads and stakeholders
5 - ULS-Heli-G3 Interface Control Document
Electrical, mechanical and communication interfaces of ULS-Heli-G3 — precision landing for large VTOL drones and helicopters, up to 50 m range.
ULSDC-PBICD110426 · version 0.1.36 · issued April 11, 2026
The numbered PDF is the controlled copy: download it from the portal.
Introduction
Purpose
This document defines the interfaces between ULS-Heli-G3 components, including one transmitter and 2 identical, equal-priority RXM receivers. It records the mechanical, electrical, communication, and functional characteristics needed for correct system integration.
Scope
This document is intended for system engineers, integrators, and developers working with ULS-Heli-G3 systems.
Assumptions and Exclusions
- This document defines interfaces only; product selection and overview information belong in the datasheet.
- Installation, calibration, and operating procedures belong in the operation manual.
System Components
Transmitter (Ground Unit)
- Device code: ULSDV-HL-G3-TX
- Primary function: Optical IR field emission for precision positioning
- Optical emission parameters: 940nm, pulsed
Figure: ULSDV-HL-G3-TX Transmitter
Receiver (Onboard Unit)
- Device code: ULSDV-HLXS-G3-RXM
- Primary function: Optical IR field sensor for precision positioning
- Optical central wavelength : 940nm
System architecture uses 2 identical RXM receiver units operating with the same priority.
Both RXM units are used for redundancy and for yaw orientation estimation using a triangular method in MRX mode.
Figure: ULSDV-HLXS-G3-RXM Receiver
RS422–UART Onboard Adapter
When the autopilot has only a UART interface, the ULSDV-HLXS-G3 RS422-to-UART adapter (ULSDV-XX-UART-RS422) is used onboard to connect the ULSDV-HLXS-G3-RXM receiver to the autopilot.
Figure: ULSDV-XX-UART-RS422 Onboard Adapter
USB–RS422 Ground Adapter
The ULSDV-XX-USB-RS422 adapter is used on the ground to connect the ULSDV-HL-G3-TX transmitter to a PC for configuration and control.
Figure: ULS-XX-USB-RS422 Ground Adapter
Interface Overview

Figure: ULS-Heli-G3 System Interfaces Overview
Physical Interfaces

Figure: ULS-Heli-G3 System Interfaces Overview
Transmitter to Control PC Interface
The transmitter (ULSDV-HL-G3-TX) connects to a PC via the ULS-XX-USB-RS422 ground adapter for configuration and control.
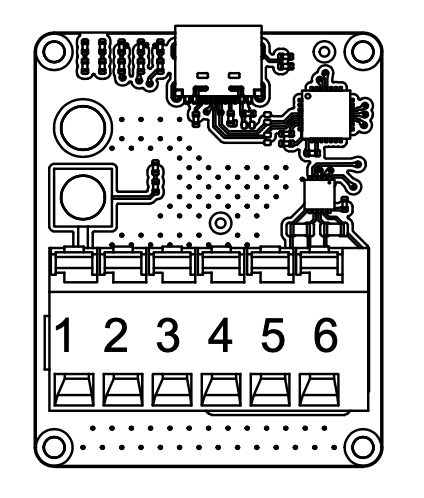
Figure: ULS-XX-USB-RS422 Adapter Pinout
| Pin | Function |
|---|
| 1 | +V supply +18V…+27V to Transmitter |
| 2 | GND |
| 3 | RS422 A RX+ (Adapter Input) |
| 4 | RS422 B RX- (Adapter Input) |
| 5 | RS422 Y TX- (Adapter Output) |
| 6 | RS422 Z TX+ (Adapter Output) |
| 7,8 | +V supply +18V…+27V Power input from battery |
*Table: ULS-XX-USB-RS422 Pinout *
Data Types
- Status information
- Control signals
- Transmitter configuration
- External IMU/COMPASS data
Connection Types
- CAN Bus – For network communication
- USB – Via ULS-XX-USB-RS422 adapter (PC side)
- RS422 – Native transmitter interface; for serial communication with external sensors
Transmitter Pinout
ULSDV-HL-G3-TX Transmitter pinout information.
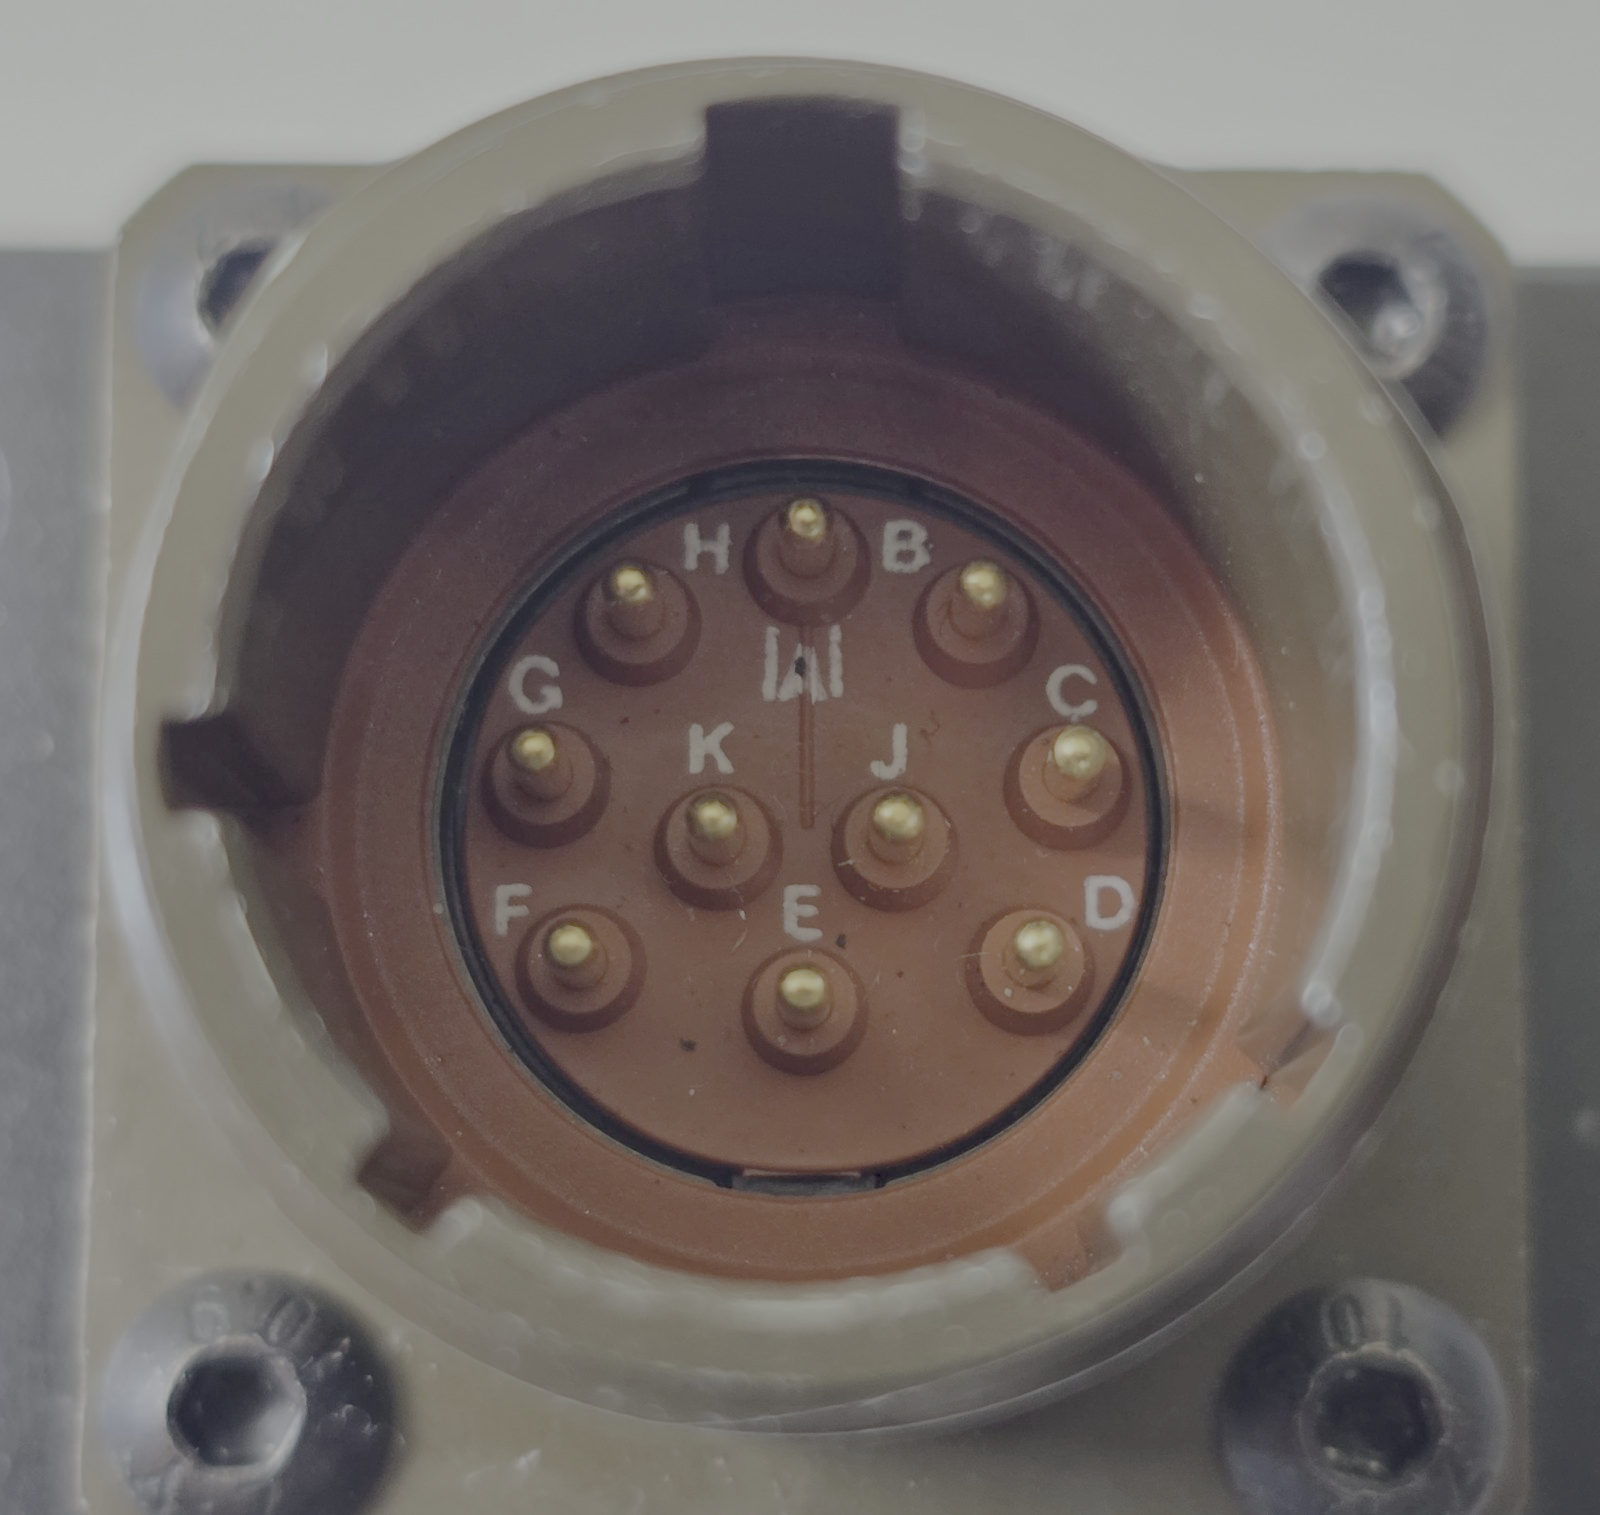
Figure: Transmitter connector
| Pin | Function |
|---|
| A | +V supply +18V…+27V |
| B | RS422 RX+ (A) |
| C | RS422 RX- (B) |
| D | RS422 TX+ (Y) |
| E | RS422 TX- (Z) |
| F | GND |
| G | C1L |
| H | C1H |
| J | GND |
| K | GND |
Table: Transmitter Connector Pinout (ULSDV-HL-G3-TX)
Do not connect or disconnect the transmitter interface under power unless approved by final hardware instructions.
Transmitter to Receiver Interface
The transmitter and receiver use an optical interface to exchange data. Transmission uses pulsed IR emission at 940 nanometers. Data transmission is only in the direction from the transmitter to the receiver.
Data Types
- Position encoded
- Status encoded data (transmitter orientation and instructions)
Connection Type
- Optical IR 940nm (pulsed) – Infrared optical link
The transmitter emits invisible infrared radiation whenever it is powered. Observe the precautions in the Optical Radiation Safety section before working in front of the transmitter.
Receiver Interfaces (RXM Set A and RXM Set B)
Both RXM receivers (ULSDV-HLXS-G3-RXM) are identical and have the same priority in system operation.
When the autopilot provides only a UART interface, connect the RXM receiver RS422 output through the ULS-XX-UART-RS422 onboard adapter.
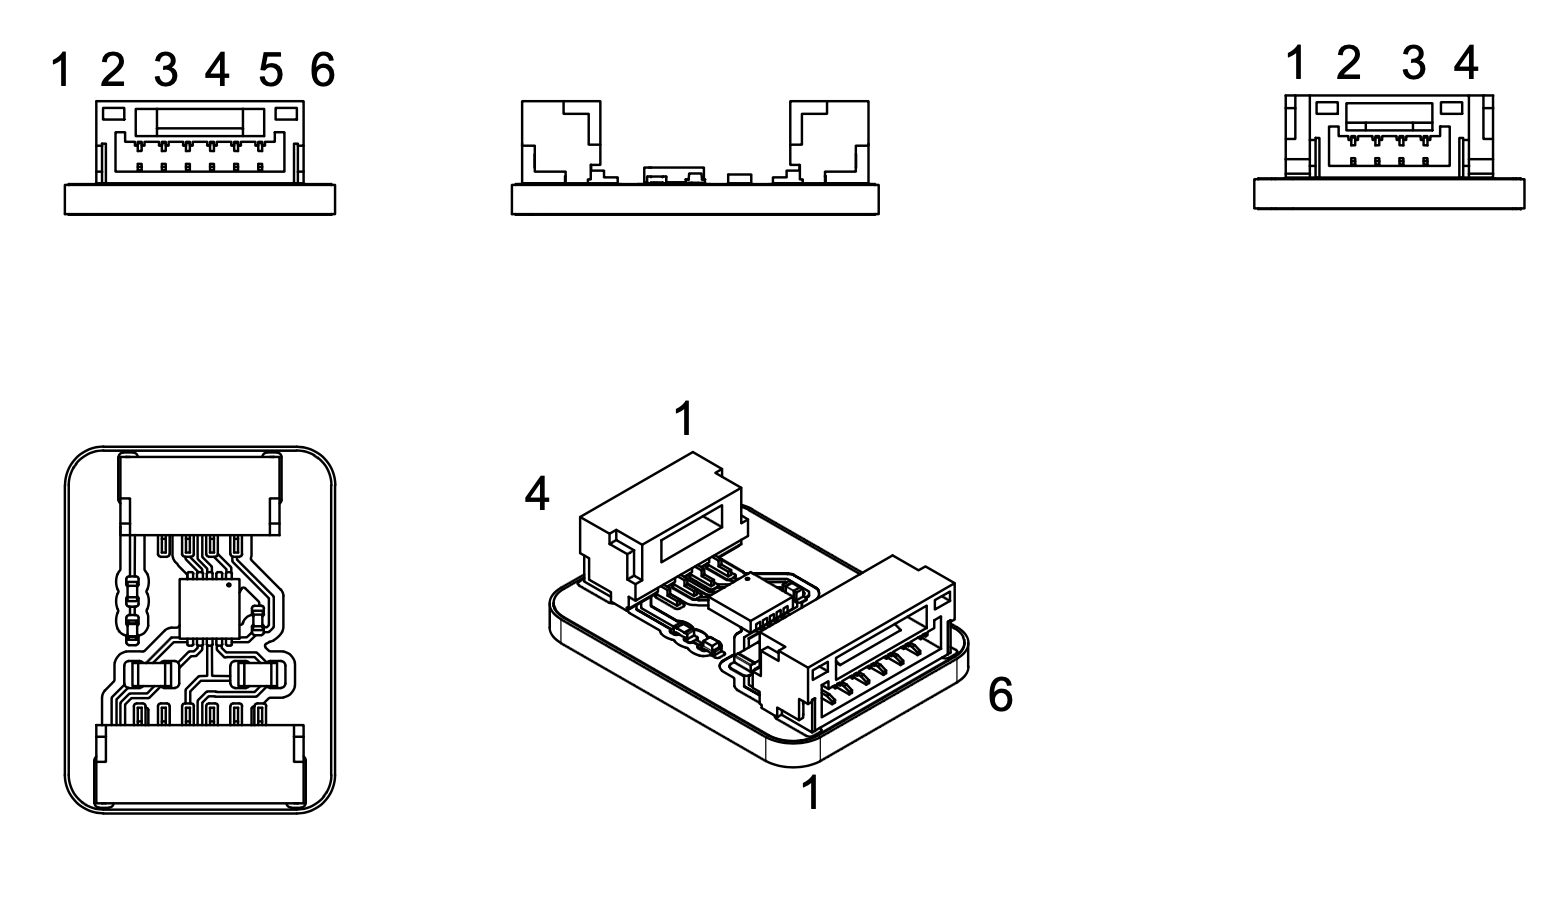
Figure: ULS-XX-UART-RS422 Adapter Pinout
| Pin | Function |
|---|
| 1 | +5V |
| 2 | UART-TX (Adapter Out) |
| 3 | UART-RX (Adapter In) |
| 4 | GND |
Table: ULSDV-XX-UART-RS422-R0 4 pin connector pinout
| Pin | Function |
|---|
| 1 | GND |
| 3 | RS422 A RX+ (Adapter Input) |
| 4 | RS422 B RX- (Adapter Input) |
| 5 | RS422 Y TX- (Adapter Output) |
| 6 | RS422 Z TX+ (Adapter Output) |
| 2 | GND |
Table: ULSDV-XX-UART-RS422-R0 6 pin connector pinout
Data Types
- MAVLink messages
- ULS-Blitz frames
- ASCII protocol
- MRX-mode yaw estimation data (triangular method)
Connection Types
- RS422 – Native receiver interface
- UART – Via ULS-XX-UART-RS422 adapter (for UART-only autopilots)
- CAN – Network communication
- USB – Direct PC connection
Receiver Pinout
ULSDV-HLXS-G3-RXM Receiver pinout information.
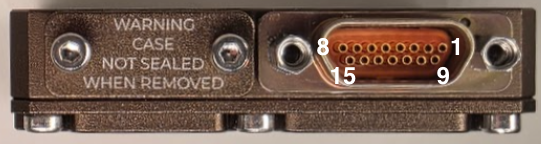
Figure: Receiver connector
| Pin | Function |
|---|
| 1 | + V supply +12V..+25V |
| 2 | C2H |
| 3 | C2L |
| 4 | GND - Ground connection |
| 5 | + V supply +12V..+25V |
| 6 | C1H |
| 7 | C1L |
| 8 | GND - Ground connection |
| 9 | + V supply +12V..+25V |
| 10 | RS422 Z |
| 11 | RS422 Y |
| 12 | RS422 A |
| 13 | RS422 B |
| 14 | GND - Ground connection |
| 15 | GND - Ground connection |
Table: ULSDV-HLXS-G3-RXM Connector Pinout
For receiver setup unscrew protection part to get access to usb connector.
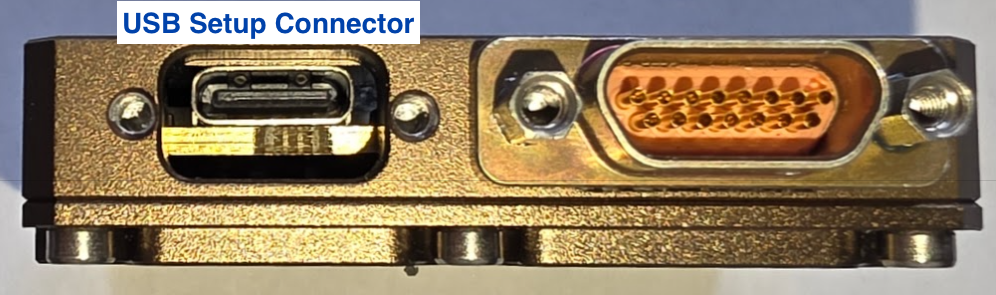
Figure: Receiver USB connector
Due hardware limitation of current revision USB connector with thin shield required
Receiver case not sealed when USB cover removed.
Electrical Interfaces

Figure: Power Distribution and Connections
Transmitter Electrical Characteristics
| Parameter | Value | Unit | Notes |
|---|
| Supply Voltage | +18…+26 | V | |
| Supply Current | 2.5 | A | |
| Power Consumption | 25 | W | |
Table: Transmitter Electrical Specifications
Receiver Electrical Characteristics (Per RXM Set)
| Parameter | Value | Unit | Notes |
|---|
| Supply Voltage | +12…+26 | V | |
| Supply Current | 1 | A | |
| Power Consumption | 10 | W | |
Table: Receiver Electrical Specifications
Communication Interfaces
Supported Communication Methods
- Optical IR 940nm pulsed link between transmitter and receiver
- RS422 for native wired subsystem interfaces
- UART via ULS-XX-UART-RS422 where required by the host autopilot
- CAN for network communication
- USB for direct PC access where supported
Data Definitions
Data Categories
- Position-encoded optical data
- Transmitter status and orientation data
- MAVLink messages
- ULS-Blitz frames
- ASCII protocol data
- MRX yaw estimation data
Functional Interfaces

Figure: Data Flow and Functional Interfaces
Data Exchange
The ULS-Heli-G3 system data exchange mechanism:
Control PC Functions:
- Configure and view status of transmitter
- Set configuration of receivers
- Send control signals (On/off, compass override information)
External Equipment:
- External IMU/Compass equipment can be used to override internal IMU/compass information
Receiver Functions:
- Accept data from transmitter over IR signal (position field information and ground unit IMU data)
- Accept NED and Attitude information from autopilot to convert coordinate system
- Multiple receivers (MRX mode) communicate to calculate vehicle orientation (YAW) using triangular method
- Send position offset data to autopilot
Mechanical Interfaces
| Component | Dimensions (mm) | Notes |
|---|
| ULSDV-HLXS-G3-RXM (ULSDV-HLXS-G3-RXM) | ~ 50mm x 52mm | Without connector |
| ULSDV-HL-G3-TX | ~254mm x 214mm | Without connector |
Table: Mechanical Dimensions
Figure: ULSDV-HL-G3-TX Projection Views (Color)
Figure: ULSDV-HL-G3-TX Transmitter Dimensions
Figure: ULSDV-HLXS-G3-RXM Projection Views (Color)
Figure: ULSDV-HLXS-G3-RXM Receiver Dimensions
Environmental Conditions
Equipment is designed to meet stringent military and maritime operational requirements, providing reliable performance in the most demanding environmental conditions including shipboard operations, offshore platforms, and tactical deployments.
Operating Temperature Range
- Extended operating range: -40°C to +85°C
- Meets MIL-STD-810 requirements for temperature extremes
- Arctic to desert operations capability
- No performance degradation across full temperature range
- Qualified for rapid temperature transitions and thermal shock
- Cold-soak start capability from -40°C
Humidity and Salt Fog Resistance
- Relative humidity: Up to 95% (condensing)
- Salt fog resistant per MIL-STD-810 Method 509
- Maritime environment qualified for shipboard operations
- Corrosion-resistant materials and protective coatings
- Protected against salt spray and marine atmosphere
- Suitable for offshore platform installations
Ingress Protection
- IP67 rated (Dust tight and water immersion resistant)
- 6 - Complete protection against dust, sand, and particulate ingress
- 7 - Protected against temporary immersion in water (up to 1 meter depth for 30 minutes)
- Exceeds requirements for shipboard and maritime operations
- Protected against:
- Heavy rain and sea spray
- Temporary submersion (deck washing, wave impact)
- Sand and dust storms
- Contaminated environments
Shock and Vibration
- Vibration: MIL-STD-810 Method 514
- Helicopter vibration profile qualified
- Shipboard vibration and shock resistant
- Continuous operation during vibration
- Mechanical Shock: MIL-STD-810 Method 516
- Drop and impact qualified
- Transportation and handling shock resistant
- Crash survival design considerations
Electromagnetic Compatibility
- EMI/EMC: MIL-STD-461 compliant
- Electromagnetic interference immunity
- Low electromagnetic emissions
- RF coexistence with military avionics
- Lightning protection per MIL-STD-464
- ESD Protection: IEC 61000-4-2
- Contact discharge: ±8kV
- Air discharge: ±15kV
Storage Conditions
- Storage temperature: -55°C to +85°C
- Relative humidity: Up to 95% (condensing)
- Long-term storage in uncontrolled environments
- Sealed for preservation and long-term depot storage
Altitude and Pressure
- Operating altitude: -500m to +4500m above sea level
- Storage altitude: -500m to +12000m
- Pressure differential resistant
- Suitable for high-altitude helicopter operations
Maintenance and Serviceability
- Designed for field maintenance and repair
- Minimal preventive maintenance required
- Accessible components for service and inspection
- Environmental seals serviceable in the field
- Long service intervals suitable for deployed operations
Note: All environmental specifications are subject to final qualification testing. Contact UAVLAS for the most current test data and certification documentation. Custom environmental testing and certification to specific standards available upon request.
Optical Radiation Safety (IR Emission)
The transmitter (ground unit) emits pulsed infrared optical radiation with a centre wavelength of 940nm. The receivers are optical sensors only and do not emit optical radiation.
INFRARED RADIATION IS EMITTED FROM THE TRANSMITTER OPTICAL APERTURES WHENEVER THE UNIT IS POWERED. Do not look into the transmitter emitter apertures at close range. IR emission at 940nm is invisible and does not trigger the blink or aversion reflex, so the eye receives no natural warning of exposure.
Why This Warning Is Given
Radiation at 940nm is outside the visible range. The protective mechanisms that limit exposure to bright visible sources — the blink reflex, pupil constriction, and the instinct to look away — are not triggered by an invisible source. Exposure time is therefore limited only by operator behaviour, which is why the precautions below are given as operating instructions and not left to the operator’s judgement.
The transmitter is a positioning beacon. It is not an illumination product and is not intended to be viewed at any time.
Operating Precautions
- Do not look directly into the transmitter emitter apertures from a distance of less than 1 metre while the unit is powered.
- Treat the transmitter as emitting whenever supply voltage is applied, including when no receiver is present and no positioning data is being transferred.
- Switch emission off before working directly in front of the transmitter. Use the Illumination parameter in ULS-Tools to disable emission, or disconnect supply power.
- Do not view the powered transmitter through binoculars, telescopes, camera lenses, magnifiers, or any other light-collecting instrument. Such optics concentrate the emission and can raise the exposure at the eye by orders of magnitude compared with unaided viewing.
- Do not add, remove, or modify optical elements of the transmitter. Added optics change the emission characteristics and invalidate any photobiological classification of the unit.
- Position the transmitter so that the emission field is directed away from work positions and walkways where personnel stay for extended periods.
- Servicing personnel working inside the emission field at close range should disable emission first rather than rely on viewing distance.
Classification and Applicable Standards
| Item | Value |
|---|
| Emitter type | Incoherent IR LED array (not a laser) |
| Centre wavelength | 940nm |
| Emission mode | Pulsed |
| Applicable standard | IEC 62471 / EN 62471, Photobiological safety of lamps and lamp systems |
| Classification distance | 200mm (non-GLS source, per IEC 62471) |
| Risk group | TBD — to be entered from the IEC 62471 assessment report |
| Hazard distance | TBD — to be entered from the IEC 62471 assessment report |
Table: Optical Radiation Safety Data
The transmitter uses light emitting diodes, not laser emitters. LED sources are assessed under IEC 62471; the laser product standard IEC 60825-1 does not apply to this product.
For a 940nm source the applicable exposure limits are the retinal thermal hazard (380nm to 1400nm), the retinal thermal hazard for a weak visual stimulus (780nm to 1400nm, which applies specifically to sources that give no visual cue), and the infrared hazard to the cornea and lens (780nm to 3000nm). The corneal and lens limits are intended for chronic exposures longer than 1000s at a daily averaged irradiance of 100 W/m² or more.
Organisations operating this equipment within the European Union are additionally subject to Directive 2006/25/EC on the exposure of workers to artificial optical radiation, which requires the employer to assess worker exposure against the exposure limit values given in Annex I of that directive. UAVLAS provides the emission data needed for that assessment on request.
Integration Wiring Diagrams
Figure: HL/XS G3 Ground-Side Wiring Schematic
Figure: HL/XS G3 Onboard Wiring Schematic
Part Numbering
| Part Number | Description |
|---|
| ULS-HELI-G3 | System set with transmitter and 2 identical RXM receiver units. |
| ULSDV-HL-G3-TX | Transmitter unit. |
| ULSDV-HLXS-G3-RXM | RXM receiver unit (identical hardware for Set A and Set B), quantity 2 per system. |
| ULS-XX-UART-RS422 | RS422-to-UART onboard adapter for connecting RXM receiver to UART-only autopilots. |
| ULS-XX-USB-RS422 | USB-to-RS422 ground adapter for connecting transmitter to PC (configuration and control). |
| TVP00WCI-13-98P | Manufacturer Amphenol. Transmitter connector type. |
| TV06RW-13-98S | Manufacturer Amphenol. Transmitter cable connector type. |
| M83513/04-B06C | Receiver connector type. |
| M83513/03-B03C | Receiver cable connector type. |
Table: Part Numbering
Applicable Documents
- ULSDC-PBDS110426-ULS-Heli-G3-Datasheet
- ULSDC-PBOM110426-ULS-Heli-G3-Operation-Manual
- ULSDC-PBDS051125-ULS-DeCoNet Blitz Messages Specification
Change Control
All changes to this document must be reviewed and approved by the relevant technical leads and stakeholders
6 - ULS-Heli-G3 Operation Manual
Installation, setup, integration and troubleshooting of ULS-Heli-G3 — precision landing for large VTOL drones and helicopters, up to 50 m range.
ULSDC-PBOM110426 · version 0.1.22 · issued April 11, 2026
The numbered PDF is the controlled copy: download it from the portal.
Introduction
Purpose
This manual provides installation, configuration, operation, verification, and troubleshooting guidance for the ULS-Heli-G3 system.
Scope
This manual covers one transmitter and 2 identical, equal-priority RXM receivers used in the ULS-Heli-G3 architecture.
Intended Audience
This manual is intended for operators, installers, technicians, and integrators responsible for commissioning and using the system.
- WARNING: The transmitter emits invisible infrared radiation when powered. Do not look into the emitter apertures at close range. See the Optical Radiation Safety section below.
- CAUTION: Do not connect or disconnect the transmitter interface under power.
Optical Radiation Safety (IR Emission)
The transmitter (ground unit) emits pulsed infrared optical radiation with a centre wavelength of 940nm. The receivers are optical sensors only and do not emit optical radiation.
INFRARED RADIATION IS EMITTED FROM THE TRANSMITTER OPTICAL APERTURES WHENEVER THE UNIT IS POWERED. Do not look into the transmitter emitter apertures at close range. IR emission at 940nm is invisible and does not trigger the blink or aversion reflex, so the eye receives no natural warning of exposure.
Why This Warning Is Given
Radiation at 940nm is outside the visible range. The protective mechanisms that limit exposure to bright visible sources — the blink reflex, pupil constriction, and the instinct to look away — are not triggered by an invisible source. Exposure time is therefore limited only by operator behaviour, which is why the precautions below are given as operating instructions and not left to the operator’s judgement.
The transmitter is a positioning beacon. It is not an illumination product and is not intended to be viewed at any time.
Operating Precautions
- Do not look directly into the transmitter emitter apertures from a distance of less than 1 metre while the unit is powered.
- Treat the transmitter as emitting whenever supply voltage is applied, including when no receiver is present and no positioning data is being transferred.
- Switch emission off before working directly in front of the transmitter. Use the Illumination parameter in ULS-Tools to disable emission, or disconnect supply power.
- Do not view the powered transmitter through binoculars, telescopes, camera lenses, magnifiers, or any other light-collecting instrument. Such optics concentrate the emission and can raise the exposure at the eye by orders of magnitude compared with unaided viewing.
- Do not add, remove, or modify optical elements of the transmitter. Added optics change the emission characteristics and invalidate any photobiological classification of the unit.
- Position the transmitter so that the emission field is directed away from work positions and walkways where personnel stay for extended periods.
- Servicing personnel working inside the emission field at close range should disable emission first rather than rely on viewing distance.
Classification and Applicable Standards
| Item | Value |
|---|
| Emitter type | Incoherent IR LED array (not a laser) |
| Centre wavelength | 940nm |
| Emission mode | Pulsed |
| Applicable standard | IEC 62471 / EN 62471, Photobiological safety of lamps and lamp systems |
| Classification distance | 200mm (non-GLS source, per IEC 62471) |
| Risk group | TBD — to be entered from the IEC 62471 assessment report |
| Hazard distance | TBD — to be entered from the IEC 62471 assessment report |
Table: Optical Radiation Safety Data
The transmitter uses light emitting diodes, not laser emitters. LED sources are assessed under IEC 62471; the laser product standard IEC 60825-1 does not apply to this product.
For a 940nm source the applicable exposure limits are the retinal thermal hazard (380nm to 1400nm), the retinal thermal hazard for a weak visual stimulus (780nm to 1400nm, which applies specifically to sources that give no visual cue), and the infrared hazard to the cornea and lens (780nm to 3000nm). The corneal and lens limits are intended for chronic exposures longer than 1000s at a daily averaged irradiance of 100 W/m² or more.
Organisations operating this equipment within the European Union are additionally subject to Directive 2006/25/EC on the exposure of workers to artificial optical radiation, which requires the employer to assess worker exposure against the exposure limit values given in Annex I of that directive. UAVLAS provides the emission data needed for that assessment on request.
System Overview
ULS-Heli-G3 is a generation 3 precision optical positioning system built around one ground transmitter and 2 equal-priority RXM receivers. The system supports redundant onboard sensing and MRX-based yaw estimation for platform-relative positioning and landing support.
Package Contents
- 1x Ground transmitter unit
- 2x RXM receiver units.
- 1x ULS-XX-USB-RS422 adapter (ground configuration)
- 2x ULS-XX-UART-RS422 onboard adapters (receiver-to-autopilot UART interface)
- Cables and mounting hardware
- Documentation package (may supply in online form )
Installation
Wiring Schematics
Figure: HL/XS G3 Ground-Side Wiring Schematic
Figure: HL/XS G3 Onboard Wiring Schematic
Transmitter Installation
Figure: ULSDV-HL-G3-TX Transmitter
Figure: ULSDV-HL-G3-TX Dimensions
- Mounting instructions: device can be mounter from top side or from bottom side. Use corresponding M3 screws to mount device on place. 3D model and pad example can be provided by UAVLAS under request.
- Orientation requirements: The device must be positioned with the optical elements facing upward. Make sure that no foreign objects obstruct the optical elements within the transmitter’s entire field of view.
Receiver Installation
Figure: ULSDV-HLXS-G3-RXM Receiver
Figure: ULSDV-HLXS-G3-RXM Dimensions
- Receivers location and orientation: The device must be positioned with the optical elements facing downward. Ensure that the optical elements are not obstructed by foreign objects within the transmitter’s entire field of view.
- Install the receivers at least 0.5 meters apart; this will ensure reliable operation in MRX mode even if one of the transmitters moves out of the system’s field of view.Typically, the first receiver (the one connected to the main autopilot) is located near the center of the landing point, and the second receiver is located at the tail. The maximum installation distance is 3 meters.
Configuration
Connecting Transmitter to PC
Use the ULS-XX-USB-RS422 adapter to connect the transmitter RS422 interface to a PC USB port for configuration and control via ULS-Tools software.
Figure: ULS-XX-USB-RS422 Ground Adapter
Figure: ULS-XX-USB-RS422 Adapter Pinout
Connecting Receiver to UART Autopilot
When the autopilot provides only a UART interface, use the ULS-XX-UART-RS422 onboard adapter between the receiver RS422 output and the autopilot UART port.
Figure: ULS-XX-UART-RS422 Onboard Adapter
Figure: ULS-XX-UART-RS422 Onboard Adapter Pinout
Receiver Pinout
ULSDV-HLXS-G3-RXM Receiver pinout information.
Figure: Receiver connector
| Pin | Function |
|---|
| 1 | + V supply +12V..+25V |
| 2 | C2H |
| 3 | C2L |
| 4 | GND - Ground connection |
| 5 | + V supply +12V..+25V |
| 6 | C1H |
| 7 | C1L |
| 8 | GND - Ground connection |
| 9 | + V supply +12V..+25V |
| 10 | RS422 Z |
| 11 | RS422 Y |
| 12 | RS422 A |
| 13 | RS422 B |
| 14 | GND - Ground connection |
| 15 | GND - Ground connection |
Table: ULSDV-HLXS-G3-RXM Connector Pinout
For receiver setup unscrew protection part to get access to usb connector.
Figure: Receiver USB connector
Due hardware limitation of current revision USB connector with thin shield required
Receiver case not sealed when USB cover removed.
Transmitter Pinout
ULSDV-HL-G3-TX Transmitter pinout information.
Figure: Transmitter connector
| Pin | Function |
|---|
| A | +V supply +18V…+27V |
| B | RS422 RX+ (A) |
| C | RS422 RX- (B) |
| D | RS422 TX+ (Y) |
| E | RS422 TX- (Z) |
| F | GND |
| G | C1L |
| H | C1H |
| J | GND |
| K | GND |
Table: Transmitter Connector Pinout (ULSDV-HL-G3-TX)
Do not connect or disconnect the transmitter interface under power unless approved by final hardware instructions.
ULS-Heli-G3 is currently in pre-production stage. Use ULS-Tools Beta for configuration and firmware update:
https://github.com/UAVLAS/ULSTools-Beta/releases/
Use the adapters listed in this manual to connect each device to a PC and complete configuration in ULS-Tools before field operation.
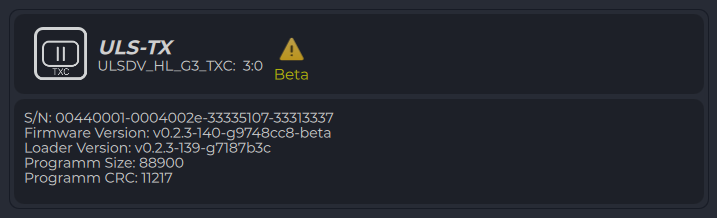
Figure: ULS-Tools Device Dashboard
- Connect the transmitter through the ULS-XX-USB-RS422 adapter.
- Open transmitter settings and verify communication parameters.
- Set required operating parameters and click Apply Config.
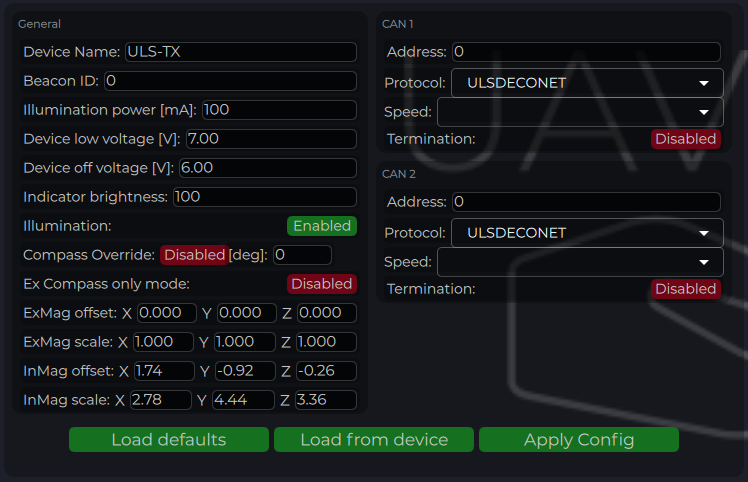
Figure: ULS-Tools Transmitter Configuration
| Parameter | Description |
|---|
| Device Name | Name shown for the transmitter in ULS-Tools. |
| Beacon ID | Transmitter iD to be transmitter to receiver over R signal (functionality under request) |
| Device Illumination Power | IR emitter power scaling (100 for nominal operation). |
| Device Low Voltage | Voltage level where low-voltage warning is activated. |
| Device Off Voltage | Voltage level where IR emitters are disabled to prevent over-discharge. |
| Indicator Brightness | Brightness level of the transmitter status LED indicator. |
| Illumination | Enables or disables transmitter emission during configuration and operation. |
| Compass Override [deg] | Fixed heading override for installations that require manual heading alignment. |
| External Compass Only | Forces system to use only external compass data when enabled. |
| Magnetometer Offset/Scale | Calibration values for internal or external (“Ex”) magnetometer. |
| CAN Address/Speed | CAN bus node address and bitrate settings. |
| CAN Protocol | Protocol selection (ULS DECENT with ULSBlitz messages supported) Custom protocols are possible |
| CAN Termination | If system has inbuilt termination resistor this option can activate it |
Table: Transmitter Configuration Parameters
- Connect each receiver and configure one at a time.
- Set UART protocol/baud rate to match autopilot serial configuration.
- For dual-receiver installation, verify MRX-related parameters and offsets.
- Click Apply Config after each update.
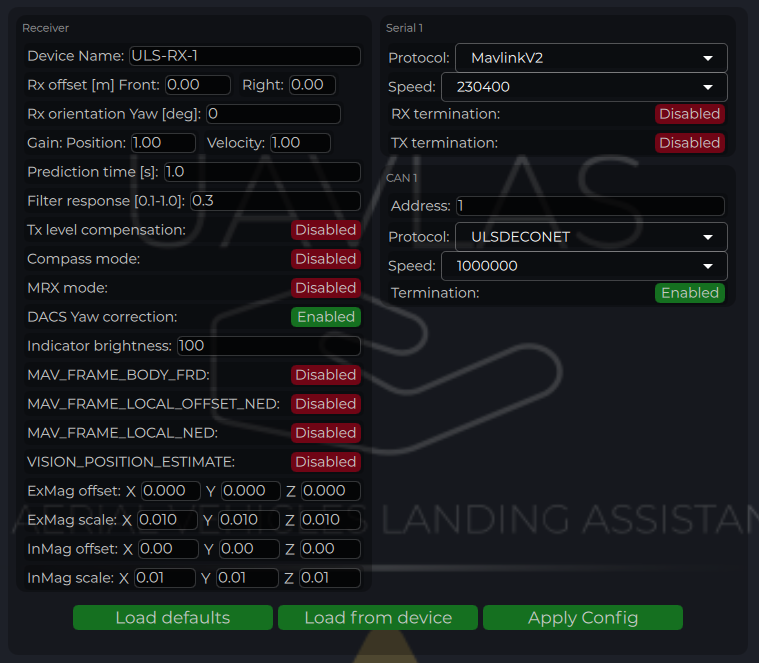
Figure: ULS-Tools Receiver Configuration
| Parameter | Description |
|---|
| Device Name | Name shown for the receiver in ULS-Tools. |
| Receiver Offset (Front, Right) [m] | Receiver position relative to vehicle reference point for MRX/yaw calculations. |
| Rx orientation | Receiver YAW installation orientation relative to vehicle front |
| Prediction Time [s] | Position prediction window used to smooth short signal interruptions. |
| Filter Response | Receiver position filter response tuning (higher is faster, lower is smoother). |
| Tx Level Compensation | Compensation for transmitter pan/tilt motion on moving platforms. |
| Compass Mode | Enables use of ground compass data in receiver calculations. |
| MRX Mode | Enables dual-receiver mode for yaw and redundancy features. |
| DACS Yaw Correction | Disable and enable Distance and Azimuth Correction System |
| Indicator Brightness | Brightness level of receiver status indicator. |
| Magnetometer Offset/Scale | Calibration values for internal or external (“Ex”) magnetometer. (under implementation) |
| CAN Address/Speed | CAN bus node address and bitrate settings. |
| CAN Protocol | Protocol selection (ULS DECENT with ULSBlitz messages supported) Custom protocols are possible |
| CAN Termination | If system has inbuilt termination resistor this option can activate it |
| UART Protocol | Protocol selection for autopilot communication (for example MavlinkV2). |
| UART Baud Rate | Serial baud rate; must match autopilot serial port settings. |
| UART Termination | If system has inbuilt termination resistor this option can activate it |
Table: Receiver Configuration Parameters
Compass Calibration (Ground Unit)
After installation, check compass behavior and perform calibration if required.
- Press Reset calibrations.
- Rotate the ground unit through multiple orientations to fill calibration charts.
- Press Apply calibration and Apply Config.
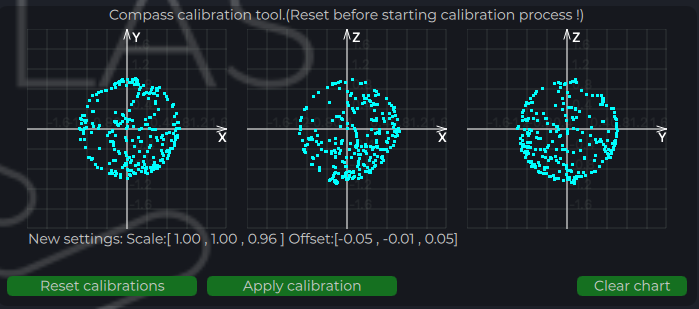
Figure: ULS-Tools Compass Calibration
- Confirm live device telemetry is visible in charts.
- Verify stable IMU and system parameter traces before flight tests.
- Confirm receiver link and valid position updates prior to autopilot integration tests.
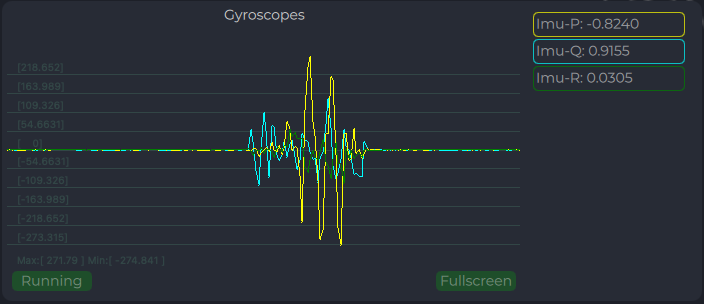
Figure: ULS-Tools System Parameters Chart
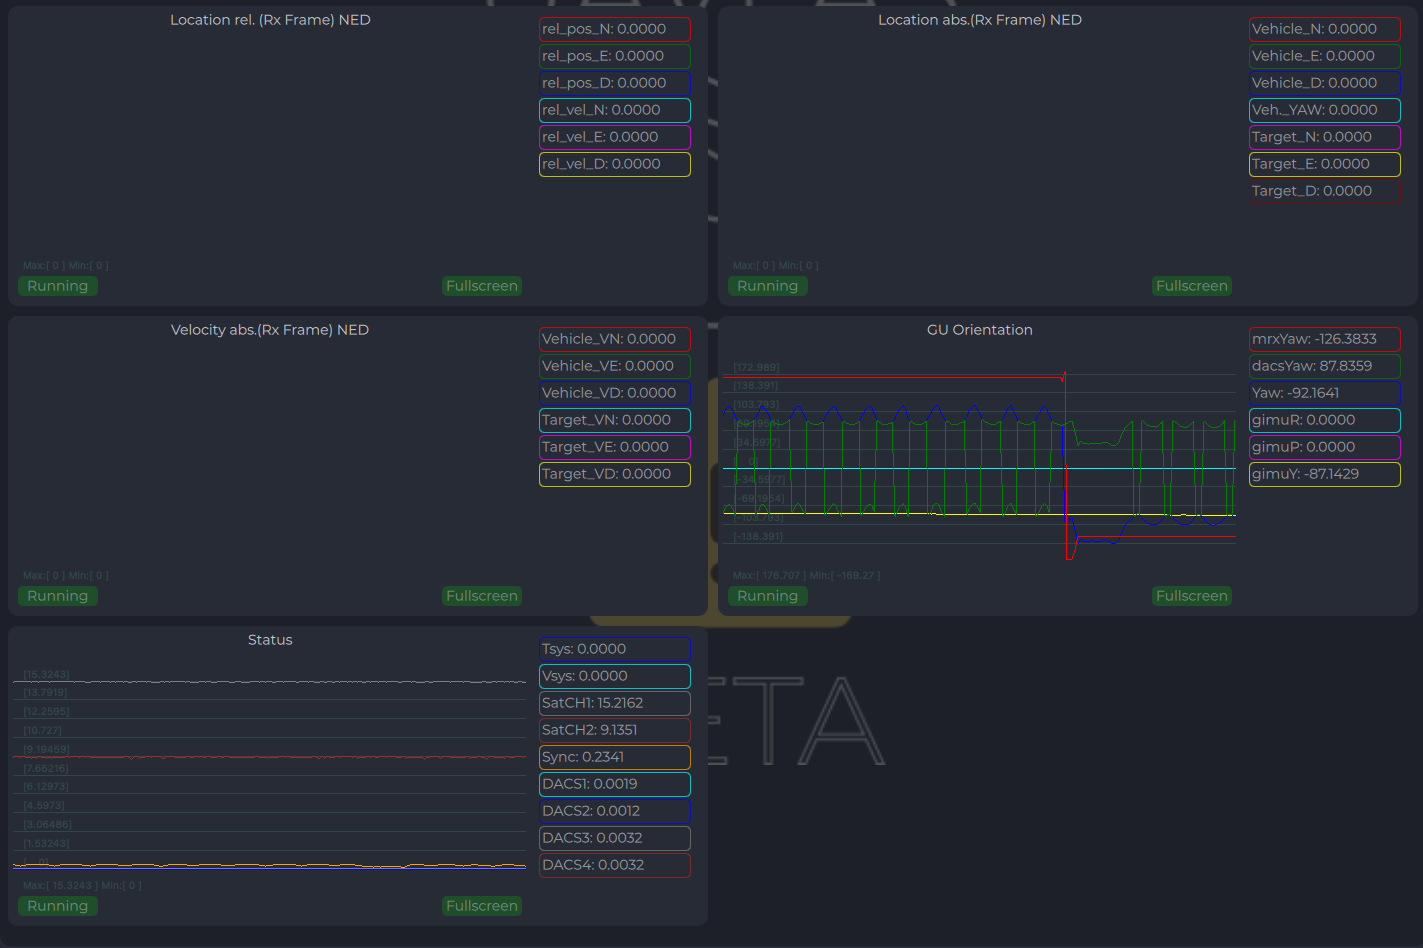
Figure: ULS-Tools Receiver Charts
Integration Instructions for Ardupilot Based Systems
Preparing for Integration
- Download the latest version of ULS-Tools (Beta). It is recommended to connect all devices to a PC and update firmware for all UAVLAS devices before proceeding.
- Update the autopilot to the latest Arducopter version.
- Configure the transmitter in ULS-Tools
- Configure both receivers in ULS-Tools
The system communicates with Ardupilot using the MavlinkV2 protocol (supports MAV_FRAME_BODY_FRD).
Autopilot Configuration
Setup PLND Section
| Param | Value | Comment |
|---|
| PLND_ENABLED | 1 | Enable the precision landing module |
| PLND_TYPE | 1 | Use type = 1 to enable UAVLAS sensor over the companion computer driver |
Table: Ardupilot PLND Section Parameters
All other PLND parameters should remain at defaults, or be set according to your vehicle requirements.
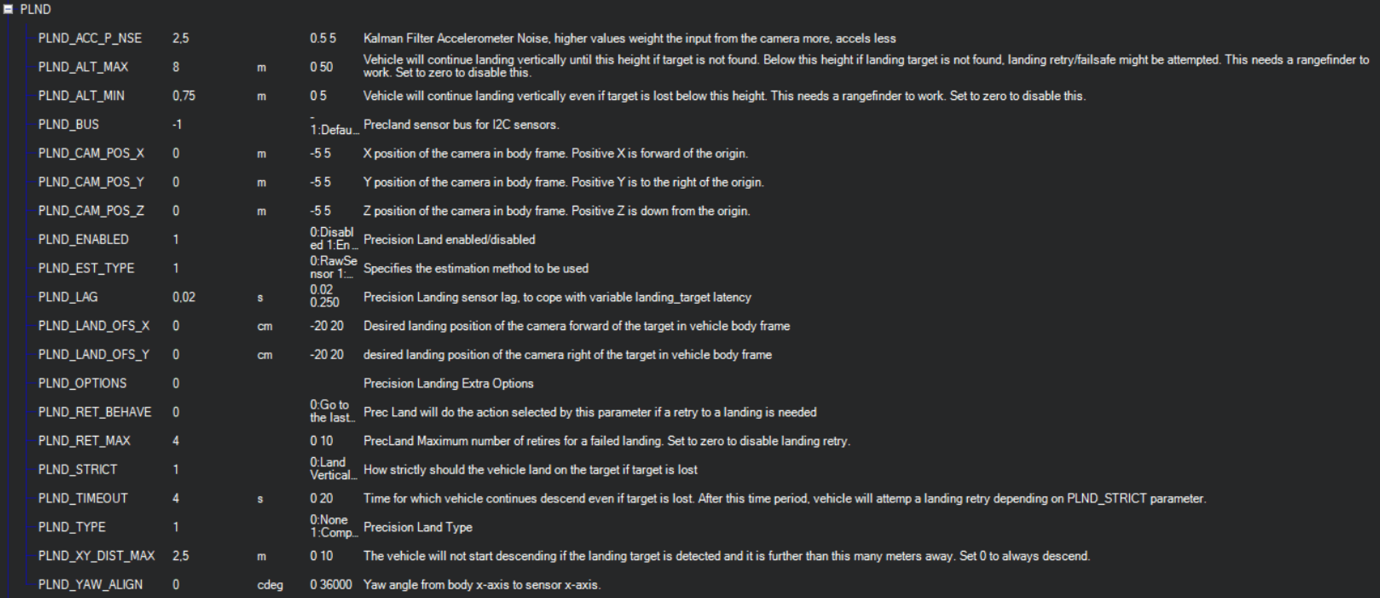
Figure: PLND Configuration Example
It is recommended to test several Kalman filter options during test flights (or switch it off) to achieve the best performance.
Set Up Serial Communication in SERIALx Section
| Param | Value | Comment |
|---|
| SERIAL2_BAUD | 230 | Baud rate — must match the receiver UART baud rate setting |
| SERIAL2_OPTIONS | 0 | Default |
| SERIAL2_PROTOCOL | 2 | MAVlink2 protocol |
Table: Ardupilot SERIALx Section Parameters
Set up serial stream rates in the SRx section. The sensor requires the following data from the autopilot:
| Param | Value | Comment |
|---|
| SR2_EXTRA1 (or MAV2_EXTRA1) | 20 | Attitude stream at 20 Hz — required for compass mode yaw orientation |
| SR2_POSITION (or MAV2_POSITION) | 20 | Optional — Vehicle LOCAL_POSITION_NED stream at 20 Hz for absolute target position calculation |
Table: Ardupilot SRx Stream Rate Parameters
Check Setup
When configuration and wiring are correct, GPS is available, and the receiver is in the field of view of the transmitter, you will see the LANDING_TARGET MAVLink message in the MAVLink Inspector (Mission Planner example shown):
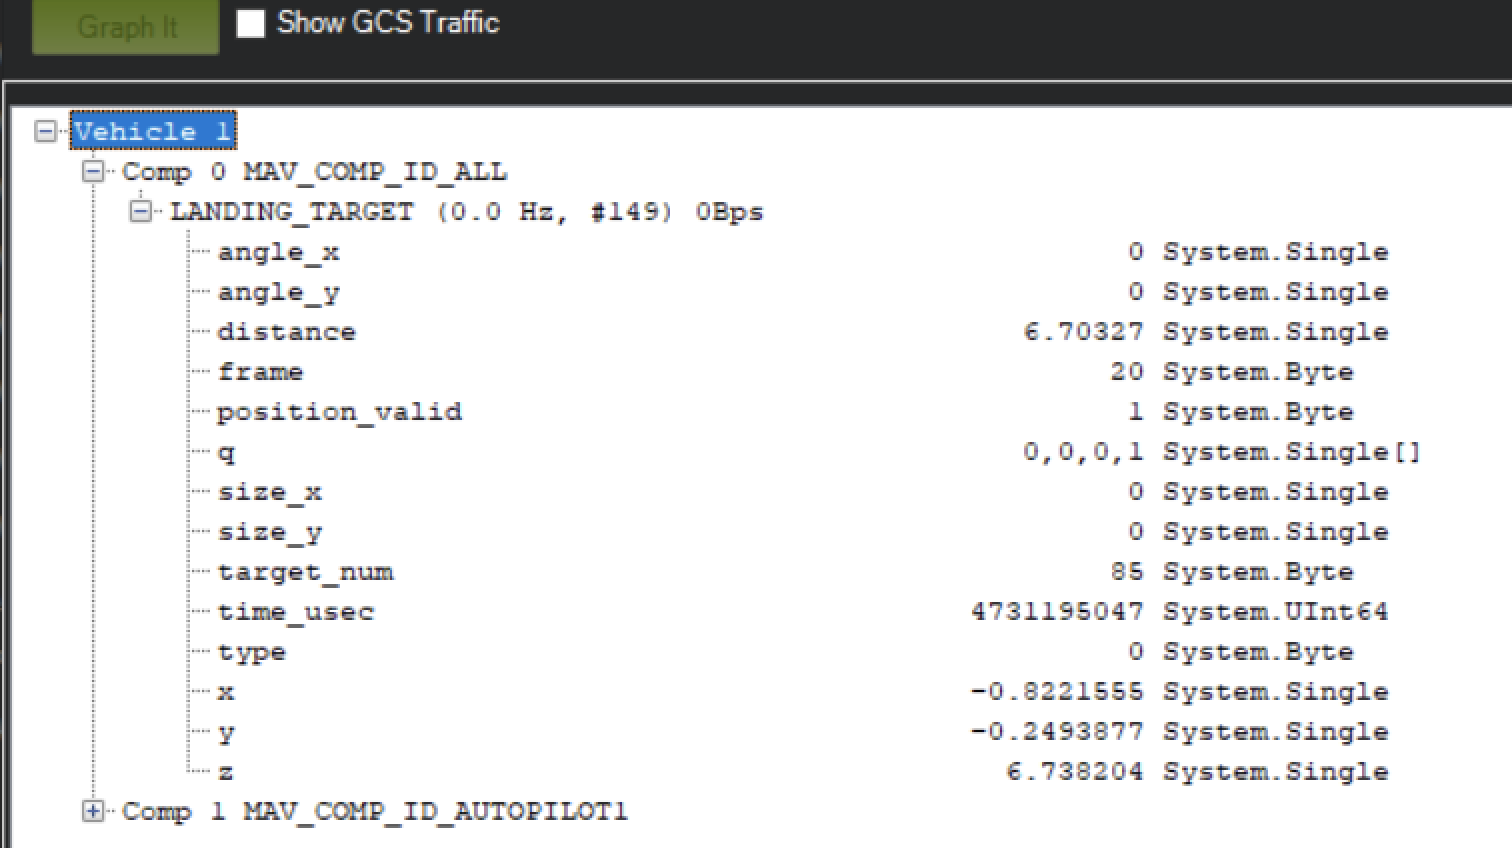
Figure: LANDING_TARGET Message in MAVLink Inspector
Setup Precision Loiter Mode
Attach any unused switch to the PrecLoiter option to enable precision loiter mode:
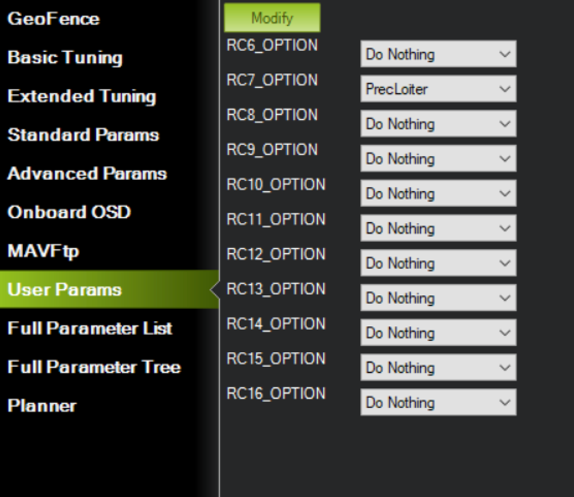
Figure: PrecLoiter Switch Configuration
Activate the switch and confirm messages “PrecLoiter: LOW” and “PrecLoiter: HIGH” appear. After a test flight above the target, check telemetry for PL offset data.
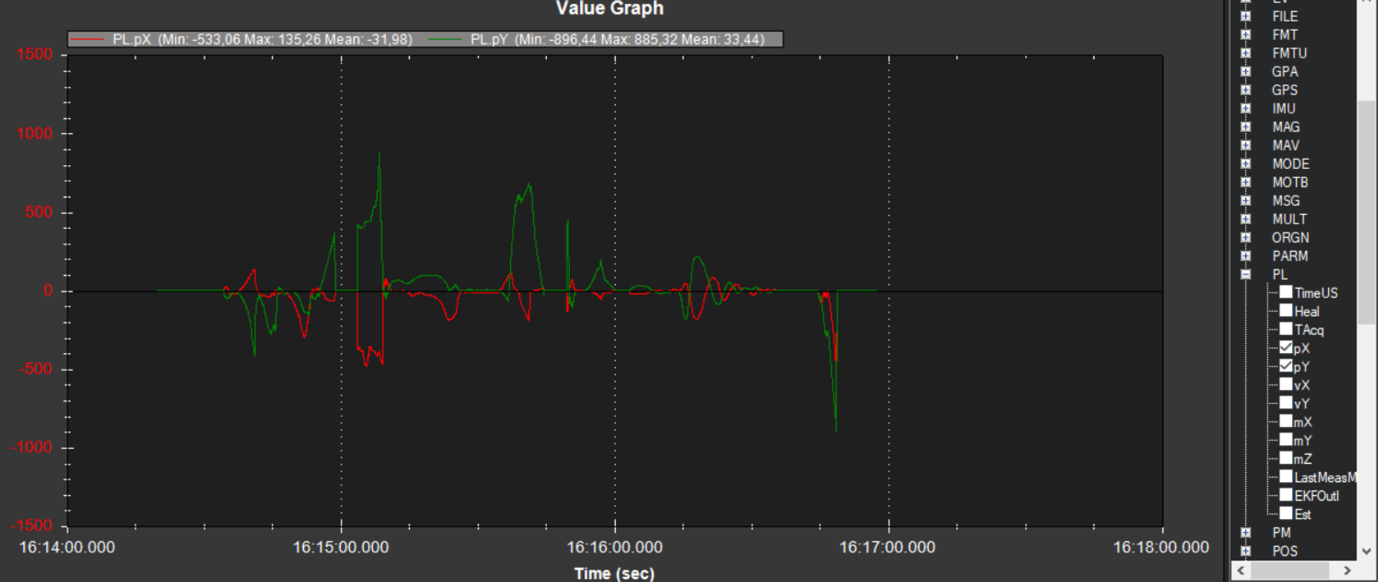
Figure: Telemetry Data Showing PL Offsets
PID Tuning
In case of oscillations or instability during landing, check the PID parameters in Ardupilot Extended Tuning.
It is recommended to tune Position XY, Velocity XY, and Loiter Speed for the best performance:
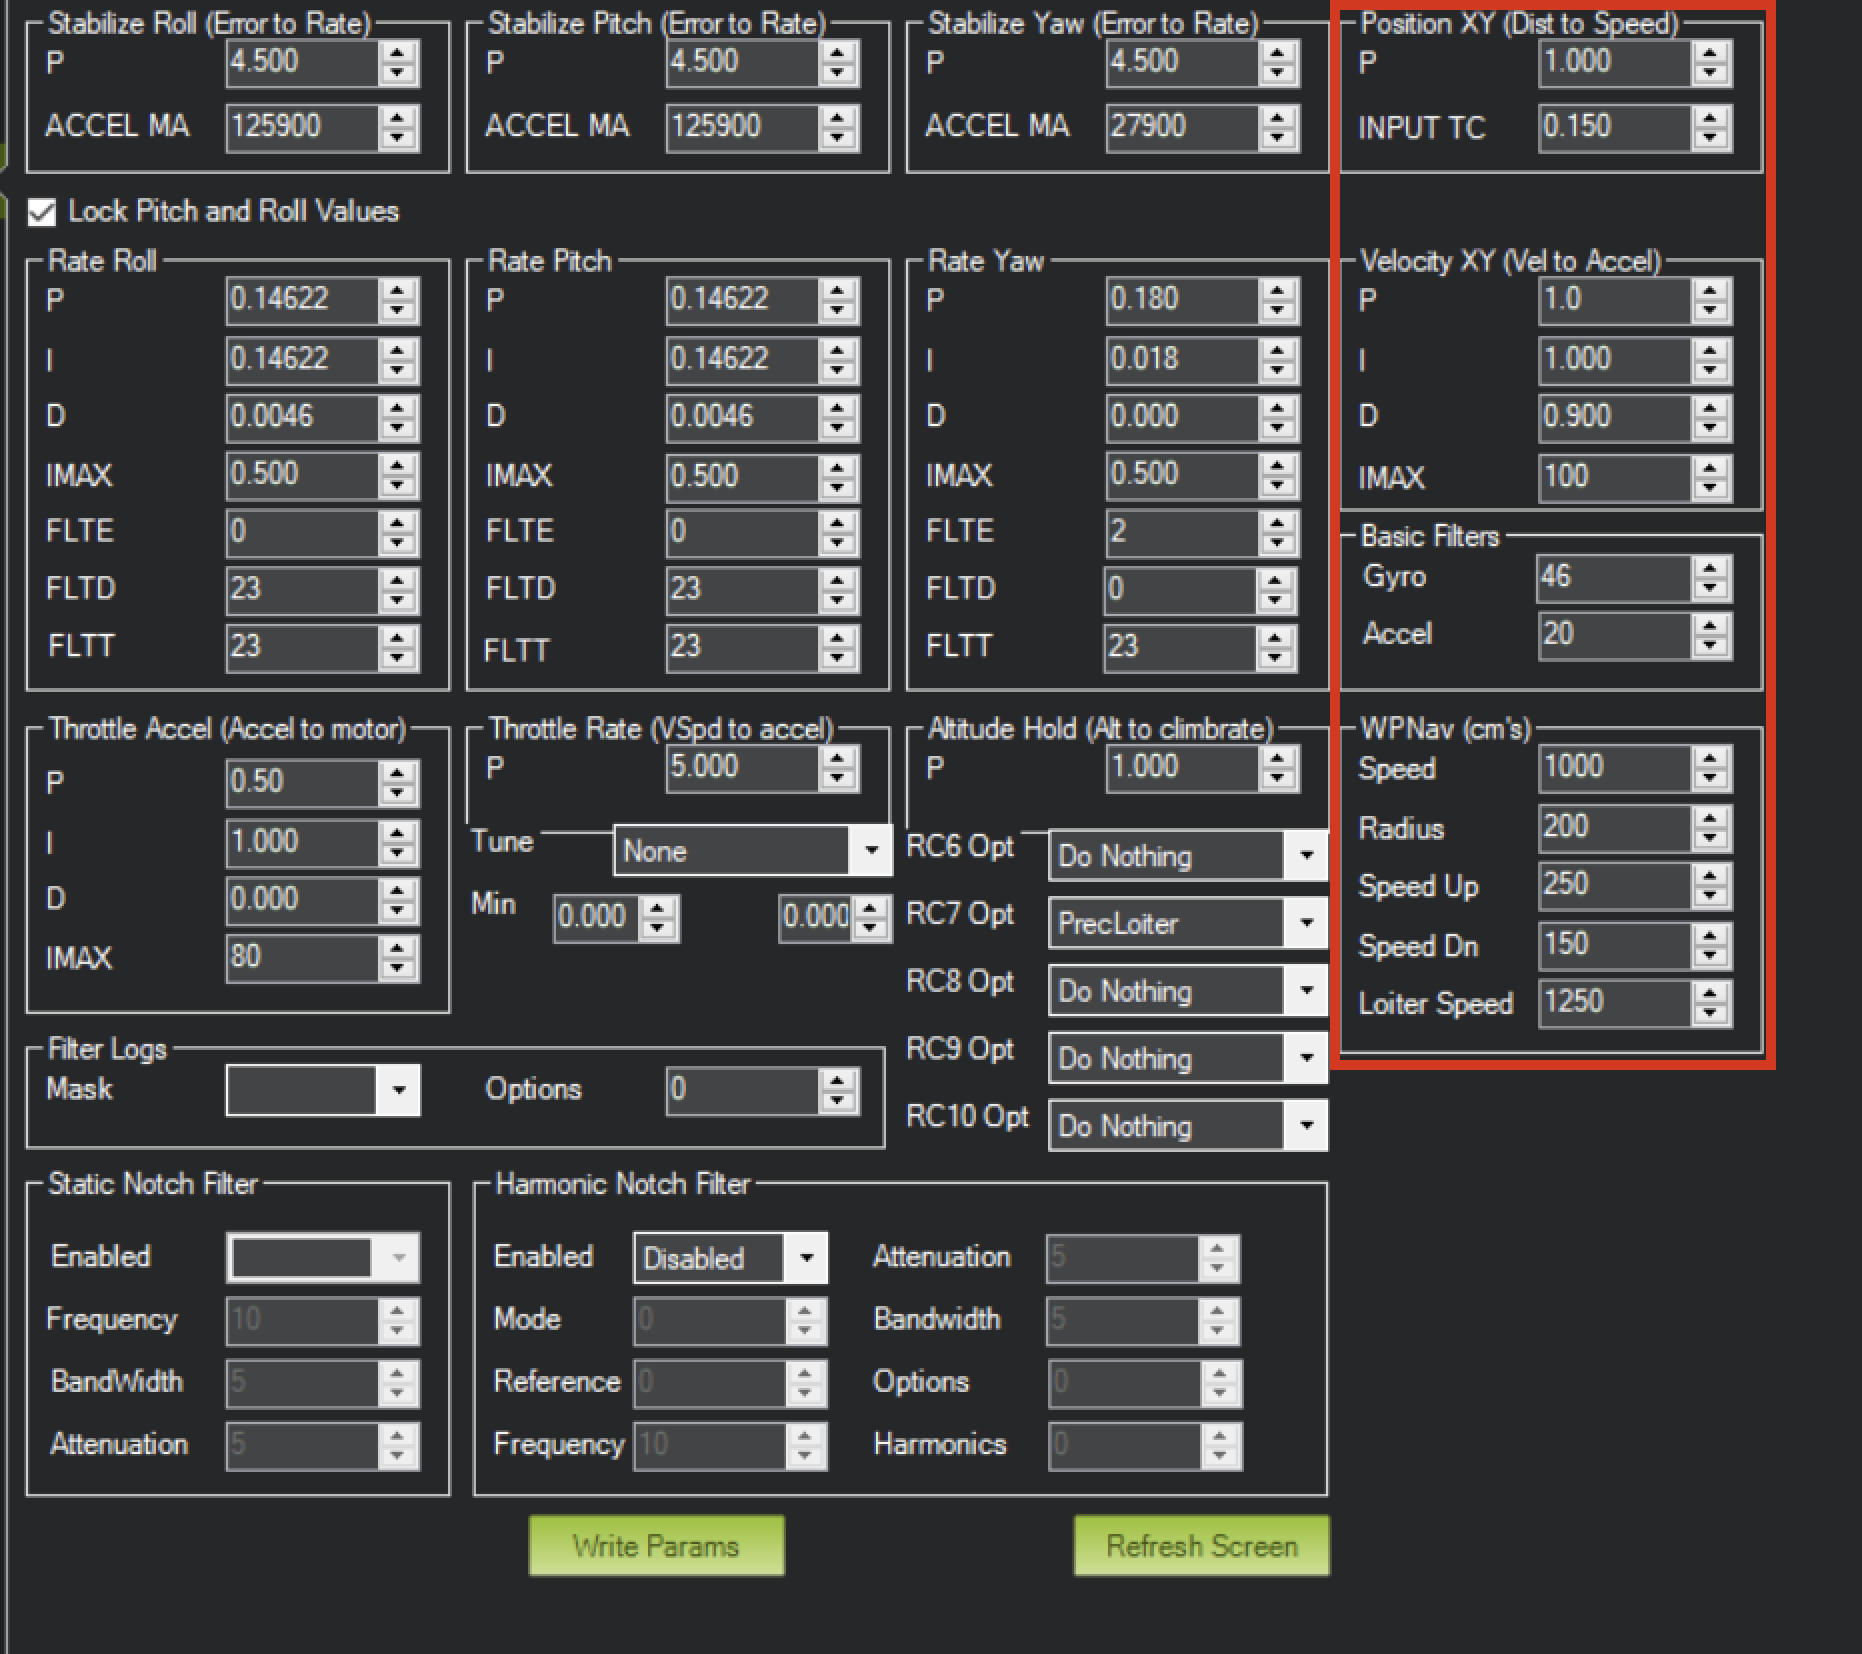
Figure: Ardupilot Extended Tuning Parameters
Settings of Velocity XY P = 0.8, I = 0.2, D = 0.6 have worked well for some customers as a starting point.
It is recommended to start PID testing and performance validation in Precision Loiter mode before enabling full precision landing.
For additional information, see the Ardupilot documentation at https://ardupilot.org/ardupilot/
Integration Instructions for PX4 Based Systems
Preparing for Integration
- Download the latest version of ULS-Tools (Beta). It is recommended to connect all devices to a PC and update firmware for all UAVLAS devices before proceeding.
- Update the autopilot to the latest PX4 version.
- Configure the transmitter in ULS-Tools.
- Configure both receivers in ULS-Tools.
The system communicates with PX4 using the MavlinkV2 protocol (supports MAV_FRAME_LOCAL_NED).
Values are provided as an example (Pixhawk4-mini AP):
| PX4 Parameter | Value | Comment |
|---|
| MAV_1_CONFIG | TELEM/SERIAL4 | Requires reboot to apply the next parameters |
| MAV_1_FORWARD | Enabled | Forward MAVLink messages |
| MAV_1_MODE | Onboard | Set link mode to onboard |
| SER_TEL4_BAUD | 460800_8N1 | Must match the UART baud rate set in the receiver configuration |
Table: PX4 Autopilot Configuration Parameters
Running and Testing
After configuration and wiring, power up the drone and transmitter. In QGroundControl, go to Analyze Tools → MAVLink Inspector and check for the LANDING_TARGET MAVLink message.
If the vehicle is providing a LOCAL_POSITION_NED message to the UAVLAS system and is hovering over the beacon, the field position_valid = 1 will appear in LANDING_TARGET.
To perform precision landing, create a flight plan and enable the Precision Landing option on the landing waypoint.
LANDING_TARGET may be unavailable when connected over USB. Use a telemetry channel (UART modem, etc.) to connect the drone to QGroundControl during testing.
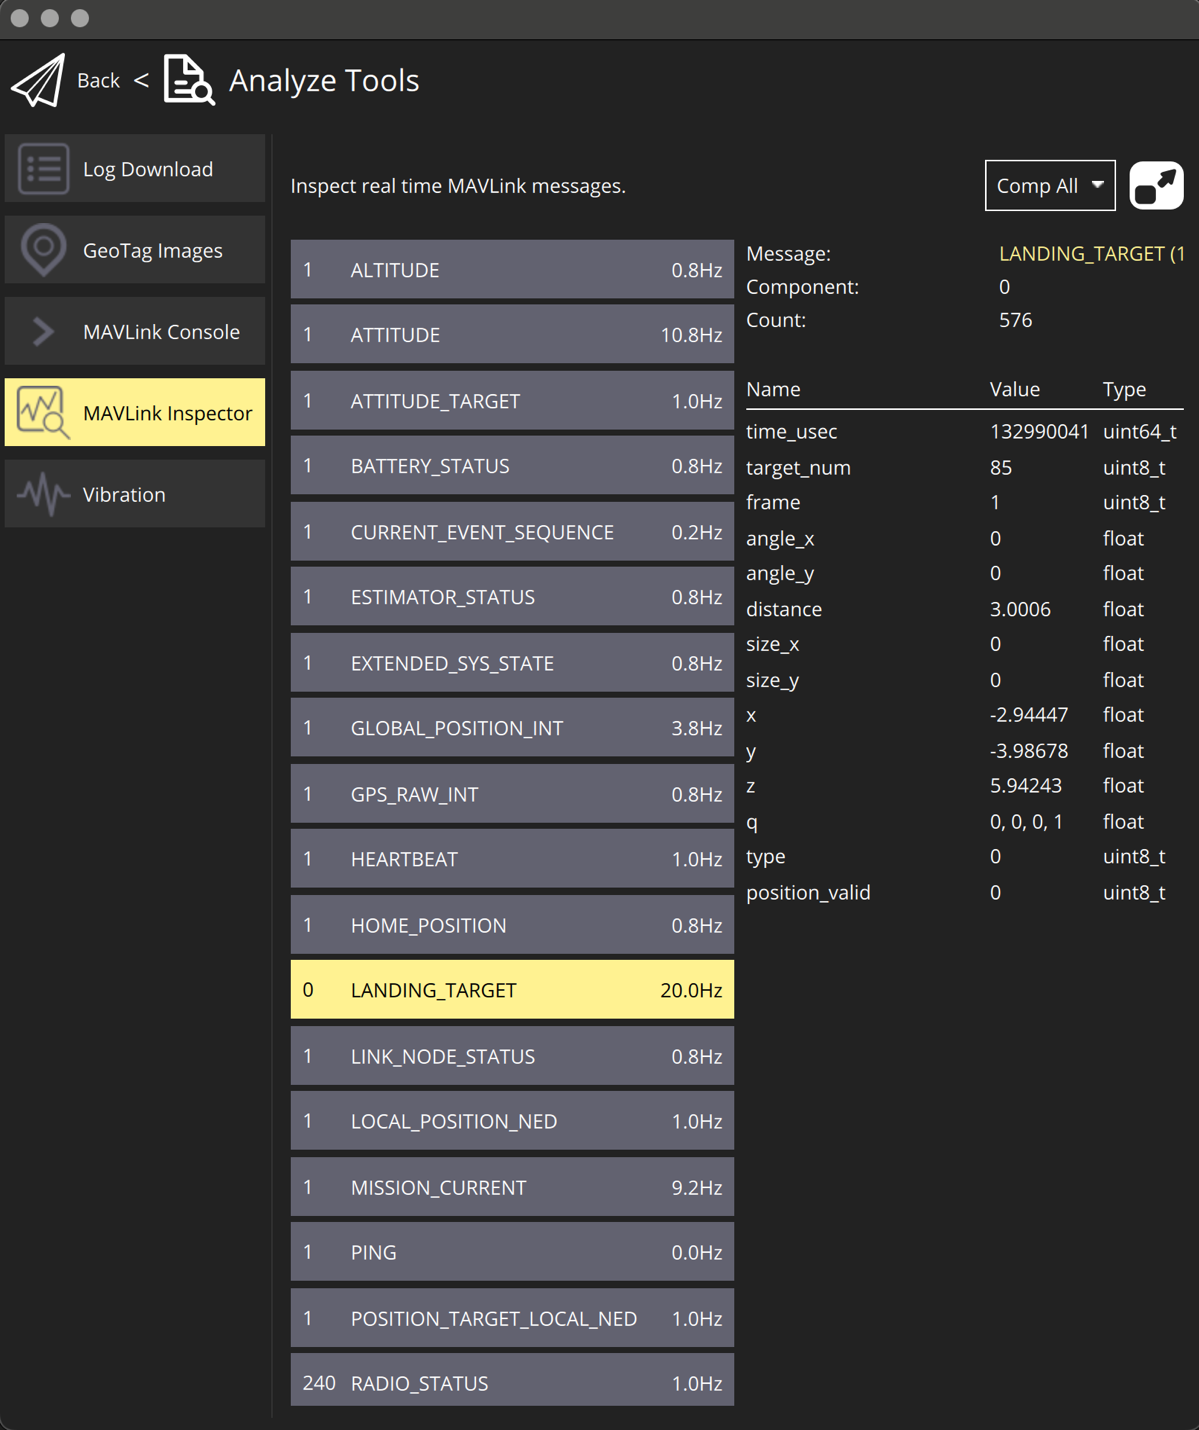
Figure: LANDING_TARGET Message in QGroundControl
For additional information, see the PX4 documentation at https://docs.px4.io/main/en/
Operating Instructions
- Power sequence: Power device after all connectors are plugged in before powering.
- Link check procedure: Link can be checked from the configuration system during system installation, as well as during operation using a third-party device via the appropriate protocols.
- Landing and approach operation notes: The vehicle’s control system independently decides on the appropriate action based on the status of the landing system. The UAVLAS system acts as a sensor—the procedure for handling abnormal situations during operation remains the responsibility of the unmanned vehicle’s control system.
- Equal-priority RXM behavior in MRX mode: Both receivers have the same priority, and either one can be used to receive system status data.
Service and Support
The device requires no maintenance throughout its service life.
Appendices
Technical Reference
| Parameter | Value |
|---|
| Distance range (m) | 30m…50m |
| Working angle (deg) | 60 |
| Data update frequency (Hz) | 20 |
| Receiver architecture | 2 identical RXM receivers with same priority |
| Redundancy mode | Dual-RXM redundancy |
| MRX yaw estimation method | Triangular method |
Table: Common Specification
| Parameter | Value |
|---|
| Field of view (deg) | 95 |
| Dimensions (mm) | 50x54 |
| Weight (g) | 50 |
| Power consumption (W) | 10 |
| Supply voltage (V) | +12V…+24V |
| Interfaces | CAN,USB,RS422 |
Table: ULSDV-HLXS-G3-RXM Receiver Specifications
| Parameter | Value |
|---|
| Field of emitting (deg) | 30 (60 in Wide Field) |
| Dimensions (mm) | 254 x 214 |
| Weight (g) | 1960 |
| Power consumption (W) | 20W |
| Supply voltage (V) | +18V..+24V |
| Interfaces | CAN, RS422 |
Table: ULSDV-HL-G3-TX Transmitter (Ground) Specifications
Change Control
All changes to this document must be reviewed and approved by the relevant technical leads and stakeholders
References
- ULSDC-PBDS110426-ULS-Heli-G3-Datasheet
- ULSDC-PBICD110426-ULS-Heli-G3-ICD