ULS-XSpot Operational Manual
ULSDC-PBOM231125 · version 1.0.1 · issued November 23, 2025
The numbered PDF is the controlled copy: download it from the portal.
Introduction
Purpose
This operational manual provides comprehensive guidance for operating the ULS-XSpot precision positioning system for tethered drone operations. It covers system setup, configuration, operation procedures, troubleshooting, and maintenance for safe and effective use of the system.
Scope
This manual is intended for operators, technicians, and engineers responsible for deploying and operating ULS-XSpot systems in tethered drone applications. It assumes basic familiarity with drone operations and autopilot systems.
About ULS-XSpot
The ULS-XSpot is a precision optical positioning system specifically designed for tethered drone operations. Key features include:
- 50-meter operational range - Covers typical tethered operating heights
- Tether-compatible transmitter - Center hole for cable passage
- Sub-5cm positioning accuracy - Precision positioning and landing (at touch point)
- 20Hz update rate - Real-time position feedback
- 24/7 operation capability - Continuous operation with tethered power
Safety Warnings
⚠️ WARNING: Always follow safety procedures when operating tethered drone systems.
⚠️ CAUTION: Ensure tether cable is properly routed through transmitter center hole to avoid optical path obstruction.
⚠️ NOTICE: Regular inspection of tether routing is required to maintain optimal system performance.
System Overview
System Components
Transmitter (Ground Unit - Tethered Design)
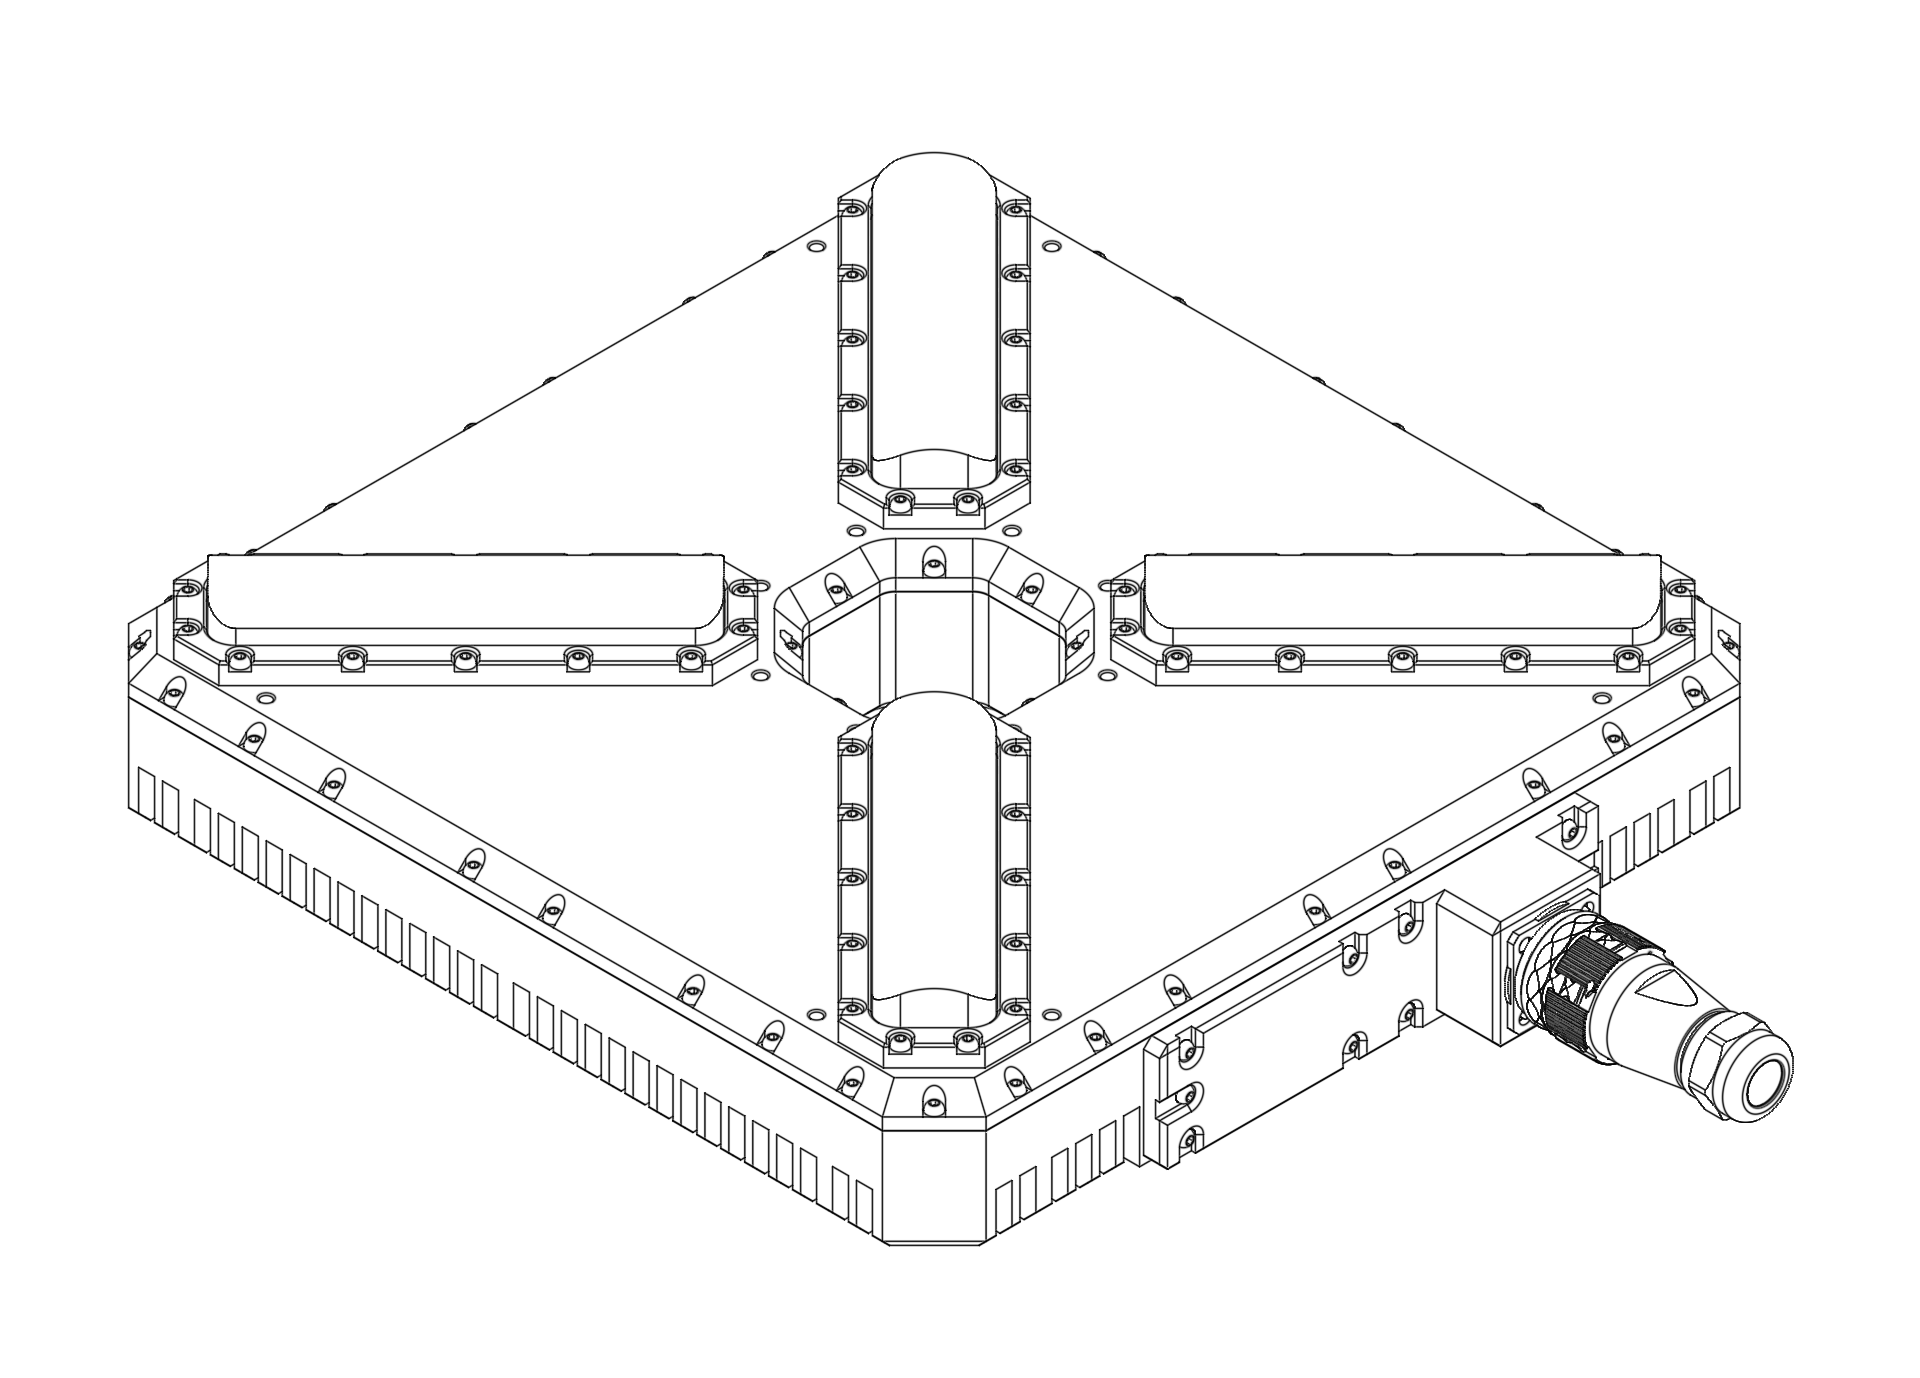
Figure: ULS-XSpot Transmitter with Center Tether Hole The ULS-XSpot transmitter is specifically designed for tethered drone systems. It features a center hole for tether passage, allowing the drone’s power and data cable to pass through while maintaining optical positioning capabilities. The transmitter is placed on the ground (platform, moving object) and emits a signal in the Infrared range, serving as a positioning beacon for tethered drone landing and station-keeping.
The primary function of the transmitter is to continuously send out a coded signal that can be detected and interpreted by the receiver unit onboard the tethered copter. This signal contains critical information needed for the operation of the system, such as positional data and status. The tethered design allows for extended flight duration while maintaining precision positioning.
Key Features:
- Center hole for tether cable passage (integrated tether management)
- Working range: 50 meters working distance
- Optimized for tethered drone operations
- Continuous power available via tether connection
Receiver (Onboard Unit)
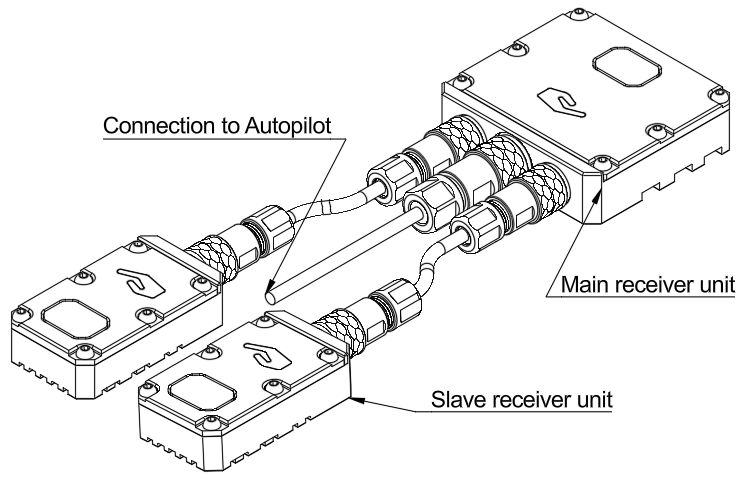
Figure: ULS-XSpot Receiver The receiver is a device that is placed on board the tethered aircraft. The receiver decodes the IR signal to derive flight information such as positional coordinates, real-time transmitter status updates, and positioning guidance. It interprets the data to navigate accurately and ensure the drone maintains its position relative to the ground station. It provides feedback to autopilot systems, such as Ardupilot and PX4, to adjust the flight parameters as needed for optimal station-keeping, landing, or hovering operations while connected to the tether.
Key Features:
- Compatible with tethered drone configurations
- Real-time position feedback for station-keeping
- Seamless integration with tether management systems
What’s in the Box
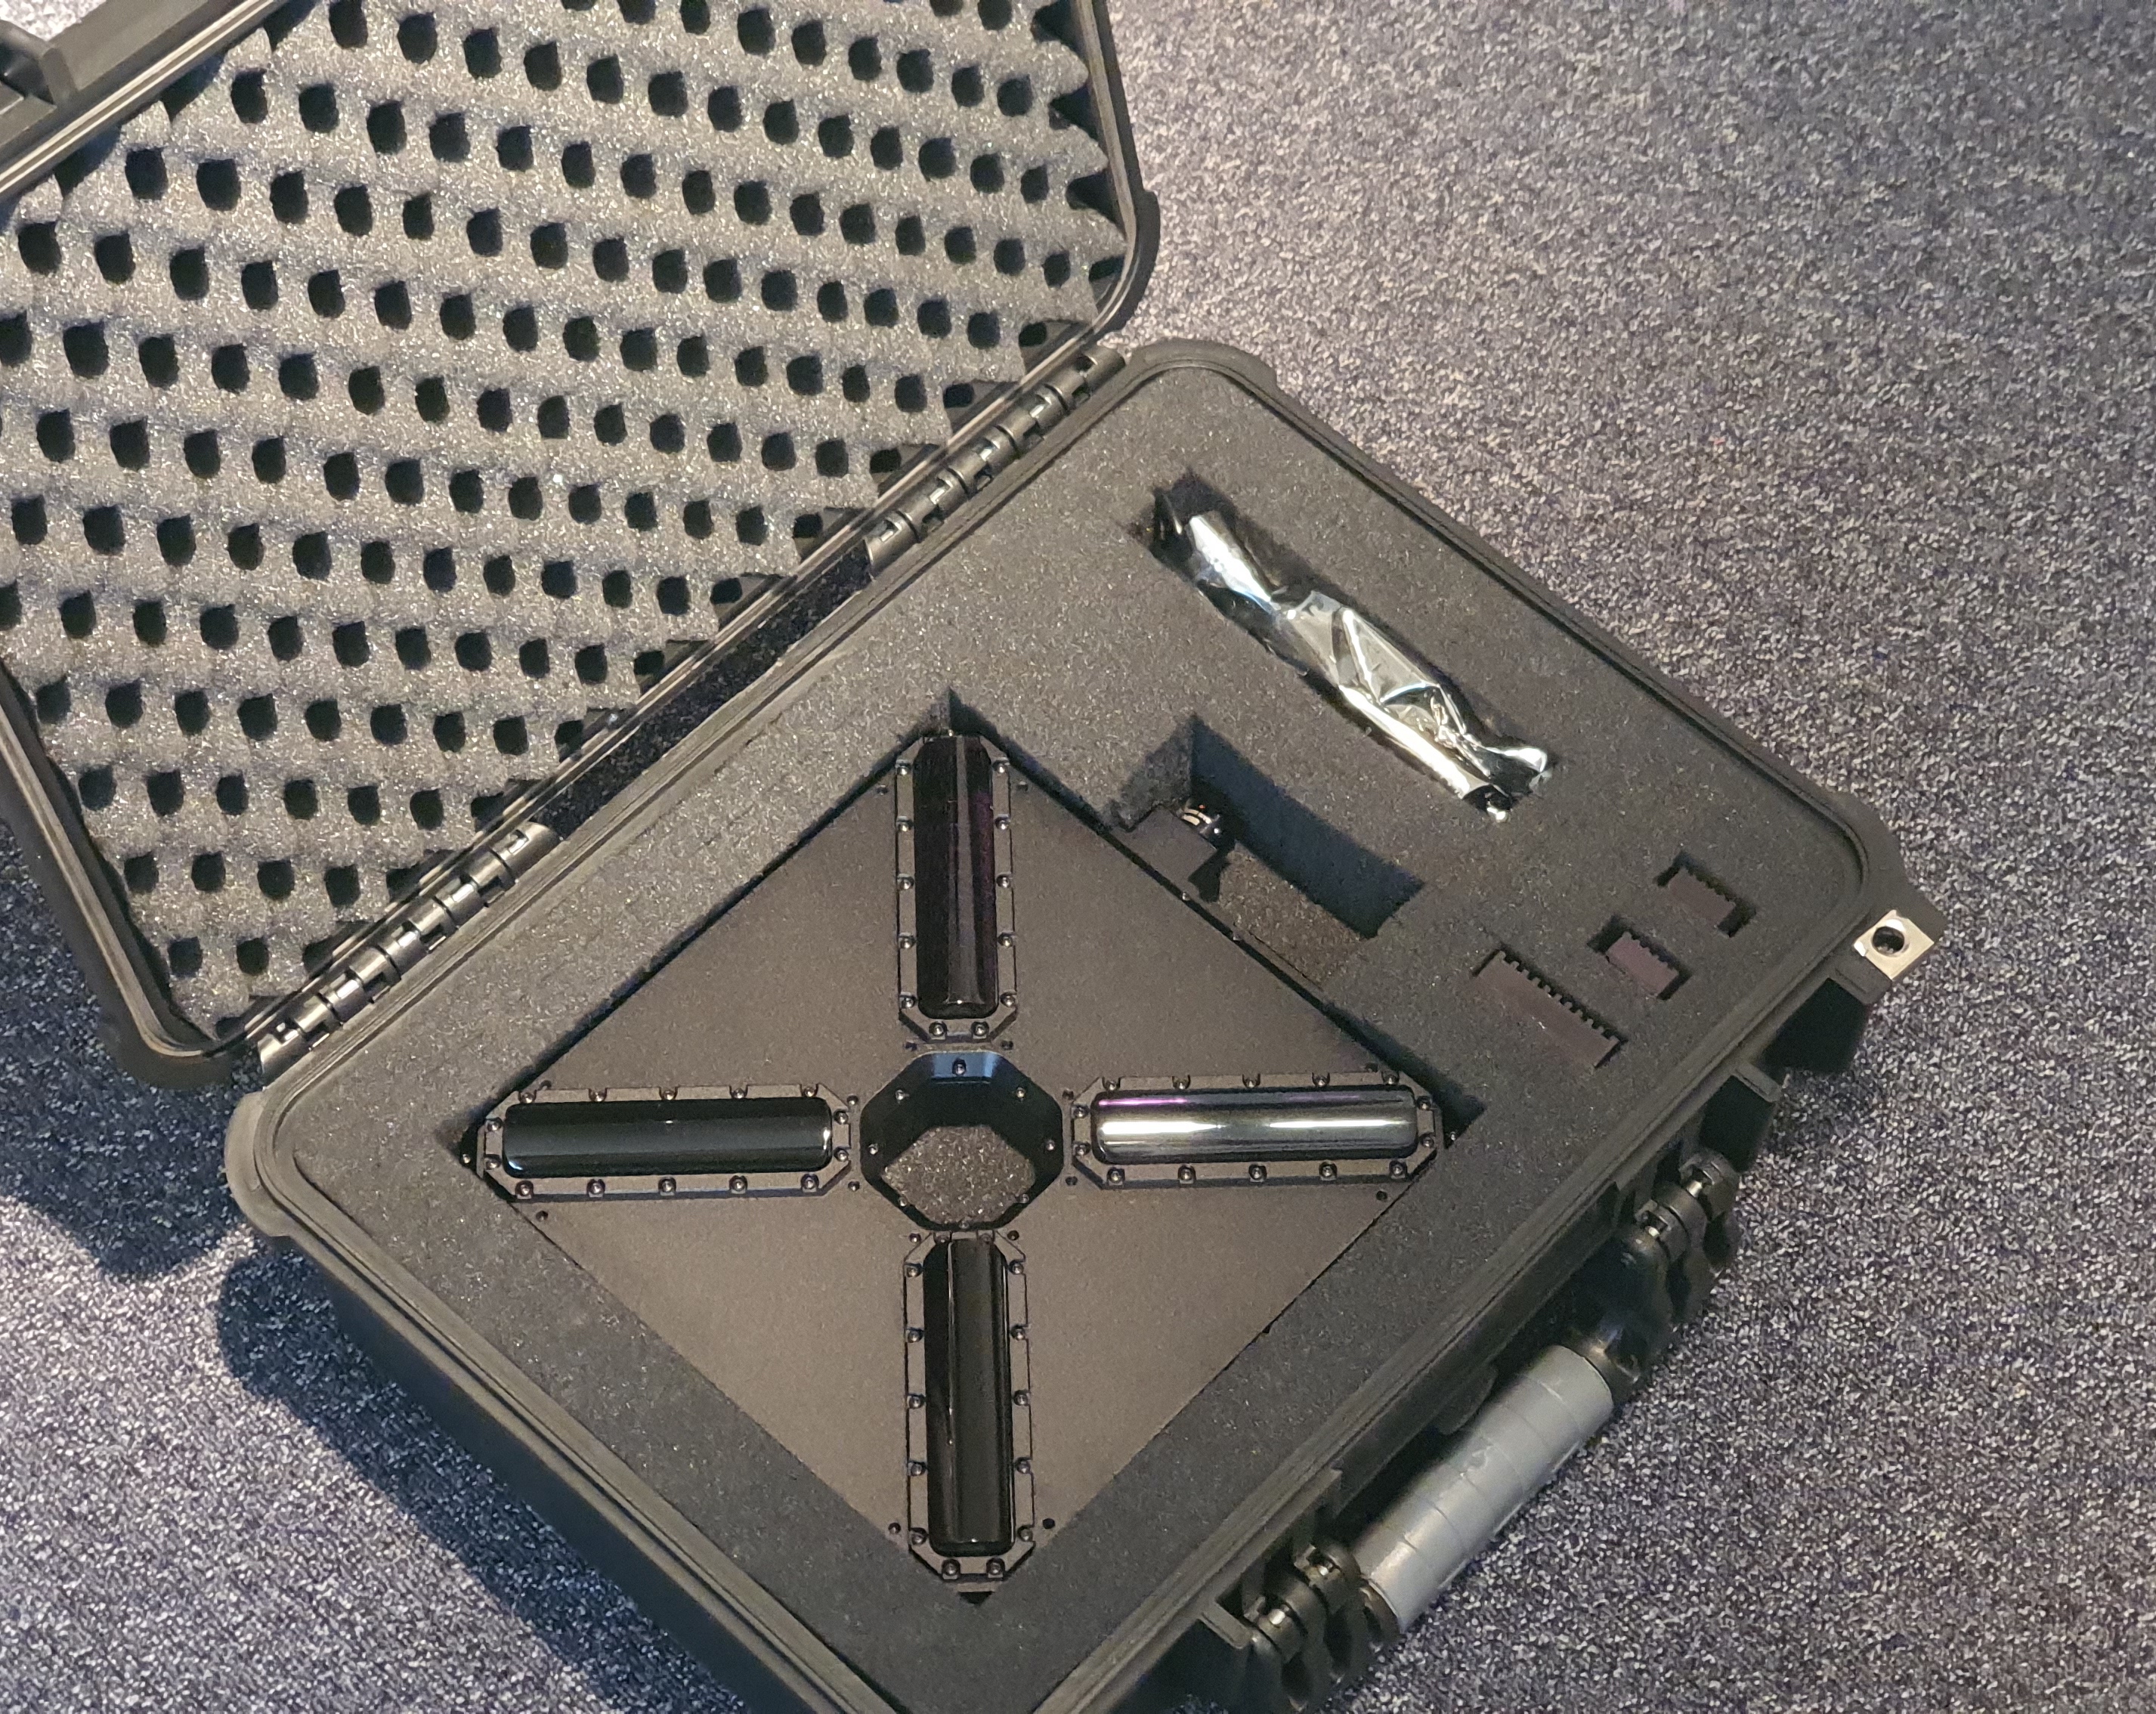
Figure: ULS-XSpot System Package
The ULS-XSpot system is packaged in a protective hard case designed for field deployment in tethered drone operations.
Package Contents
- 1x Transmitter unit (with center tether hole)
- 1x Master receiver unit
- 2x Slave receiver units
- Connection cables
- Mounting hardware
- Quick start guide
- USB configuration cable
Package Specifications
| Parameter | Value |
|---|---|
| Case Type | Hard protective case |
| Dimensions (LxWxH) | Approx. 450 x 350 x 200 mm |
| Weight (with equipment) | Approx. 6 kg |
Table: Package Specifications
Pre-Operation Checklist
Before operating the ULS-XSpot system, verify the following:
- All system components are present and undamaged
- Transmitter is securely mounted at ground station
- Tether cable is properly routed through transmitter center hole
- Receivers are properly mounted on aircraft
- All electrical connections are secure
- Power supply to transmitter is within specification (22-26V DC)
- Receiver power from flight controller is stable (5V DC)
- Autopilot is configured for precision landing
- Weather conditions are within operational limits
- Operating area is clear of obstacles
- Tether management system is operational
Installation and Setup
Ground Station Setup
Step 1: Transmitter Mounting
- Select mounting location at tether launch/recovery point
- Ensure clear line-of-sight to expected aircraft operating area
- Route tether cable through center hole of transmitter
- Secure transmitter using 16 mounting holes
- Install strain relief above and below transmitter
- Verify 10cm minimum clearance around transmitter
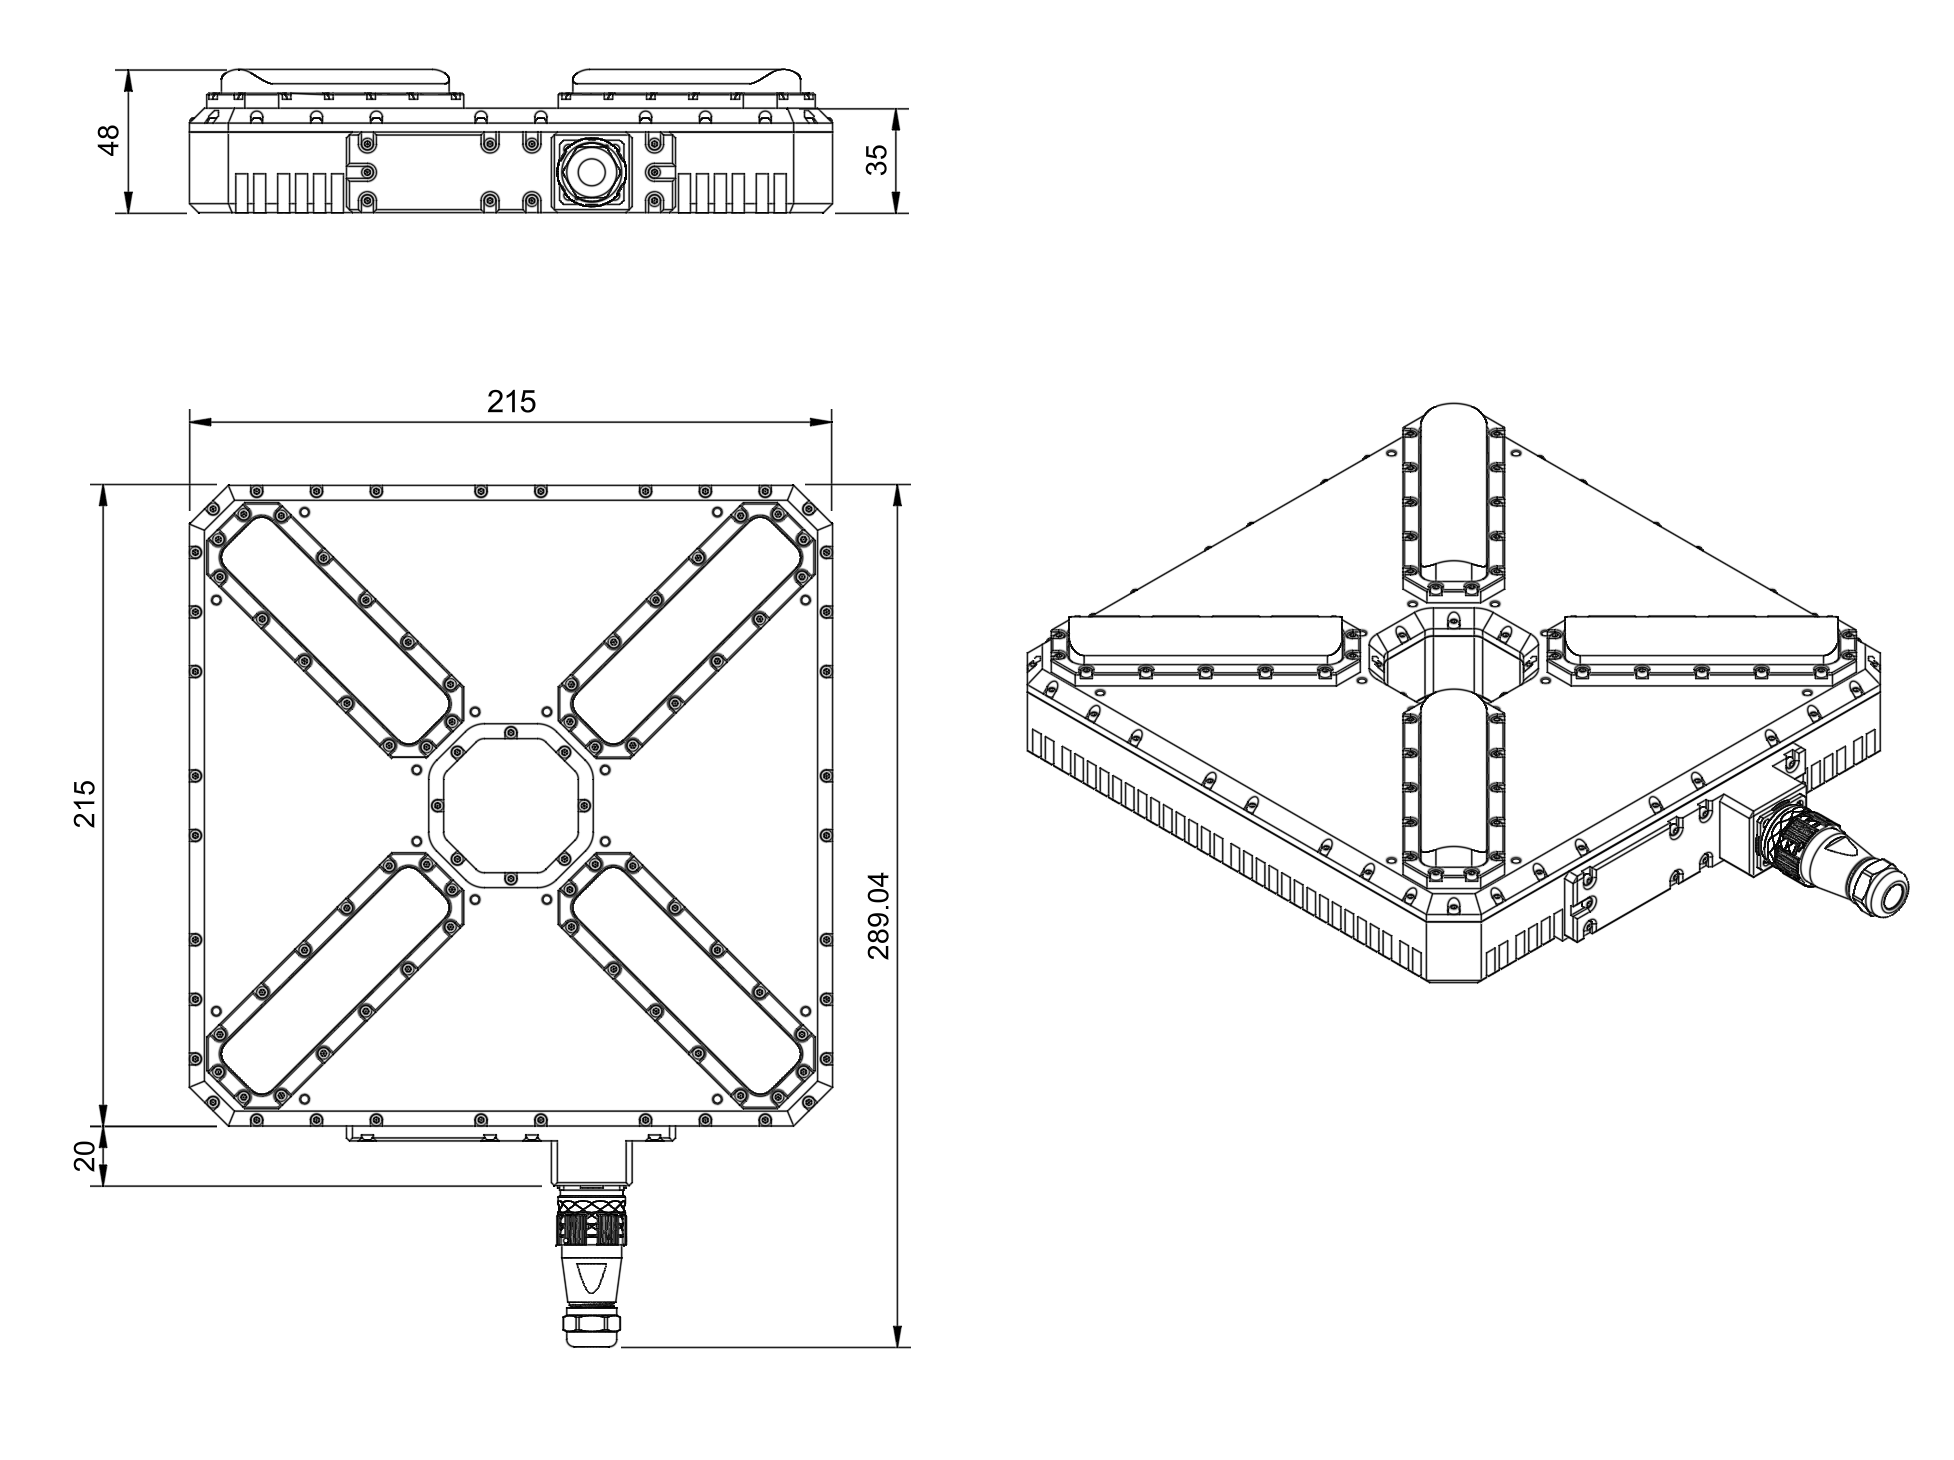
Figure: Transmitter Mounting with Tether
Step 2: Power Connection
- Connect 24V DC power supply to transmitter
- Verify power supply can provide minimum 4A peak current
- Check power connections are secure
- Verify transmitter LED indicators show normal operation
Step 3: Data Connection
- Connect USB or CAN cable to transmitter for configuration
- Launch ULS configuration software on control PC
- Verify communication with transmitter
- Configure transmitter parameters as needed
Aircraft Installation
Step 1: Receiver Mounting
Master Receiver Installation:
- Mount master receiver on top of aircraft
- Ensure receiver has clear view downward toward ground station
- Position away from tether cable to avoid shadowing
- Secure using provided mounting hardware
- Verify receiver orientation (arrow pointing forward)
Slave Receiver Installation:
- Mount slave receivers on aircraft (typically 2 units)
- Position for optimal triangulation (90° apart recommended)
- Ensure clear view toward ground transmitter
- Avoid tether cable shadow zones
- Secure and verify orientation
Step 2: Electrical Connections
Receiver to Autopilot:
- Connect receiver to autopilot UART or CAN port
- Verify correct pinout per receiver specifications
- Configure autopilot serial port (230400 baud for UART)
- Ensure power connection is stable 5V DC
- Verify receiver LED indicators show normal operation
Step 3: Tether Integration
- Verify tether routing does not obstruct receiver views
- Check tether management system compatibility
- Confirm tether power distribution if used for receivers
- Test tether connection and disconnection procedures
Software Configuration
Transmitter Configuration
Using the ULS configuration software:
Orientation:
- Calibrate transmitter IMU
- Set transmitter mounting orientation
- Verify compass calibration
Network Configuration:
- Set CAN bus parameters if used
- Configure device ID for multi-system operations
- Set communication protocols
Autopilot Configuration
For ArduPilot:
#Enable precision landing
PLND_ENABLED = 1
PLND_TYPE = 1
PLND_EST_TYPE = 0  #Raw sensor data

#Set serial port (example using SERIAL2)
SERIAL2_PROTOCOL = 2  # MAVLINK V2
SERIAL2_BAUD = 230
SR2_EXTRA1 (or MAV2_EXTRA1)	 = 20	 # Stream Attitude
SR2_POSITION (or MAV2_POSITION)	 = 20	# Optional - Stream Vehicle position


#Precision landing parameters
PLND_LAG = 0.02  #20Hz update rate
PLND_XY_DIST_MAX = 10  #Maximum distance for precision landing (meters)
For PX4:
Configure precision landing in QGroundControl:
- Navigate to Vehicle Setup → Parameters
- Set
PLD_HACC_RAD= 0.2 (horizontal accuracy radius) - Set
PLD_FAPPR_ALT= 10.0 (final approach altitude) - Configure appropriate serial port for ULS receiver
- Enable precision landing mode in flight modes
Operation Procedures
Pre-Flight Checks
Visual Inspection:
- Check transmitter for damage or obstruction
- Verify tether is properly routed through center hole
- Inspect receivers for secure mounting
- Check all cable connections
Power On Sequence:
- Apply power to ground station transmitter
- Wait for transmitter initialization (LED solid green)
- Power on aircraft and autopilot
- Verify receivers detect transmitter signal
System Status Check:
- Verify transmitter status (green LED)
- Check receiver status on autopilot (position data received)
- Confirm tether management system ready
- Verify communication links active
Functional Test:
- With aircraft on ground near transmitter, verify position data
- Check position accuracy (should show near-zero offset)
- Verify orientation data if multi-receiver setup
- Test tether connection and release mechanism
Normal Operations
Station Keeping
For tethered drone station-keeping operations:
Takeoff:
- Launch aircraft in standard mode
- Allow tether to deploy gradually
- Maintain visual contact during initial climb
- Monitor position data on ground station
Station Keeping:
- Engage position hold mode
- ULS-XSpot provides continuous position reference
- Autopilot maintains position over ground station
- Monitor tether status and tension
- Typical operating altitude: 10-50m
Position Adjustment:
- Use autopilot commands to adjust position
- ULS-XSpot provides reference for offset positioning
- Maintain awareness of tether length and tension
- Monitor weather conditions and wind
Precision Landing
For precision landing on ground station:
Landing Preparation:
- Aircraft should be in visual range
- Verify ULS-XSpot position data is stable
- Engage precision landing mode in autopilot
- Monitor tether retrieval system ready status
Approach Phase:
- Autopilot follows precision landing approach
- ULS-XSpot guides aircraft to transmitter center
- Typical final approach from 10m altitude
- Descent rate: 0.5-1.0 m/s recommended
Final Approach:
- Below 5m altitude, position accuracy improves
- Autopilot centers aircraft over transmitter
- Tether should be nearly vertical
- Prepare for touchdown
Landing:
- Aircraft lands centered on ground station
- Tether cable guides through transmitter center hole
- Verify safe landing and aircraft secured
- Disarm autopilot and secure aircraft
Range Operations
The ULS-XSpot supports operations up to 50 meters:
| Altitude Range | Positioning Accuracy | Recommended Use |
|---|---|---|
| 0-20m | ±0.5m horizontal | Precision landing, low hover |
| 20-50m | ±2m horizontal | Normal station keeping, maximum range operations |
Table: Performance by Altitude Range Considerations:
- Higher altitudes require more tether management
- Wind effects increase with altitude
- IR signal quality may vary with atmospheric conditions
- Always maintain visual line-of-sight
Emergency Procedures
Loss of Position Signal
If ULS-XSpot position signal is lost:
Aircraft will revert to GPS or manual control (per autopilot configuration)
Immediate Actions:
- Pilot takes manual control if needed
- Stabilize aircraft position
- Check transmitter status (LED indicators)
- Verify tether not obstructing IR path
- Check receiver power and connections
Recovery:
- If signal not restored, execute emergency landing procedure
- Use tether as physical reference for aircraft retrieval
- Do not exceed tether length limits
- Land in safe area and troubleshoot system
Tether Emergency
If tether becomes tangled or compromised:
Stop Operations:
- Hold aircraft position immediately
- Assess tether status
- Do not attempt to force tether retrieval
Safe Recovery:
- If tether is safe, execute controlled landing
- If tether is compromised, execute emergency landing in clear area
- Maintain aircraft control using GPS/manual
- ULS-XSpot may still provide position reference
Post-Emergency:
- Secure aircraft and assess damage
- Inspect entire tether length
- Check ULS-XSpot system for damage
- Do not resume operations until system verified
Troubleshooting
Common Issues and Solutions
No Position Data
Symptom: Autopilot not receiving position data from ULS-XSpot
Possible Causes:
- Receiver not powered
- Serial port configuration incorrect
- No line-of-sight to transmitter
- Tether blocking optical path
Solutions:
- Verify receiver power LED is on
- Check autopilot serial port settings (230400 baud)
- Clear line-of-sight between receiver and transmitter
- Verify tether routing not obstructing IR path
- Check transmitter is powered and operating (LED status)
Intermittent Position Data
Symptom: Position data drops in and out
Possible Causes:
- Range too far for conditions
- Receiver blocked by some object
Solutions:
- Improve tether cable management
- Reduce operating range if near 50m limit
- Secure receiver mounting to reduce vibration
- Check receiver cleanliness (lens clear)
Inaccurate Position Data
Symptom: Position shows large offset from actual location
Possible Causes:
- Receiver orientation incorrect
- Transmitter not level or calibrated
- Multiple reflections (indoor use)
- System needs calibration
Solutions:
- Verify receiver mounted with correct orientation (arrow forward)
- Check transmitter is level and calibrated
- Ensure outdoor operation or controlled indoor environment
- Perform system calibration procedure
- Check for magnetic interference affecting IMU
Transmitter Not Emitting
Symptom: Transmitter powered but receivers not detecting signal
Possible Causes:
- Transmitter in configuration mode
- Emission disabled in settings
- Hardware failure
Solutions:
- Check transmitter LED status (should be solid green for normal operation)
- Connect to configuration software and verify emission enabled
- Power cycle transmitter
- Check firmware version and update if needed
- Contact technical support if issue persists
LED Status Indicators
Transmitter LED
| LED Pattern | Meaning | Action Required |
|---|---|---|
| Solid Green | Normal operation | None |
| Flashing Green | Starting up | Wait for solid green |
| Solid Red | Error condition | Check configuration |
| Flashing Red | Critical error | Power cycle, check connections |
| Off | No power | Check power supply |
Table: Transmitter LED Status
Receiver LED
| LED Pattern | Meaning | Action Required |
|---|---|---|
| Solid Green | Receiving signal | None |
| Flashing Green | Searching for signal | Verify line-of-sight |
| Solid Amber | Configuration mode | Exit configuration when done |
| Flashing Red | Error | Check connections and power |
| Off | No power | Check power supply |
Table: Receiver LED Status
Maintenance
Routine Maintenance
Daily (Before Each Operation)
- Visual inspection of all components
- Check tether routing through transmitter
- Verify all connections secure
- Clean receiver lenses if necessary
- Check transmitter mounting security
- Verify LED indicators normal
Weekly
- Inspect tether for wear at transmitter contact points
- Clean transmitter exterior and check for damage
- Verify receiver mounting hardware tight
- Check cable connections for corrosion
- Test system at various ranges
- Backup configuration settings
Monthly
- Perform full system calibration
- Check transmitter IMU calibration
- Verify receiver orientation settings
- Inspect all cables for damage
- Check firmware versions and update if available
- Review system logs for errors or warnings
- Test emergency procedures
Annual
- Factory calibration recommended
- Comprehensive system testing at all ranges
- Replace any worn or damaged components
- Update documentation and procedures
- Review and update training materials
Cleaning Procedures
Receiver Lenses:
- Power off receivers
- Use soft, lint-free cloth
- Gently wipe lens surface
- For stubborn dirt, use isopropyl alcohol (90%+)
- Allow to dry completely before powering on
Transmitter:
- Power off transmitter
- Clean exterior with damp cloth
- Check IR emission window for dirt or obstruction
- Verify center hole clear of debris
- Dry completely before powering on
DO NOT:
- Use abrasive cleaners or cloths
- Apply excessive pressure to lenses
- Allow water to enter connectors
- Clean while powered on
Calibration Procedures
Transmitter IMU Calibration
Perform when:
- After initial installation
- After transmitter is moved or remounted
- Monthly maintenance schedule
- If position accuracy degraded
Procedure:
- Connect to transmitter via USB
- Launch configuration software
- Navigate to IMU Calibration section
- Ensure transmitter is level and stationary
- Follow on-screen calibration steps
- Verify calibration successful
- Test system operation after calibration
System Alignment Check
Perform to verify overall system accuracy:
- Place aircraft on ground near transmitter (2-3m away)
- Power on system and wait for stable position lock
- Record position offset reported by system
- Should be within ±15cm of physical measurement
- Move aircraft to different positions and verify
- If offsets consistently large, recalibrate system
Technical Specifications
| Parameter | Value |
|---|---|
| Distance range m.: | 50.0 |
| Working angle (deg): | 60 |
| Data update frequency (Hz): | 20 |
| Technology: | Standard IR Optical (No DACS) |
Table: Common Specification
| Parameter | Value |
|---|---|
| Field of view (deg): | 90 |
| Dimensions mm : | 46x26x12 |
| Weight g.: | 40 |
| Power Consumption (W): | 3 |
| Voltage supply (V): | 5 |
| Interfaces: | USB, CAN, UART |
Table: Receiver (Slave) Specifications
| Parameter | Value |
|---|---|
| Field of view (deg): | 90 |
| Dimensions mm : | 50x50x14 |
| Weight g. : | 60 |
| Power Consumption (W): | 3 |
| Voltage supply (V): | 5 |
| Interfaces: | USB, CAN, UART |
Table: Receiver (Master) Specifications
| Parameter | Value |
|---|---|
| Field of emitting (deg): | 35 |
| Dimensions mm. : | 290x215x48 |
| Weight g.: | 4100 |
| Power Consumption (W): | 10 |
| Voltage supply (V): | 22.0-26.0 |
| Interfaces : | USB, CAN, UART |
| Special Features: | Center hole for tether passage |
Table: Transmitter (Ground) Specifications - Tethered Design
Appendix A: Tethered System Integration
Tether Cable Recommendations
For optimal performance with ULS-XSpot:
| Parameter | Specification |
|---|---|
| Maximum Diameter | 50mm (to fit through center hole) |
| Weight | Minimized for aircraft performance |
| Conductors | Power + data (optional) |
| Outer Jacket | Weather resistant, low friction |
| Color | Visible color recommended for safety |
Table: Tether Cable Recommendations
Ground Station Integration
The ULS-XSpot transmitter should be integrated with the tether management system:
Mechanical Integration:
- Mount transmitter at tether launch point
- Align center hole with tether path
- Provide strain relief above and below transmitter
- Ensure 360° access for maintenance
Electrical Integration:
- 24V DC power from ground station supply
- USB or CAN connection for monitoring/configuration
- Optional: Integrate with ground station control system
Safety Integration:
- Emergency stop procedures
- Tether tension monitoring
- Position data to ground station display
- Weather monitoring integration
Aircraft Integration
Power Distribution:
- Receiver power from flight controller (5V) or
- Receiver power from tether power distribution
- Ensure power quality and filtering
Data Integration:
- Position data to autopilot via UART or CAN
- Integration with flight management system
- Data logging for performance analysis
Physical Integration:
- Mount receivers for optimal view of ground station
- Avoid tether shadow zones
- Consider aircraft dynamics and tether effects
- Maintain equipment access for maintenance
Appendix B: Operating Limits
Environmental Limits
| Parameter | Limit | Notes |
|---|---|---|
| Operating Temperature | -20°C to +60°C | Full performance |
| Storage Temperature | -40°C to +85°C | Non-operating |
| Humidity | 0-95% non-condensing | Weather resistant |
| Wind Speed | 0-15 m/s | Tethered operation |
| Precipitation | Light rain acceptable | IP54 rating |
| Altitude | 0-4000m ASL | Reduced performance above 3000m |
Table: Environmental Operating Limits
Performance Limits
| Parameter | Limit | Notes |
|---|---|---|
| Maximum Range | 50m | Altitude dependent |
| Minimum Range | 0.5m | Below 0.5m not recommended |
| Maximum Update Rate | 20Hz | Real-time positioning |
| Position Accuracy | ±5cm horizontal | Under normal conditions |
| Altitude Accuracy | ±10cm | Vertical positioning |
Table: Performance Limits
Operational Limits
| Parameter | Limit | Notes |
|---|---|---|
| Maximum Wind | 15 m/s | With tether |
| Maximum Tether Weight | Per aircraft specs | Affects performance |
| Operating Duration | Unlimited | With tethered power |
| Maintenance Interval | Daily inspection | See maintenance section |
Table: Operational Limits
Appendix C: Configuration Examples
ArduPilot Full Configuration
# Precision Landing Parameters
PLND_ENABLED = 1
PLND_TYPE = 1
PLND_EST_TYPE = 0
PLND_LAG = 0.02
PLND_XY_DIST_MAX = 10
PLND_LAND_OFS_X = 0
PLND_LAND_OFS_Y = 0

# Serial Port Configuration (SERIAL2 example)
SERIAL2_BAUD = 230
SERIAL2_OPTIONS = 0
SERIAL2_PROTOCOL	2	MAVlink2 protocol support.

# Landing Configuration
LAND_SPEED = 50  # cm/s descent rate
LAND_SPEED_HIGH = 100  # cm/s high altitude descent

# Position Hold Parameters
PSC_POSXY_P = 1.0
PSC_VELXY_P = 2.0
PX4 Configuration Parameters
# Precision Landing
PLD_HACC_RAD = 0.2
PLD_FAPPR_ALT = 10.0
PLD_MAX_SRCH = 3.0

# Landing Detection
LNDMC_ALT_MAX = 10.0
LNDMC_TRIG_TIME = 0.3

# Position Control
MPC_XY_VEL_MAX = 5.0
MPC_XY_P = 1.0
MPC_Z_VEL_MAX_DN = 1.0
Support and Contact
Technical Support
UAVLAS sp. z o.o.
- Email: info@uavlas.com
- Website: www.uavlas.com
- Documentation: https://docs.uavlas.com
Product Information
- Product Code: ULS-XSPOT
- Family: ULS-XSpot Tethered Positioning System
- Hardware Version: 1.0
- Software Version: 1.0
Related Documentation
- ULS-XSpot Datasheet (ULSDC-PBDS231125)
- ULS-XSpot Interface Control Document (ULSDC-PBICD231125)
- ULS-ProCopter Online Manual: https://docs.uavlas.com/docs/uls-procopter/